The Wanderer's Waypoint Backpack Free Pattern – A Knitted Textured Rucksack with Cabled Straps
The Wanderer's Waypoint Backpack Free Pattern – A Knitted Textured Rucksack with Cabled Straps
Imagine a backpack that feels like a warm hug—a rugged yet cozy companion for your weekend adventures or daily commutes. The Wanderer's Waypoint Backpack is exactly that: a handcrafted rucksack that blends the timeless charm of classic cables with the soothing texture of moss stitch, all finished with a practical drawstring closure. This pattern is a labor of love, designed to be both a functional carryall and a statement piece of heirloom-quality artistry. Whether you're a seasoned knitter looking for a new challenge or a confident beginner ready to dive into cables, this project will reward you with a stunning, one-of-a-kind accessory that turns heads and sparks conversations.
In this comprehensive guide, we'll walk you through every step—from casting on the oval base to sewing on the final strap. We've broken down the process into clear, manageable sections, complete with detailed instructions and helpful tips. By the end, you'll have a beautiful, textured backpack that's as practical as it is beautiful. Let's get started!
Materials Needed
Before you begin, gather the following supplies. Having everything ready will make your knitting experience smooth and enjoyable.
Yarn
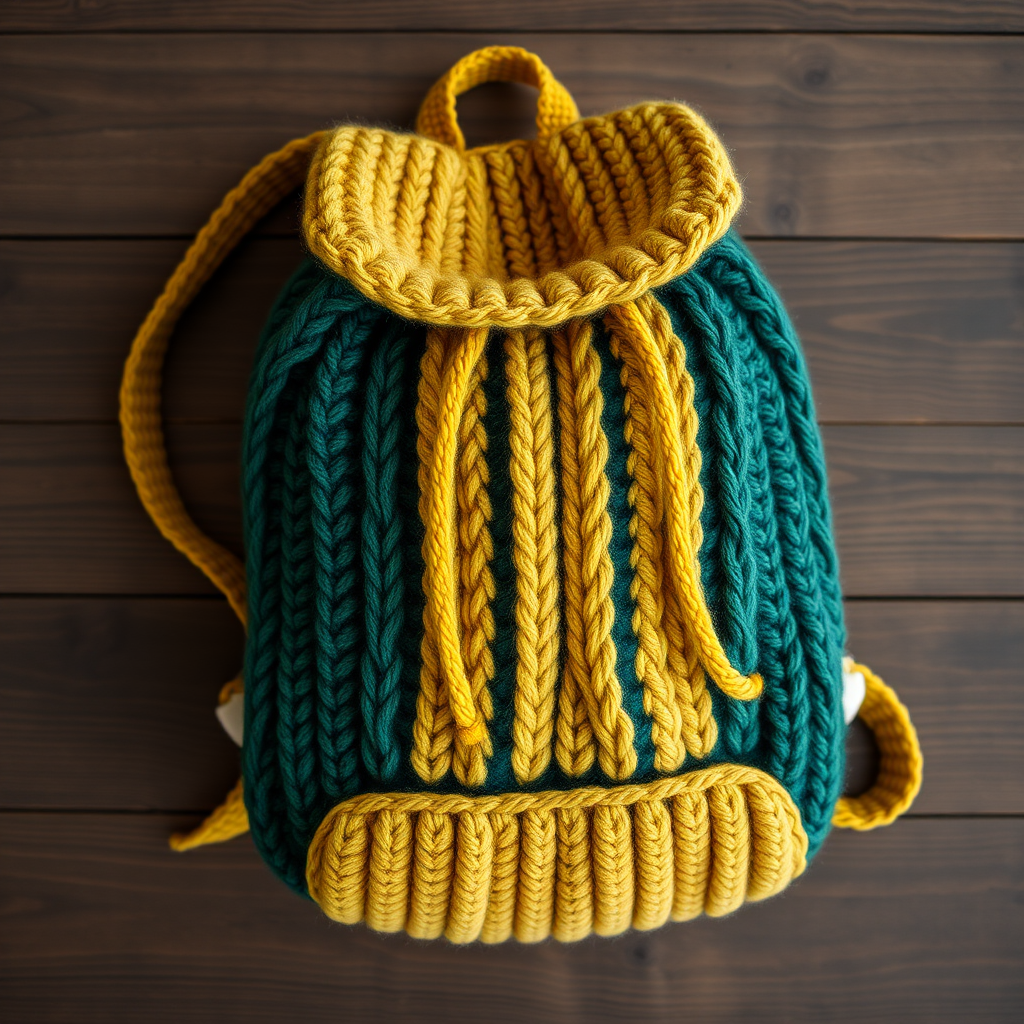
- Main Color (MC): Worsted weight wool blend, approximately 600–700 yards. A deep forest green is pictured, but any color you love will work beautifully.
- Contrast Color (CC): Worsted weight wool blend, approximately 150–200 yards. Mustard yellow is shown for the drawstring and strap accents, but choose a complementary shade that makes your heart sing.
Needles & Hooks
- US 7 (4.5 mm) circular needles, 24-inch length (for the body)
- US 7 (4.5 mm) double-pointed needles (for small circumferences, if needed)
- US 7 (4.5 mm) crochet hook (for edging and finishing)
Notions
- Stitch markers (at least 5)
- Cable needle
- Tapestry needle for weaving in ends
- Scissors
- Measuring tape
- Optional: Button for flap closure
Gauge
20 stitches and 28 rows = 4 inches in stockinette stitch, blocked. Always knit a gauge swatch to ensure your finished backpack is the correct size. Adjust needle size if necessary to achieve gauge.
Step-by-Step Instructions
This pattern is worked in the round from the bottom up. We'll start with the flat oval base, then pick up stitches to create the body, work the cable and moss stitch panels, add a drawstring casing, knit the flap, and finally create and attach the straps. Don't worry—we'll take it one step at a time.
Abbreviations
- CO: cast on
- K: knit
- P: purl
- K2tog: knit two together (decrease)
- P2tog: purl two together (decrease)
- M1: make one (increase)
- C4F: cable 4 front (slip 2 stitches to cable needle, hold in front, k2, k2 from cable needle)
- C4B: cable 4 back (slip 2 stitches to cable needle, hold in back, k2, k2 from cable needle)
- PM: place marker
- SM: slip marker
- St(s): stitch(es)
- BO: bind off
- YO: yarn over (increase, creates an eyelet)
Part 1: The Oval Base (Worked Flat, Then Joined)
The base of your backpack is a flat oval that provides structure and stability. We'll knit it back and forth in rows, increasing to widen, working even, then decreasing to shape the other end.
Step 1: Cast On
CO 24 stitches.
Step 2: Increase Rows
Row 1 (RS): K all stitches.
Row 2 (WS): K1, M1, K to last stitch, M1, K1. (26 stitches)
Repeat Rows 1–2 until you have 40 stitches on your needle. This will create a rounded, widening shape.
Step 3: Work Even
Once you have 40 stitches, work even in stockinette stitch (knit on RS, purl on WS) for 10 rows. This creates the flat middle section of the oval.
Step 4: Decrease Rows
Row 1 (RS): K1, K2tog, K to last 3 stitches, K2tog, K1. (38 stitches)
Repeat this decrease row every other row (i.e., on every RS row) until you have 24 stitches remaining.
Step 5: Bind Off
BO all stitches. This completes your oval base. Set it aside; we'll pick up stitches from it next.
Part 2: The Body (Worked in the Round)
Now we'll bring the base to life by picking up stitches around its edge and working upward in the round. This creates the bag's body.
Step 1: Pick Up Stitches
With your circular needle and the RS of the base facing you, pick up and knit 96 stitches evenly around the edge of the oval. A good rule of thumb: approximately 24 stitches on each short side and 24 stitches on each long side. Place a stitch marker (PM) at the beginning of the round and join in the round, being careful not to twist your stitches.
Step 2: Moss Stitch Border
We'll start with a moss stitch border to give a neat, textured edge.
Round 1: *K1, P1* repeat to end.
Round 2: *P1, K1* repeat to end. (This creates the moss stitch pattern—knit the purls and purl the knits from the previous round.)
Repeat Rounds 1–2 once more. You'll have a lovely, bumpy border.
Step 3: Set Up the Pattern
Now we'll place markers to divide the round into sections for the cable panels and moss stitch sections.
Round 1: PM, work 16 stitches in moss stitch (alternating K1, P1 each round), PM, work 16 stitches in cable pattern (see below), PM, work 32 stitches in moss stitch, PM, work 16 stitches in cable pattern, PM, work 16 stitches in moss stitch. (Total 96 stitches)
Cable Pattern (worked over 16 stitches):
Rounds 1–4: *C4F, P2, C4B, P2* repeat once more.
Round 5: *K4, P2, K4, P2* repeat once more.
Round 6: *C4B, P2, C4F, P2* repeat once more.
Rounds 7–10: *K4, P2, K4, P2* repeat once more.
Repeat Rounds 1–10 for the cable panels. This creates a beautiful, twisting cable design.
Step 4: Continue in Pattern
Work even in pattern, maintaining the moss stitch sections (knit the purls and purl the knits on every round) and the cable pattern as established, until the body measures 10 inches from the base. This is a great time to try it on or measure against a favorite bag to ensure the height is right for you.
Part 3: Drawstring Casing
At the top of the body, we'll create a casing for the drawstring with a row of eyelets.
Step 1: Eyelet Round
Next round: *K2tog, YO* repeat to end. This creates a series of small holes around the entire circumference.
Step 2: Stockinette Rounds
Work 4 rounds of stockinette stitch (knit all stitches). This forms a neat, rolled casing above the eyelets.
Step 3: Bind Off
BO all stitches loosely. A loose bind-off ensures the casing doesn't pull in and the drawstring can slide easily.
Part 4: The Flap (Worked Flat)
The flap covers the top of the backpack and adds a classic rucksack look. We'll knit it flat, starting from the back edge of the body.
Step 1: Pick Up Stitches
With the RS facing you, pick up and knit 32 stitches along the back edge of the body, centered between the two cable panels. This will be the top of your flap.
Step 2: Shape the Flap
Row 1 (WS): P all stitches.
Row 2 (RS): K1, K2tog, K to last 3 stitches, K2tog, K1. (30 stitches)
Repeat these 2 rows until you have 16 stitches remaining. This creates a gentle taper.
Step 3: Work Even
Once you have 16 stitches, work even in stockinette stitch for 6 rows. This gives the flap a nice, finished length.
Step 4: Bind Off
BO all stitches. The flap will naturally curl slightly at the edge, which adds to its charm.
Part 5: The Straps (Make 2)
These long, flat straps are knitted separately and sewn on. They feature a subtle ribbed texture that adds grip and visual interest.
Step 1: Cast On
CO 10 stitches.
Step 2: Work the Pattern
Row 1: K2, P6, K2.
Row 2: K all stitches.
Repeat Rows 1–2 until the strap measures 24 inches. This length is perfect for wearing as a backpack. Adjust if you prefer a longer or shorter strap.
Step 3: Bind Off
BO all stitches. Repeat to make a second strap.
Part 6: Finishing Touches
Now comes the satisfying part—assembling your masterpiece!
Step 1: Weave in Ends
Using your tapestry needle, carefully weave in all loose ends on the wrong side of the work. This ensures your backpack is neat and durable.
Step 2: Block the Backpack
Blocking is essential for this project. It evens out the stitches, defines the cables, and gives the bag its final shape. Wet block by soaking the backpack in lukewarm water with a gentle wool wash, then gently squeeze out excess water (don't wring!). Lay it flat on a towel, shape it to the correct dimensions, and let it dry completely. This will make your cables pop and your moss stitch look perfectly even.
Step 3: Attach the Straps
Position the straps on the back of the backpack. Place them about 2 inches apart at the top (near the flap) and 4 inches apart at the bottom (near the base). This slight angle makes the bag sit comfortably on your back. Sew the straps securely using a whip stitch or mattress stitch, making sure to catch both layers of the strap and the body of the bag. Reinforce with a few extra stitches at stress points.
Step 4: Create the Drawstring
You have two options for the drawstring:
Option A (Twisted Cord): Cut two lengths of yarn (MC or CC) about 3 times the circumference of the bag opening. Hold them together and twist until they form a tight cord, then fold in half and let it twist onto itself. Knot the ends.
Option B (I-Cord): Using your double-pointed needles, CO 4 stitches and knit an I-cord until it reaches the desired length (about 30 inches). BO and weave in ends.
Thread the drawstring through the eyelets, starting and ending at the front center of the bag. Pull to close.
Step 5: Optional Button Closure
For extra security, sew a button to the front of the flap. Create a loop on the body of the bag (using a crochet chain or a small knitted loop) to fasten over the button. This is a lovely functional detail.
Step 6: Final Check
Give your backpack a final once-over. Trim any stray yarn, ensure all seams are secure, and admire your handiwork!
Tips for Success
- Markers are your friends: Use different colored markers for the beginning of the round versus section markers to avoid confusion.
- Keep your cables consistent: Always cable on the same round of your pattern repeat to maintain a uniform twist.
- Check your gauge: A swatch is quick and saves you from disappointment. If your gauge is off, your bag will be too big or too small.
- Blocking is non-negotiable: It transforms your knitting from good to professional. Don't skip it!
Congratulations! You've just created a stunning, heirloom-quality backpack that's as unique as you are. The Wanderer's Waypoint is perfect for carrying your essentials on a hike, a trip to the market, or a cozy day out. It's a true testament to the beauty of handmade items—functional, beautiful, and made with love.
We'd love to see your finished backpack! Share your photos on social media with the hashtag #WanderersWaypoint and tag us. Happy knitting, and may your adventures be many!