The Enchanted Vine Corset Belt Free Pattern – A Textured Crochet Waist Cincher with Leaf Motifs
The Enchanted Vine Corset Belt Free Pattern – A Textured Crochet Waist Cincher with Leaf Motifs
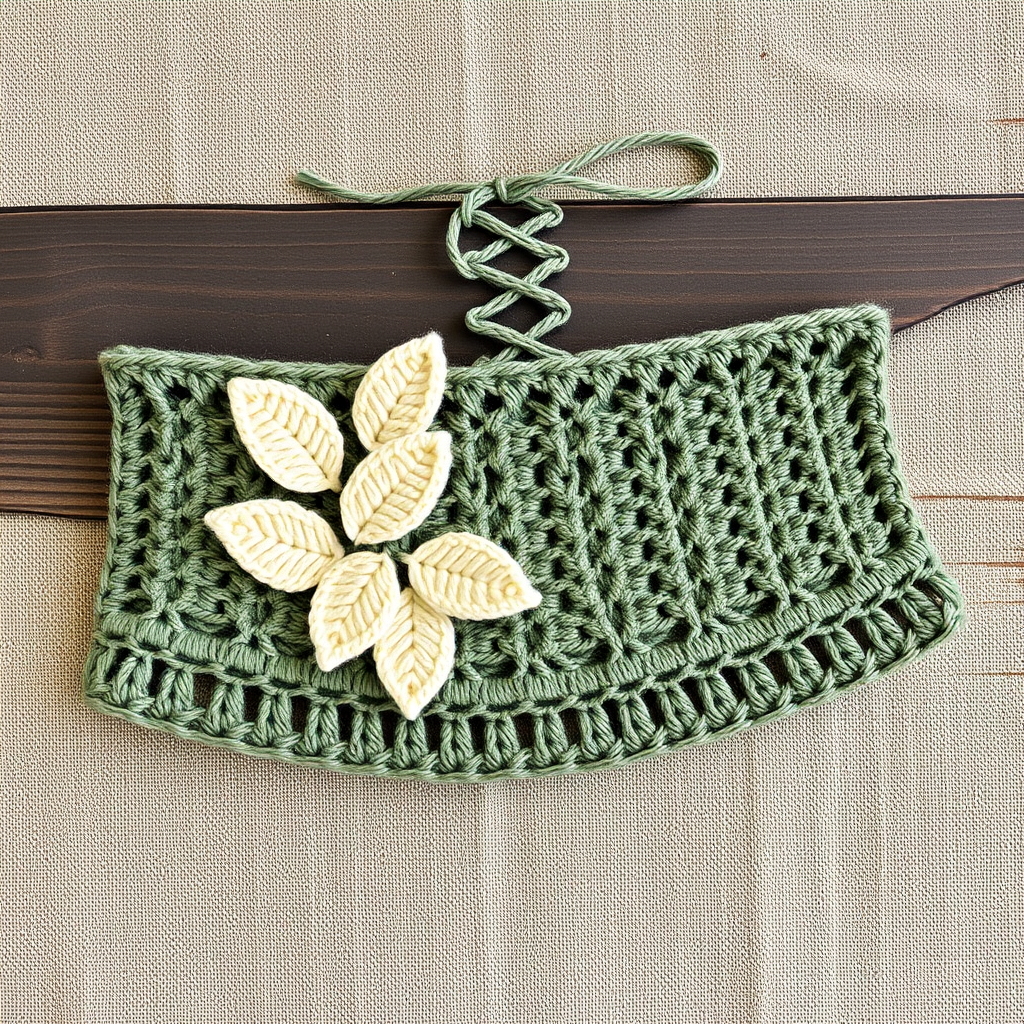
Wrap yourself in woodland elegance with this crochet corset belt, featuring a lush vine of textured leaves and a delicate lace-up back. This unique waist cincher adds a touch of bohemian charm to any outfit, from flowy dresses to high-waisted jeans. The combination of sage green and cream cotton yarn creates an earthy, forest-inspired aesthetic that's both timeless and eye-catching. Whether you're a seasoned crocheter or a curious beginner, this pattern is designed to guide you through every step with clarity and confidence. Let's dive into creating this stunning, wearable piece of art!
Materials Needed
Before you begin, gather the following supplies to ensure a smooth and enjoyable crocheting experience:
- Yarn: Worsted weight cotton yarn (e.g., Lion Brand 24/7 Cotton) in Sage Green (MC) and Cream (CC). You'll need approximately 150g of MC and 50g of CC.
- Hook: 5.0 mm (H-8) crochet hook
- Notions: Yarn needle for weaving in ends and sewing motifs, 2 small buttons or beads for optional decoration
- Gauge: 16 sc x 18 rows = 4 x 4 inches (10 x 10 cm) in sc with MC. Always check your gauge to ensure the belt fits as intended.
Step-by-Step Instructions
This belt is worked in two main panels (front and back) that are joined at the sides, with a lace-up back for adjustability. The front panel features a central leaf motif, while the back panel is a simple mesh for the lacing. Follow along carefully, and you'll have a beautiful, custom-fit belt in no time.
Front Panel (Worked Flat)
The front panel is the star of the show, featuring a graduated shell pattern that creates a vine-like texture. Work each row as directed, turning at the end of each row.
- Row 1: With MC, ch 30. Sc in 2nd ch from hook and in each ch across. Turn. (29 sc)
- Row 2: Ch 1, sc in each sc across. Turn.
- Row 3: Ch 1, sc in first 4 sc, *ch 3, skip 2 sc, sc in next 3 sc* repeat from * to * across, ending with sc in last 4 sc. Turn. (This creates spaces for the leaf motif)
- Row 4: Ch 1, sc in first 4 sc, *in ch-3 space work (2 dc, ch 1, 2 dc) – this forms a V-stitch, sc in next 3 sc* repeat from * to * across, ending with sc in last 4 sc. Turn.
- Row 5: Ch 1, sc in first 4 sc, *in ch-1 space of V-stitch work (3 dc, ch 2, 3 dc) – this forms a shell, sc in next 3 sc* repeat from * to * across, ending with sc in last 4 sc. Turn.
- Row 6: Ch 1, sc in first 4 sc, *in ch-2 space of shell work (4 dc, ch 2, 4 dc) – larger shell, sc in next 3 sc* repeat from * to * across, ending with sc in last 4 sc. Turn.
- Row 7: Ch 1, sc in first 4 sc, *in ch-2 space work (5 dc, ch 2, 5 dc) – largest shell, sc in next 3 sc* repeat from * to * across, ending with sc in last 4 sc. Turn.
- Row 8: Ch 1, sc in first 4 sc, *in ch-2 space work (6 dc, ch 2, 6 dc) – extra-large shell, sc in next 3 sc* repeat from * to * across, ending with sc in last 4 sc. Turn.
- Row 9: Ch 1, sc in first 4 sc, *in ch-2 space work (5 dc, ch 2, 5 dc) – decrease shell, sc in next 3 sc* repeat from * to * across, ending with sc in last 4 sc. Turn.
- Row 10: Ch 1, sc in first 4 sc, *in ch-2 space work (4 dc, ch 2, 4 dc), sc in next 3 sc* repeat from * to * across, ending with sc in last 4 sc. Turn.
- Row 11: Ch 1, sc in first 4 sc, *in ch-2 space work (3 dc, ch 2, 3 dc), sc in next 3 sc* repeat from * to * across, ending with sc in last 4 sc. Turn.
- Row 12: Ch 1, sc in first 4 sc, *in ch-2 space work (2 dc, ch 1, 2 dc), sc in next 3 sc* repeat from * to * across, ending with sc in last 4 sc. Turn.
- Row 13: Ch 1, sc in each sc and in each ch across, working 1 sc in each dc and 1 sc in each ch-1 space. Turn. (29 sc)
- Row 14: Ch 1, sc in each sc across. Turn.
- Row 15: Ch 1, sc in each sc across. Fasten off MC.
Leaf Motif (Make 5, Using CC)
These charming leaves are worked in the round and will be sewn onto the front panel, adding a three-dimensional, organic touch. Each leaf is quick to make and incredibly satisfying.
- Round 1: With CC, make a magic ring, ch 2 (counts as dc), work 11 dc into ring, join with sl st to top of ch-2. (12 dc)
- Round 2: Ch 1, *sc in next dc, ch 2, skip 1 dc* repeat from * to * around, join with sl st to first sc. (6 ch-2 spaces)
- Round 3: Sl st into first ch-2 space, ch 1, (sc, hdc, 3 dc, hdc, sc) in same space – this forms a leaf, *sl st into next ch-2 space, (sc, hdc, 3 dc, hdc, sc) in same space* repeat from * to * around, join with sl st to first sl st. Fasten off, leaving a long tail for sewing.
Back Panel (Worked Flat)
The back panel is a simple mesh that allows for the corset-style lacing. It's quick to work up and provides the perfect contrast to the textured front.
- Row 1: With MC, ch 30. Sc in 2nd ch from hook and in each ch across. Turn. (29 sc)
- Row 2: Ch 1, sc in each sc across. Turn.
- Row 3: Ch 1, sc in first 2 sc, *ch 3, skip 2 sc, sc in next 2 sc* repeat from * to * across, ending with sc in last 2 sc. Turn. (This creates a mesh for lacing)
- Row 4: Ch 1, sc in each sc and in each ch across, working 1 sc in each ch of ch-3 spaces. Turn. (29 sc)
- Row 5: Repeat Row 3.
- Row 6: Repeat Row 4.
- Row 7: Repeat Row 3.
- Row 8: Repeat Row 4.
- Row 9: Ch 1, sc in each sc across. Turn.
- Row 10: Ch 1, sc in each sc across. Fasten off.
Assembly
Now comes the fun part – bringing all the pieces together to create your finished belt. Take your time with the sewing and lacing to ensure a polished result.
- Sew the leaf motifs: Position the five leaf motifs onto the front panel, placing one over each of the shell stitches (the largest shells from Rows 7 and 8, and the smaller ones from Rows 5, 6, and 9-12). Use the long tails to secure them neatly, weaving the yarn through the back of the stitches to hide the threads.
- Join the panels: With MC, sew the front and back panels together at the short side edges, leaving the top and bottom open. Use a whip stitch or mattress stitch for a seamless join. Weave in all ends securely.
- Lace-up back: Cut a length of MC yarn about 1.5 yards long. Thread it through the mesh holes of the back panel, starting from the top and crisscrossing down to the bottom, like lacing a corset. Leave long tails at the top for tying a bow. This lacing not only adds adjustability but also a beautiful, authentic corset detail.
- Optional decoration: Add two small buttons or beads at the top corners of the front panel for a touch of whimsy and extra visual interest. Sew them on securely with a needle and thread or yarn.
- Wear and enjoy: To wear, wrap the belt around your waist, cross the laces at the back, and tie a bow at the top. Adjust the tightness as desired. The belt is designed to sit comfortably at your natural waist, cinching your silhouette with bohemian flair.
And there you have it – your very own Enchanted Vine Corset Belt! This project is perfect for adding a handmade touch to your wardrobe or gifting to a fellow craft lover. The textured leaves and delicate lacing make it a standout piece that's sure to spark conversations. Happy crocheting!


