Sunset Meadow Triangle Bunting Free Pattern – Crochet a Warm Ombre Garden Garland
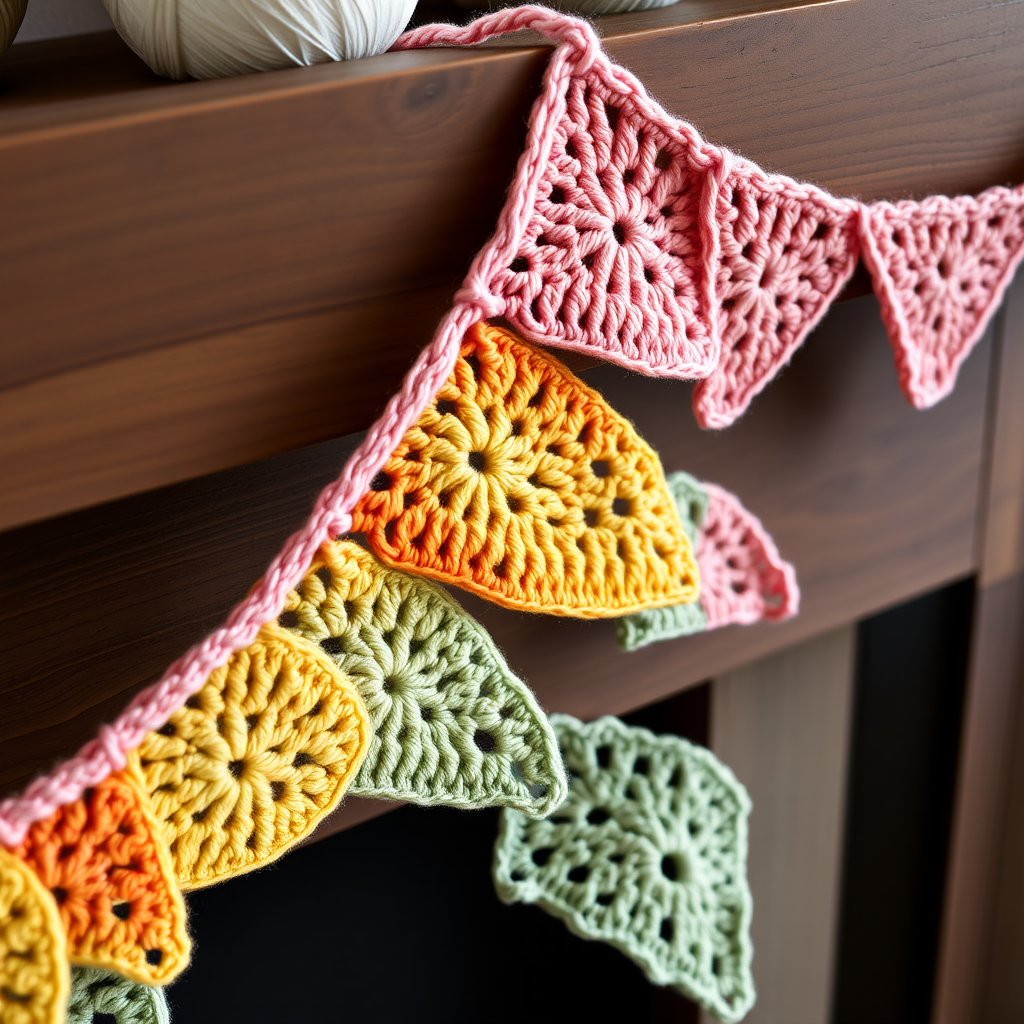
Sunset Meadow Triangle Bunting: A Free Crochet Pattern for a Warm Ombre Garden Garland
Imagine draping a piece of a summer sunset across your mantel, nursery shelf, or front porch. This Sunset Meadow Triangle Bunting is a quick, joyful crochet project that transforms any corner into a cozy, handcrafted celebration. Each flag melts from blush pink to marigold yellow to sage green, creating a stunning ombre effect that feels both rustic and modern. Whether you're a seasoned maker or picking up a hook for the first time, this free pattern is designed to be simple, satisfying, and absolutely beautiful.
This garland is made of individual crochet triangles, each worked in a continuous spiral from the top down. Each flag uses a simple granny-style cluster pattern with a delicate picot edging. Make as many flags as you like—the pattern gives one flag, and you simply repeat for your desired length. Let's get started!
Materials Needed
Before you begin, gather these simple supplies. The beauty of this project is that it requires minimal materials and is perfect for using up small amounts of worsted-weight yarn.
- Yarn: Worsted weight cotton or acrylic (e.g., Lion Brand 24/7 Cotton) in 3 colors:
- Color A: Blush Pink (approx. 50g)
- Color B: Marigold Yellow (approx. 50g)
- Color C: Sage Green (approx. 50g)
- Hook: 5.0 mm (H-8) crochet hook
- Notions: Tapestry needle for weaving in ends, scissors
- Gauge: First 3 rounds of triangle = 3 inches across the top edge. Gauge is not critical, but consistency keeps flags uniform.
Step-by-Step Instructions: The Triangle Flag (Make 1 per flag)
This pattern is worked in the round, starting from the top point of the triangle and working downward. Each round builds on the last, creating a classic granny-style triangle. Read through each round carefully—once you get the rhythm, it's incredibly meditative.
Round 1: The Magic Ring Foundation
With Color A (Blush Pink), make a magic ring. This creates a tight, adjustable center point.
- Ch 3 (counts as your first double crochet).
- Work 2 dc into the ring.
- Ch 2 (this forms your first corner).
- Work (3 dc, ch 2) twice more into the ring.
- Work 3 dc into the ring one final time.
- Join with a slip stitch to the top of the beginning ch-3.
You should now have 3 clusters of 3 dc, with 3 ch-2 corner spaces. This forms the basic triangle shape.
Round 2: Building the Corners
Now we'll expand the triangle by working into those corner spaces.
- Slip stitch into the next 2 dc to reach the first ch-2 corner space.
- In that corner space: Ch 3, (2 dc, ch 2, 3 dc) all in the same space. This creates a corner cluster.
- *Ch 1, skip the next 3 dc, then work (3 dc, ch 2, 3 dc) in the next corner space.*
- Repeat from * once more.
- Ch 1, skip the last 3 dc.
- Join with a slip stitch to the top of the beginning ch-3.
You now have 6 clusters total (2 per side, with 3 corner spaces).
Round 3: Adding Side Clusters
This round introduces the first side clusters between the corners.
- Slip stitch into the next 2 dc to reach the first corner space.
- In that corner space: Ch 3, (2 dc, ch 2, 3 dc).
- *Ch 1, skip 3 dc, work 3 dc in the next ch-1 space, ch 1, skip 3 dc, then work (3 dc, ch 2, 3 dc) in the next corner space.*
- Repeat from * once more.
- Ch 1, skip 3 dc, work 3 dc in the next ch-1 space, ch 1.
- Join with a slip stitch to the top of the beginning ch-3.
You now have 9 clusters total (3 per side).
Round 4: Continuing the Growth (Still in Color A)
We'll repeat the pattern from Round 3, but now we have more side spaces to fill.
- Slip stitch to the first corner space.
- Work the corner: Ch 3, (2 dc, ch 2, 3 dc) in the corner space.
- *Ch 1, skip 3 dc, 3 dc in next ch-1 space, ch 1, skip 3 dc, 3 dc in next ch-1 space, ch 1, skip 3 dc, then work (3 dc, ch 2, 3 dc) in the next corner space.*
- Repeat from * once more.
- Continue working 3 dc in each ch-1 space along the side, then join.
You will have 4 clusters along each side (including corners). Fasten off Color A and weave in the end.
Round 5: Introducing Color B (Marigold Yellow)
Time for the beautiful color transition! Join Color B in any corner space.
- Join Color B in any corner space with a slip stitch.
- Ch 3, (2 dc, ch 2, 3 dc) in the same corner space.
- *Ch 1, skip 3 dc, 3 dc in next ch-1 space, ch 1, skip 3 dc, 3 dc in next ch-1 space, ch 1, skip 3 dc, then work (3 dc, ch 2, 3 dc) in the next corner space.*
- Repeat from * once more.
- Work the side clusters as established, then join.
You now have 12 clusters total (5 per side).
Round 6: More Yellow Growth
Repeat Round 5, working one more 3-dc cluster in each side's ch-1 spaces.
- Join in a corner space, work the corner cluster.
- Work 3 dc in each ch-1 space along the side, with ch 1 between each cluster.
- At each corner, work the (3 dc, ch 2, 3 dc) cluster.
- Join and fasten off Color B.
You now have 15 clusters total (6 per side).
Round 7: Final Color – Sage Green (Color C)
Join Color C in any corner space. This round continues the same pattern, adding one more cluster per side.
- Join Color C in any corner space.
- Ch 3, (2 dc, ch 2, 3 dc) in the same corner space.
- *Ch 1, skip 3 dc, 3 dc in next ch-1 space, repeat from * across the side until you reach the next corner.
- Work (3 dc, ch 2, 3 dc) in the corner space.
- Repeat for all three sides.
- Join with a slip stitch.
You now have 18 clusters total (7 per side). Do not fasten off—we're moving straight into the edging.
Round 8: The Delicate Picot Edging
This is what gives the bunting its charming, finished look. The picot edging is worked along the bottom and side edges of the triangle.
- With Color C still attached, ch 1.
- Work a single crochet (sc) in each dc across the top edge (the straight edge of the triangle).
- At the top-left corner, work a picot: (sc, ch 3, sl st in 3rd ch from hook, sc) all in the corner space.
- Continue sc across the bottom edge (the two slanted sides), working a picot (sc, ch 3, sl st in 3rd ch from hook, sc) in each ch-1 space and at each corner.
- At the top-right corner, work a picot.
- Fasten off and weave in all ends.
Your first flag is complete! Repeat this entire process to make as many flags as you'd like for your garland.
Assembly: Stringing Your Garland
Once you've made all your beautiful flags, it's time to string them together. This is a quick and easy process.
- Lay flat: Lay your flags flat, right side up, and arrange them in the order you like.
- Threading method: Using a tapestry needle and a long length of Color C yarn, thread through the top corner picots of each flag. Space them about 2 inches apart.
- Alternative method: Crochet a chain the desired length of your garland. Then, slip stitch into each flag's top corner to attach them. This creates a sturdier, more defined string.
- Hanging loops: For a hanging loop, chain 10 at each end of the garland and fasten off. This gives you easy loops to drape over nails or hooks.
- Blocking (optional): Block gently if desired to even out the triangles and give them a crisp, professional look.
And there you have it—a stunning, handmade Sunset Meadow Triangle Bunting that brings warmth and charm to any space. This project is perfect for using up yarn scraps, making heartfelt gifts, or simply adding a personal touch to your home decor. The ombre effect is endlessly customizable—try ocean blues, autumn oranges, or pastel pinks for a completely different vibe. Happy crocheting!


