Starlight Drift Baby Blanket Free Pattern – Knit a Dreamy Night Sky
Wrap Your Little One in a Celestial Cloud: The Starlight Drift Baby Blanket
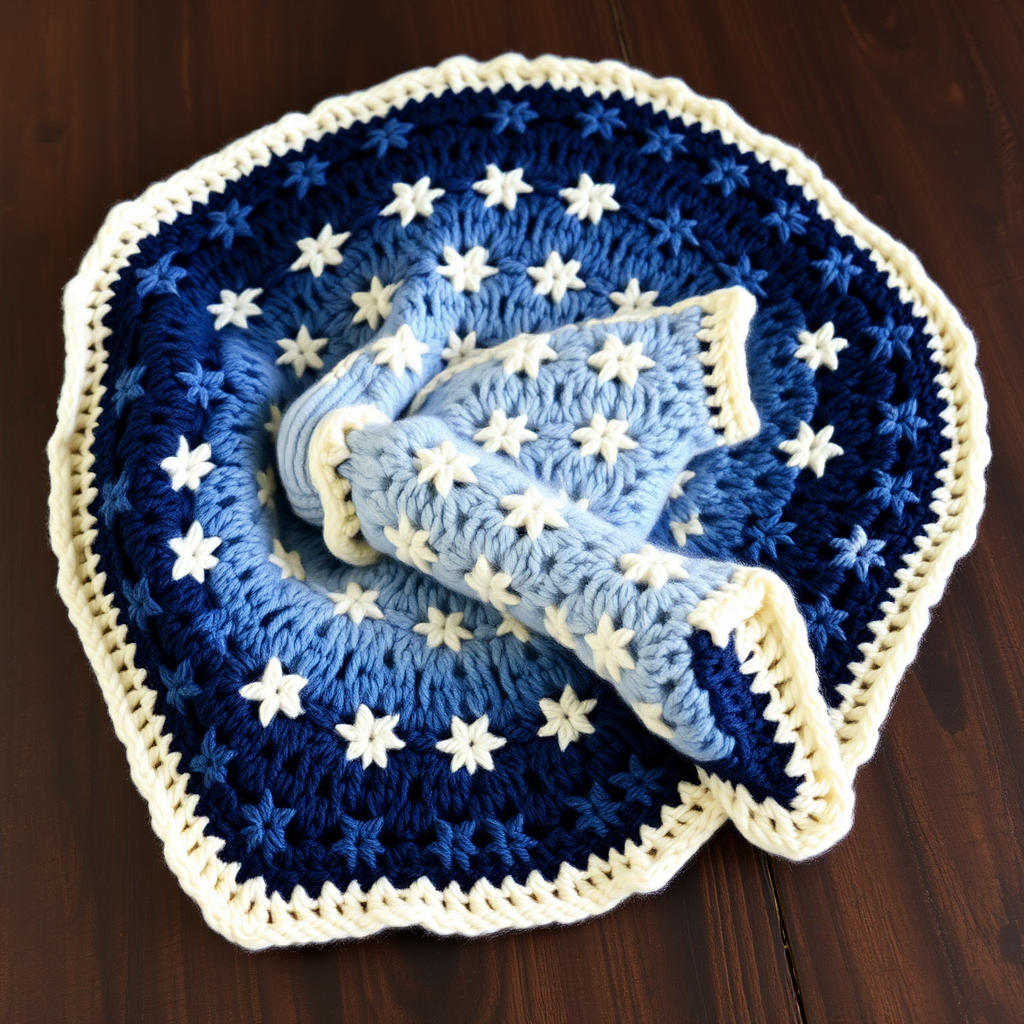
There is something truly magical about creating a handmade heirloom for a new arrival. The Starlight Drift Baby Blanket is more than just a cozy accessory; it is a dreamy night sky captured in soft, plush yarn. Featuring a delicate, all-over star stitch and a serene gradient of twilight blues melting into cream, this pattern is designed to be as soothing to knit as it is to snuggle. Whether you are a seasoned maker or a confident beginner looking for a rewarding project, this free pattern will guide you through every step to create a stunning, heirloom-quality piece that will be treasured for years to come.
This blanket is worked flat in one piece, making it highly portable and easy to manage. The gentle rhythm of the 4-row repeat is almost meditative, and the visual payoff—a lacy, airy texture of four-pointed stars—is absolutely breathtaking. Let's dive into the materials and instructions so you can start stitching your own celestial masterpiece.
Materials Needed: Gathering Your Night Sky
Before you begin, ensure you have all the necessary supplies. The quality of your yarn will significantly impact the final drape and feel of the blanket, so choose a soft, washable option suitable for a baby.
Yarn & Notions
- Yarn: Worsted weight (#4) cotton or cotton-blend yarn in 3 shades. The pattern calls for approximately 600g total. Here is the breakdown:
- Color A (Deep Navy): Approx. 200g – for the base and first section.
- Color B (Soft Periwinkle): Approx. 200g – for the middle section.
- Color C (Cream): Approx. 200g – for the top section and borders.
- Needle: US 7 (4.5 mm) circular knitting needle with a 32-inch cable. The long cable is essential to hold the 150 stitches comfortably.
- Other: A tapestry needle for weaving in ends, stitch markers (optional but helpful), and scissors.
Gauge & Finished Size
- Gauge: 20 stitches and 28 rows = 4 inches in stockinette stitch (after blocking). Always knit a gauge swatch to ensure your blanket matches the intended dimensions.
- Finished Size: Approx. 30 x 36 inches (76 x 91 cm). This is the perfect size for a stroller, crib, or cuddle-time.
Step-by-Step Instructions: Knitting Your Starlight Drift
Follow these detailed instructions carefully. The pattern is broken down into manageable steps, and the star stitch is easier than it looks. Let's get started!
Understanding the Pattern & Abbreviations
Before you cast on, familiarize yourself with these common knitting abbreviations:
- CO: Cast on
- K: Knit
- P: Purl
- K2tog: Knit two stitches together (a right-leaning decrease).
- SSK: Slip, slip, knit (a left-leaning decrease). Slip two stitches knitwise one at a time, then insert the left needle into the front of these two stitches and knit them together.
- YO: Yarn over (creates an increase and a decorative hole).
- St(s): Stitch(es)
- RS: Right side (the front of the work).
- WS: Wrong side (the back of the work).
Step 1: Casting On
With Color A (deep navy), make a slip knot and place it on your needle. Using a loose long-tail cast-on method, CO 150 stitches. It is crucial to cast on loosely so the bottom edge remains stretchy and doesn't pucker. Take your time with this step.
Step 2: Knitting the Garter Border
This border creates a sturdy, non-curling edge that frames the blanket beautifully.
- Rows 1-6: Knit all stitches. (You will have 6 ridges of garter stitch on the RS).
Step 3: Beginning the Star Stitch Pattern
Now we begin the magical star stitch. This is a 4-row repeat. The edge stitches (K1 at the beginning and end of RS rows) create a neat selvedge edge.
- Row 1 (RS): With Color A, K1 (edge), *K2tog, YO, K1, YO, SSK*; repeat from * to * until the last stitch, K1 (edge).
- Row 2 (WS): Purl all stitches.
- Row 3 (RS): K1 (edge), *K1, YO, SSK, K2tog, YO*; repeat from * to * until the last stitch, K1 (edge).
- Row 4 (WS): Purl all stitches.
Pro-Tip: The combination of YOs and decreases (K2tog and SSK) keeps the stitch count consistent while forming the open, star-like shapes. If you lose your place, look for the "V" shapes of the decreases to guide you.
Step 4: Changing Colors & Continuing the Pattern
Continue repeating Rows 1-4 of the star stitch pattern. You will work the blanket in three distinct color blocks:
- Section 1: Continue with Color A (deep navy) until the piece measures 10 inches from the cast-on edge.
- Section 2: Cut Color A and join Color B (soft periwinkle). Continue the exact same pattern for another 10 inches.
- Section 3: Cut Color B and join Color C (cream). Continue the pattern for a final 10 inches.
Note: When changing colors, do so at the beginning of a RS row (Row 1) for the cleanest transition. Leave a 6-inch tail to weave in later.
Step 5: Knitting the Top Garter Border
Once you have completed the final 10-inch section with Color C, it's time to finish the top edge to match the bottom.
- With Color C, knit 6 rows of garter stitch (all knit). This will mirror the bottom border.
Step 6: Binding Off
On the RS, bind off all stitches loosely in knit. To bind off loosely, knit the first two stitches, then pass the first stitch over the second. Knit the next stitch and pass the previous stitch over it. Continue this way until one stitch remains. Cut the yarn, leaving a 6-inch tail, and pull it through the last loop to secure.
Step 7: Weaving in Ends
Thread your tapestry needle with the yarn tails from your cast-on, bind-off, and color changes. Weave them carefully through the wrong side of the blanket, following the path of the stitches. Trim any excess yarn.
Step 8: The Final Touch – Blocking
Blocking is essential for this pattern. It opens up the star stitch, evens out the tension, and gives the blanket its professional, finished look.
- Fill a basin or sink with lukewarm water and add a drop of mild baby shampoo or wool wash.
- Submerge the blanket and gently press it down to soak. Let it sit for 15-20 minutes. Do not agitate or wring.
- Drain the water and gently squeeze out the excess. Roll the blanket in a clean, dry towel to remove more moisture.
- Lay the blanket flat on a blocking mat or a dry towel. Gently stretch and pin the edges to the finished measurements (30 x 36 inches).
- Allow it to dry completely before unpinning.
And there you have it—a stunning, dreamy Starlight Drift Baby Blanket ready to be gifted or cherished. The combination of the soothing knit rhythm and the beautiful celestial result makes this a truly special project. Happy knitting!