Sherbet Sombrero Mini Backpack Free Crochet Pattern
Sherbet Sombrero Mini Backpack: A Beginner-Friendly Crochet Pattern
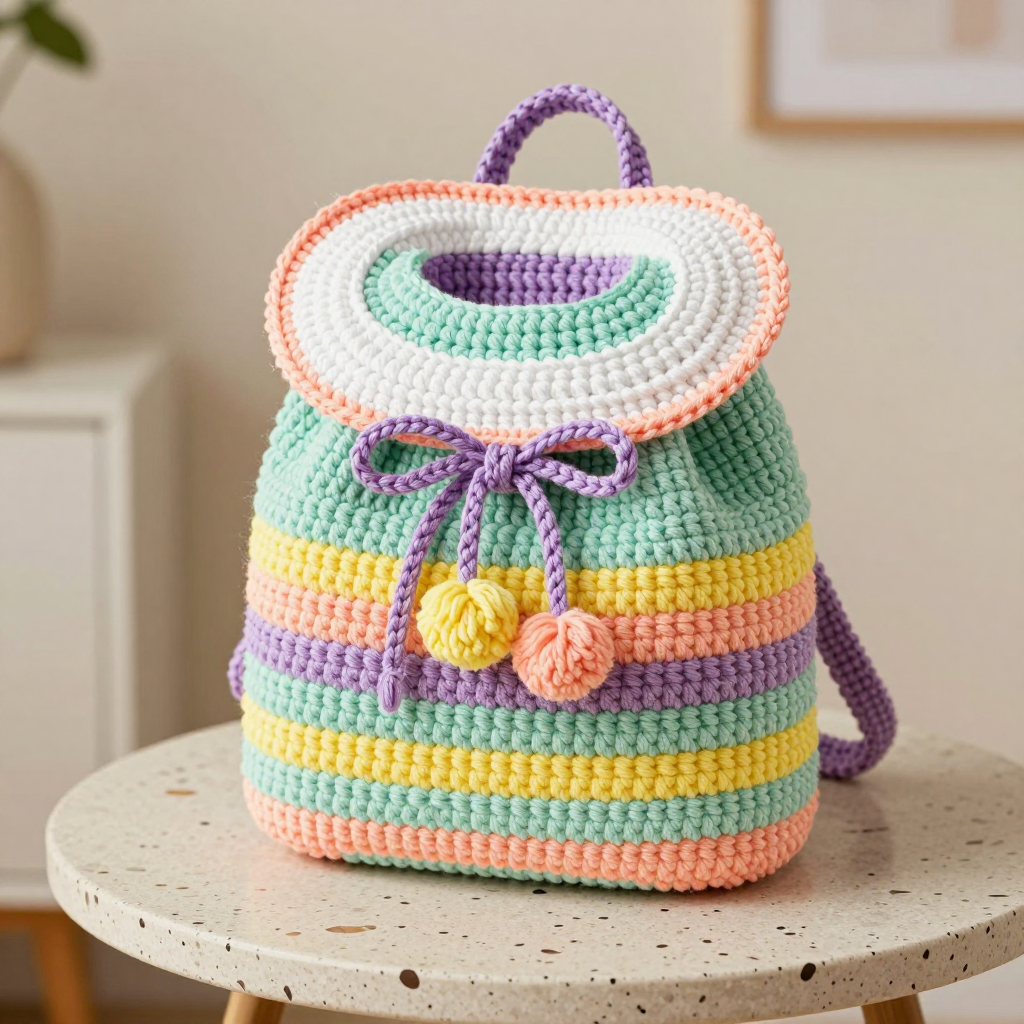
If you have never held a crochet hook before, this is the perfect first project to fall in love with. The Sherbet Sombrero Mini Backpack is a tiny, candy-colored bag built almost entirely from one simple stitch, so you only need to learn a single motion to make the whole thing. It looks like a little striped barrel in soft mint, peach, lavender, and lemon, topped with a wide, flat white sombrero brim and finished with a lavender drawstring bow and a fluffy pompom tassel. The finished piece is about 7 inches tall with an 11-inch brim, so it works as a sweet display piece, a gift, or a small bag for tiny treasures. The texture is soft and squishy, and the pastel stripes make every round feel like a little reward.
Materials Needed
- Yarn: Worsted weight (category 4) acrylic yarn. Color A (mint green): 1 skein (approx. 170 yards). Color B (peach): 1 skein. Color C (lavender): 1 skein. Color D (lemon yellow): 1 skein. Color E (white): small amount, approx. 40 yards for the brim.
- Crochet hook: I/9 (5.5 mm).
- Stitch marker: 1, to mark the first stitch of each round.
- Tapestry needle: a large blunt needle for weaving in ends and sewing the brim.
- Scissors.
- Optional: 2 small D-rings or 1/2-inch ribbon for strap anchors, and a small pompom maker or a piece of cardboard to make a 2-inch pompom.
- Finished size: Body is 7 inches tall and about 8 inches in circumference (roughly 2.5 inches across). The brim is 11 inches in diameter.
Abbreviations and Beginner Glossary
- ch – chain. Make a loop of yarn on your hook, wrap the yarn over the hook, and pull it through the loop. That is one chain.
- sc – single crochet. Insert your hook into the stitch, wrap yarn over the hook, pull up a loop (you now have 2 loops on the hook), wrap yarn over again, and pull through both loops. One single crochet made.
- sl st – slip stitch. Insert your hook into the stitch, wrap yarn over, and pull it through both the stitch and the loop on your hook at the same time. It makes a nearly invisible join.
- sc2tog – single crochet 2 together (a decrease). Insert your hook into the first stitch, pull up a loop, insert your hook into the next stitch, pull up a loop (3 loops on hook), wrap yarn over, and pull through all 3 loops. This turns 2 stitches into 1.
- st / sts – stitch / stitches. One completed loop or "V" in your work.
- rnd – round. One full circle of stitches worked around.
- magic ring – an adjustable loop of yarn you crochet into, then pull tight to close the center hole. If you prefer, you can chain 4 and join with a slip stitch to make a small ring instead.
- 2 sc in next st – an increase. Work two single crochets into the same stitch, which adds one stitch to your count.
- [ ] – brackets mean "repeat everything inside the brackets" the number of times stated after them.
Gauge
13 single crochet stitches x 14 rows = 4 inches (10 cm) with the I/9 (5.5 mm) hook.
Gauge matters because it tells you how big your finished bag will be. If your stitches are looser than this, the bag will come out larger than 7 inches tall; if they are tighter, it will be smaller. To make a gauge swatch, chain 20, then single crochet in each chain across and back for about 16 rows. Lay a ruler across the middle of the swatch and count how many stitches fit in 4 inches. If you have more than 13, try a smaller hook; if you have fewer, try a larger hook. Do not skip this step — it takes ten minutes and saves you from a disappointing surprise.
Beginner Tips Before You Start
- Use a stitch marker. The body is worked in a continuous spiral, so the rounds blend together. Place a marker in the first stitch of each round so you always know where the round begins.
- Do not pull the yarn too tight. Beginners often grip the yarn hard, which makes the stitches stiff and hard to work into. Keep a relaxed, even tension so the hook slides easily.
- Count your stitches at the end of every round. The numbers in parentheses tell you exactly how many stitches you should have. If you are off, fix it before moving on.
- Change colors in the last stitch of the round. When you pull through the final loop of the last single crochet, use the new color. This keeps the stripes clean.
- Keep the wrong side out. In continuous rounds, the "right side" faces you as you work. If the bag looks inside-out, simply turn it right side out before assembly.
- Work the brim flat and joined. The brim is worked in joined rounds, so you will slip stitch at the end of each round. This keeps the circle perfectly flat.
Step-by-Step Instructions
Body (worked in continuous rounds — do not join)
With Color A (mint), make a magic ring.
Rnd 1: 6 sc in ring. (6 sts)
Rnd 2: 2 sc in each st around. (12 sts)
Rnd 3: [Sc in next st, 2 sc in next st] around. (18 sts)
Rnd 4: [Sc in next 2 sts, 2 sc in next st] around. (24 sts)
Rnd 5: [Sc in next 3 sts, 2 sc in next st] around. (30 sts)
Rnd 6: [Sc in next 4 sts, 2 sc in next st] around. (36 sts)
Rnd 7: [Sc in next 5 sts, 2 sc in next st] around. (42 sts)
Rnd 8: [Sc in next 6 sts, 2 sc in next st] around. (48 sts)
Rnds 9–10: Sc in each st around. (48 sts)
Change to Color B (peach).
Rnds 11–14: Sc in each st around. (48 sts)
Change to Color C (lavender).
Rnds 15–18: Sc in each st around. (48 sts)
Change to Color D (lemon).
Rnds 19–22: Sc in each st around. (48 sts)
Change to Color A (mint).
Rnds 23–26: Sc in each st around. (48 sts)
Change to Color B (peach).
Rnds 27–30: Sc in each st around. (48 sts)
Change to Color C (lavender).
Rnds 31–34: Sc in each st around. (48 sts)
Change to Color D (lemon).
Rnds 35–38: Sc in each st around. (48 sts)
Change to Color A (mint).
Rnd 39: Sc in each st around. (48 sts)
Rnd 40: [Sc in next 6 sts, sc2tog] around. (42 sts)
Rnd 41: [Sc in next 5 sts, sc2tog] around. (36 sts)
Rnd 42: [Sc in next 4 sts, sc2tog] around. (30 sts)
Rnd 43: [Sc in next 3 sts, sc2tog] around. (24 sts)
Rnd 44: [Sc in next 2 sts, sc2tog] around. (18 sts)
Rnd 45: [Sc in next st, sc2tog] around. (12 sts)
Rnd 46: Sc2tog around. (6 sts)
Fasten off, leaving a long tail. Thread the tail onto your tapestry needle and weave it through the remaining 6 stitches, then pull tight to close the hole.
Brim (worked flat in joined rounds)
With Color E (white), ch 4, join with sl st to form a ring.
Rnd 1: Ch 1, 8 sc in ring, join with sl st to first sc. (8 sts)
Rnd 2: Ch 1, 2 sc in each st around, join. (16 sts)
Rnd 3: Ch 1, [Sc in next st, 2 sc in next st] around, join. (24 sts)
Rnd 4: Ch 1, [Sc in next 2 sts, 2 sc in next st] around, join. (32 sts)
Rnd 5: Ch 1, [Sc in next 3 sts, 2 sc in next st] around, join. (40 sts)
Rnd 6: Ch 1, [Sc in next 4 sts, 2 sc in next st] around, join. (48 sts)
Rnd 7: Ch 1, [Sc in next 5 sts, 2 sc in next st] around, join. (56 sts)
Rnd 8: Ch 1, [Sc in next 6 sts, 2 sc in next st] around, join. (64 sts)
Rnd 9: Ch 1, [Sc in next 7 sts, 2 sc in next st] around, join. (72 sts)
Rnd 10: Ch 1, [Sc in next 8 sts, 2 sc in next st] around, join. (80 sts)
Rnd 11: Ch 1, sc in each st around, join. (80 sts)
Rnd 12: Ch 1, [Sc in next 9 sts, 2 sc in next st] around, join. (88 sts)
Rnd 13: Ch 1, sc in each st around, join. (88 sts)
Fasten off and weave in ends.
Brim Edging
Join Color B (peach) to any stitch on the brim edge.
Rnd 1: Ch 1, sc in each st around, join with sl st. (88 sts)
Fasten off and weave in ends.
Drawstring
With Color C (lavender), ch 60. Fasten off. Thread the chain through the top round of the body just below the brim, going in and out every 2 stitches. Tie the ends in a bow at the front.
Pompom Tassel
Make a 2-inch pompom using Color D (lemon) and Color B (peach) held together. Cut a 10-inch length of Color C (lavender) and tie it securely around the center of the pompom, leaving two long tails. Attach the pompom to the center of the drawstring bow by tying the tails in a knot. Trim the pompom evenly.
Straps (optional)
With Color A (mint), ch 50. Sc in each ch across. Fasten off. Make 2. Sew one end of each strap to the back of the body near the top, and the other end near the bottom, forming shoulder loops. Reinforce with extra stitches.
Assembly and Finishing
Step 1: Turn the body right side out. The narrower closed end is the bottom, and the open end with the last round is the top.
Step 2: Center the brim over the top opening. The brim's inner ring should sit just inside the top edge of the body.
Step 3: Sew the brim in place. Using white yarn and your tapestry needle, whipstitch (a simple over-and-over stitch) the brim to the top edge of the body, working through both layers. Sew evenly around, keeping the stitches hidden on the underside.
Step 4: Weave in all ends. Thread each tail onto the tapestry needle and run it through several stitches on the wrong side, then trim close to the work.
Step 5: Block the brim. Lightly steam the brim with an iron held just above the surface (never touch the iron to acrylic yarn, as it can melt). This helps the brim lie flat and hold its shape.
Pro Tips and Variations
- Change the color story. Swap the pastels for bold primary colors, or use a single self-striping yarn so the stripes appear without changing balls.
- Adjust the size. To make a larger bag, add more increase rounds to the body base (each round adds 6 stitches) and work more straight rounds before the decreases. Keep the brim increases the same pattern of adding 8 stitches per round.
- Try a different yarn. Cotton yarn gives a sturdier, more structured bag, while a soft acrylic keeps it squishy. Always re-check your gauge if you change yarn.
- Add a lining or a button. Sew a small fabric lining inside for a more finished look, or add a decorative button to the front of the drawstring bow.