Mauve Basketweave Chin-Tie Cozy: Free Crochet Pattern for Large Dogs
Mauve Basketweave Chin-Tie Cozy: A Warm Cap for Your Big Dog
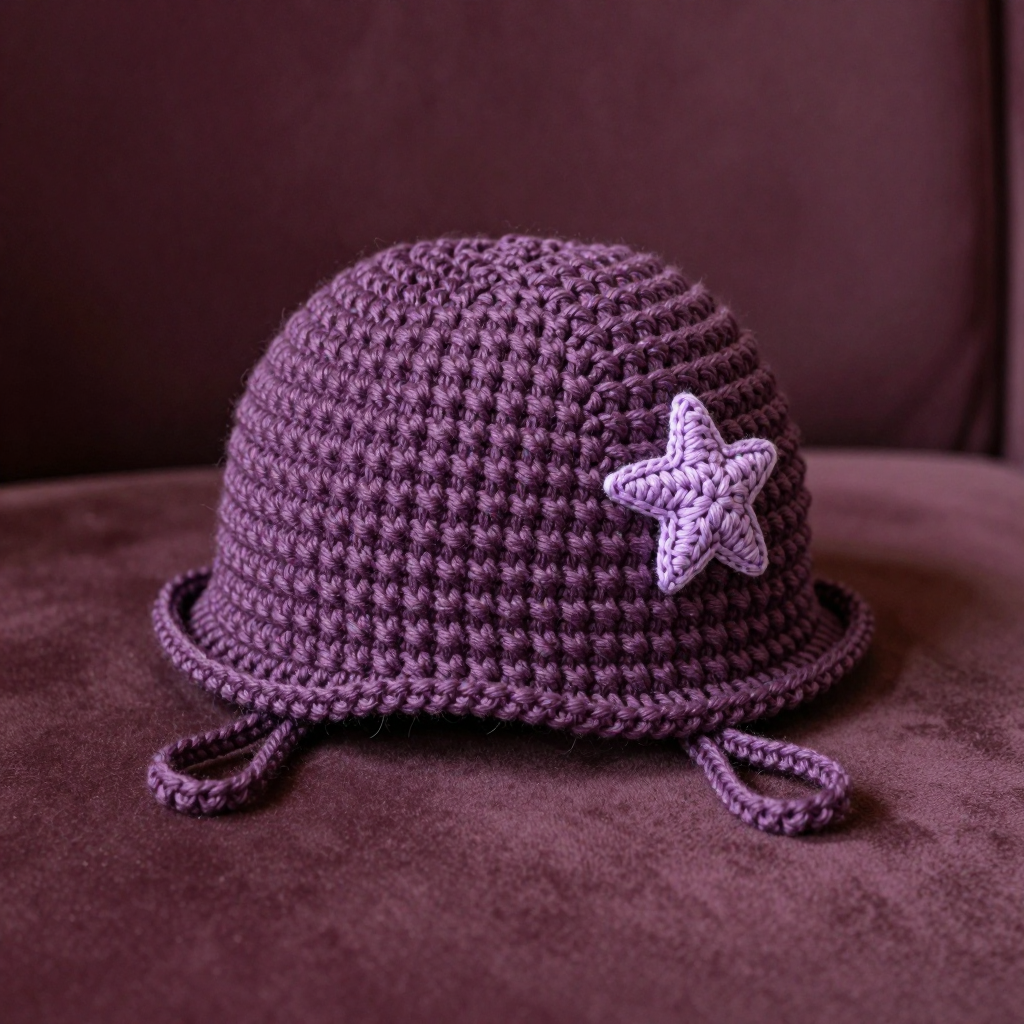
If you have a large dog who shivers on frosty mountain mornings, this cozy little cap is for you. It is a wonderfully forgiving first project: you crochet one simple rectangle, seam it into a tube, and gather the top into a soft, rounded crown. The finished cap looks like a tiny woven basket in deep plum, with a raised checkerboard texture that feels thick and cabin-ready, and a single mauve star stitched on the side for a touch of charm. Two short chin ties keep it snug under the jaw, so it stays put on walks. Best of all, it uses only a few basic stitches, so even if you have never held a hook before, you can make this today.
Materials Needed
- Yarn: Aran weight wool blend (approx. 180 yd / 165 m per 100 g skein). You need 1 skein Plum (MC) and 1 skein Mauve (CC). The sample uses about 95 yd of Plum and 25 yd of Mauve.
- Crochet hook: 5.0 mm (US H-8), or whatever size gets you the gauge below.
- Tapestry needle: A large, blunt needle with an eye big enough for your yarn, for seaming and weaving in ends.
- Stitch marker: One removable marker to help you keep track.
- Scissors: Any sharp pair for cutting yarn.
- Finished size: Fits large dogs with a head circumference of 22–25 in / 56–64 cm (measured around the widest part of the skull, just behind the ears and over the brow). The finished cap measures approx. 23 in / 58 cm around the brim and 7 in / 18 cm tall from brim to crown seam. Each chin tie is approx. 9 in / 23 cm long.
Abbreviations and Beginner Glossary
Every pattern is written in shorthand. Here is every abbreviation used in this pattern, explained in plain English. Read this once before you begin and you will be ready.
- ch – chain. Make a loop of yarn on your hook, then pull the yarn through the loop. Each loop you pull through is one chain. Chains are the foundation you build on.
- sc – single crochet. Insert your hook into the stitch, yarn over (wrap yarn around hook), pull up a loop (you now have 2 loops on the hook), yarn over again, and pull through both loops. One single crochet made.
- fpsc – front post single crochet. Instead of going into the top of a stitch, you go around the post (the vertical body) of a stitch from the row below. Insert your hook from front to back around that post, yarn over, pull up a loop, yarn over, pull through both loops. This pushes the stitch forward, creating the raised texture.
- bpsc – back post single crochet. Same as above, but insert your hook from back to front around the post, so the stitch is pushed to the back. Together, fpsc and bpsc make the woven basketweave look.
- st(s) – stitch or stitches. One completed loop or the space where you work.
- sl st – slip stitch. Insert hook into stitch, yarn over, and pull through both the stitch and the loop on your hook at the same time. It joins things without adding height.
- rep – repeat. Do the instruction again.
- RS – right side. The front, outward-facing side of your work.
- WS – wrong side. The back, inward-facing side.
- MC – main color (Plum).
- CC – contrast color (Mauve).
- Rnd – round. A row that goes all the way around in a circle.
- Magic ring – an adjustable loop you make with yarn, then crochet into, so the center pulls tight with no hole.
- Whipstitch – a simple seaming stitch: bring the needle up through both edges, over the top, and back down, like a spiral of small slanted stitches.
Gauge
Basketweave pattern: 14 sts x 12 rows = 4 in / 10 cm. Each block of 4 stitches measures about 1 in / 2.5 cm wide, and each block of 4 rows measures about 1.3 in / 3.3 cm tall.
Why gauge matters: Gauge is how tightly or loosely you crochet. If your stitches are bigger than the pattern expects, the cap will be too loose and slide off; if they are smaller, it will be too tight. Checking first saves you from redoing the whole thing.
How to make a gauge swatch: Chain 22, then work 14 rows of the basketweave pattern (Rows 1–14 of the rectangle below). Lay it flat without stretching and measure a 4 in / 10 cm square in the middle. Count how many stitches and rows fit in that square. If you have more than 14 stitches, try a larger hook; if fewer, try a smaller hook. Change hook size and swatch again until it matches.
Beginner Tips Before You Start
- Use a stitch marker. Place it in the first stitch of each row so you never lose your place, especially when counting the 81 stitches.
- Do not pull the yarn too tight. Keep your loops relaxed and even. Tight tension makes the post stitches hard to insert your hook around and makes the cap too small.
- Count your blocks, not just stitches. The pattern has 19 blocks of 4 post stitches between the edge stitches. If you can count 19 blocks, you are on track.
- Work the post stitches around the stitch two rows below, not the one directly beneath your hook. This is what creates the raised, woven look.
- Keep the right side facing you on RS rows. The raised blocks should pop toward you on the front.
- Check your size before seaming. Lay the rectangle flat and measure. It should be about 23 in wide and 7 in tall. Adjust repeats now, not later.
Step-by-Step Instructions
This cap is worked flat as one rectangle, side to side, in a woven basketweave of raised front and back post stitches. The rectangle is then seamed into a tube, and the top edge is gathered and closed to form the crown. The star motif is worked separately and sewn on. The two chin ties are crocheted directly onto the brim corners.
Basketweave Rectangle (make 1, worked flat in MC)
Row 1 (RS): Ch 82. Sc in 2nd ch from hook and in each ch across. (81 sc)
Row 2 (WS): Ch 1, turn. Sc in each st across. (81 sc)
Row 3 (RS): Ch 1, turn. Sc in first 2 sts, *fpsc around next st 2 rows below, fpsc around next st 2 rows below, fpsc around next st 2 rows below, fpsc around next st 2 rows below, bpsc around next st 2 rows below, bpsc around next st 2 rows below, bpsc around next st 2 rows below, bpsc around next st 2 rows below; rep from * to last 3 sts, sc in last 3 sts. (81 sts: 2 sc, 19 blocks of 4 post sts, 3 sc)
Row 4 (WS): Ch 1, turn. Sc in first 2 sts, *bpsc around next 4 sts, fpsc around next 4 sts; rep from * to last 3 sts, sc in last 3 sts. (81 sts)
Row 5 (RS): Ch 1, turn. Sc in first 2 sts, *fpsc around next 4 sts, bpsc around next 4 sts; rep from * to last 3 sts, sc in last 3 sts. (81 sts)
Rows 6–7: Rep Rows 4–5 once more. (81 sts) You have now completed one full basketweave band of 4 rows of blocks.
Row 8 (WS): Ch 1, turn. Sc in first 2 sts, *fpsc around next 4 sts, bpsc around next 4 sts; rep from * to last 3 sts, sc in last 3 sts. (81 sts) The blocks are offset by one block to create the woven look.
Row 9 (RS): Ch 1, turn. Sc in first 2 sts, *bpsc around next 4 sts, fpsc around next 4 sts; rep from * to last 3 sts, sc in last 3 sts. (81 sts)
Rows 10–11: Rep Rows 8–9 once more. (81 sts)
Repeat Rows 3–11 two more times, then repeat Rows 3–7 once more. Do not fasten off yet. (81 sts throughout)
Check: The rectangle should measure approx. 23 in / 58 cm wide (the 81-stitch edge, which becomes the circumference) and 7 in / 18 cm tall (the row edge, which becomes the brim-to-crown height). If it is short or long, add or remove repeats of Rows 3–11 before continuing.
Brim Edging (in MC)
With RS facing and working along the bottom long edge of the rectangle (the foundation-chain edge), join MC with a sl st in the corner.
Rnd 1: Ch 1, work 81 sc evenly along the edge. Sl st to first sc. Fasten off. (81 sc)
Star Motif (make 1, in CC)
Rnd 1: Make a magic ring. Ch 1, work 10 sc into the ring. Sl st to first sc. (10 sc)
Rnd 2: *Ch 3, sl st in 2nd ch from hook, sc in next ch, skip next sc on Rnd 1, sl st in next sc; rep from * 5 times total. (5 star points)
Fasten off, leaving a 10-in / 25-cm tail. Set the star aside until assembly.
Chin Ties (make 2, in MC)
Tie 1: With RS facing, join MC with a sl st at the bottom right corner of the brim. Ch 1, work 3 sc in the corner. Ch 1, turn. Work 3 sc across. Rep the last row until the tie measures 9 in / 23 cm. Fasten off. (3 sc per row throughout)
Tie 2: Rep at the bottom left corner of the brim. (3 sc per row throughout)
Assembly and Finishing
Seam the cap: Fold the rectangle in half with RS together so the two short ends meet, forming a tube. Thread your tapestry needle with MC. Whipstitch the short ends together to form the back seam: bring the needle up through both edges, over the top, and back down, working small slanted stitches all along the seam. Turn the cap RS out.
Close the crown: Thread a fresh length of MC on your tapestry needle. Run a gathering thread through the top edge of the tube (the row edge opposite the brim), going in and out around the whole edge. Pull the thread tight to close the crown into a rounded dome, then secure with several stitches through the gathered edge. Weave in the end.
Attach the star: Using the star's 10-in tail and your tapestry needle, sew the star flat to the side of the cap, approx. 2 in / 5 cm up from the brim and 3 in / 7.5 cm back from the front edge. Take small stitches through the star's center and points so it lies flat. Weave in the end.
Weave in all ends: Thread each loose tail on the tapestry needle and run it back and forth through the inside of the fabric for about 1 in, then trim close.
Block lightly: Mist the cap with water and pat it into shape on a towel, taking care not to flatten the raised post stitches. Let it dry fully. The cap should sit snugly over the dog's head with the brim just above the eyes; tie the chin ties under the jaw with a single bow.
Pro Tips and Variations
- Change the colors: Swap Plum and Mauve for any two aran-weight shades you love. Try a cream body with a rust star for a classic cabin look, or a charcoal cap with a bright mustard star for visibility on snowy walks.
- Adjust the size: For a smaller dog, reduce the starting chain by 8 stitches (one block) for each size down, and work one fewer repeat of Rows 3–11. For a larger dog, add 8 stitches and one extra repeat. Always check the width against your dog's head measurement before seaming.
- Substitute yarn: Any aran-weight wool or wool-blend works well. Avoid slippery acrylics if your dog is active, as the cap may slide; a wool blend gives grip and warmth. Always swatch to confirm gauge.
- Make the ties longer or shorter: Simply work more or fewer repeats of the 3-sc tie rows. Add a small button or a crocheted loop if you prefer a fastener to a bow.