Barn Loft Beret in Ripple: Free Crochet Pattern for Cats
Barn Loft Beret in Ripple: Free Crochet Pattern for Cats
Introduction
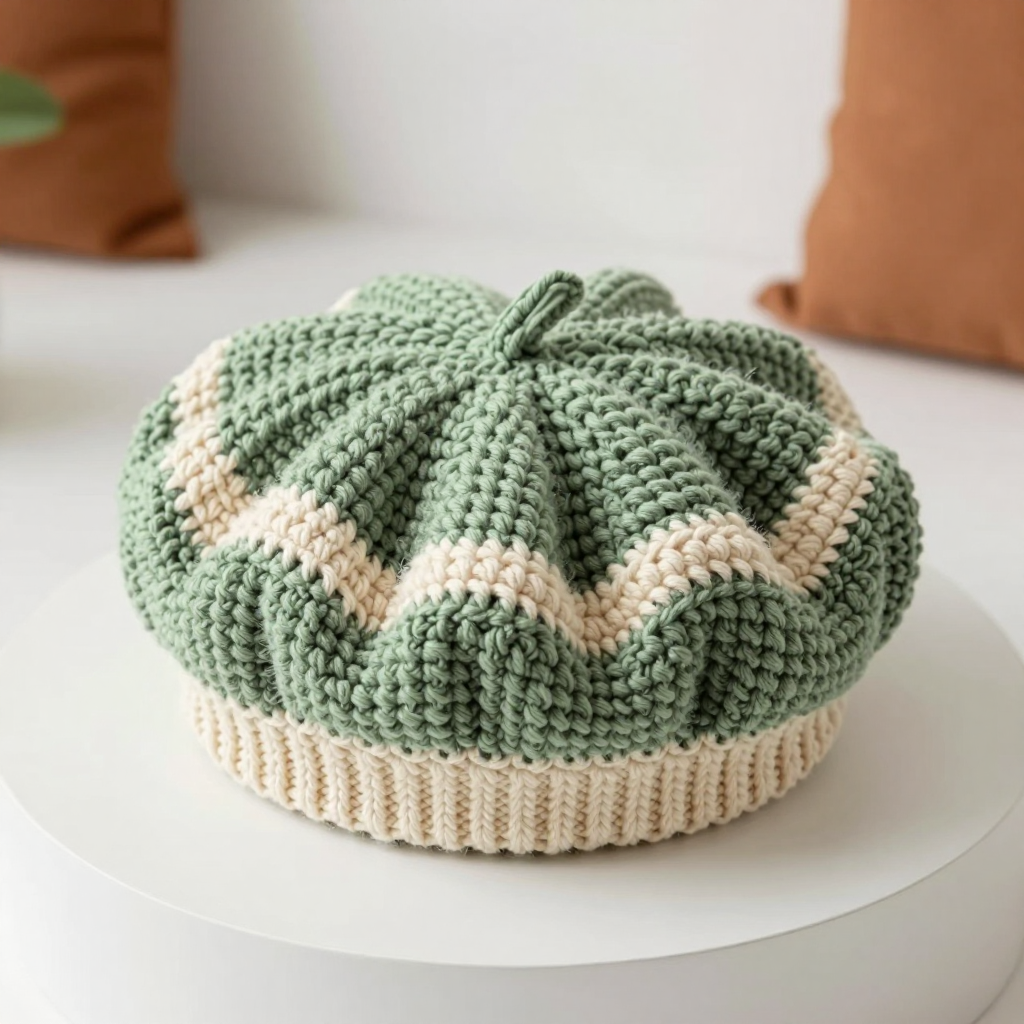
If you have never held a crochet hook before, this is the perfect first project to fall in love with. The Barn Loft Beret is a soft, slouchy little hat for your cat, crocheted in plush chenille yarn in muted sage green and warm cream. It is special because the crown is a flat, rippling chevron circle — a wavy, scalloped disc that looks far more complicated than it really is — and then it is gently gathered into a narrow ribbed cream band that sits just behind your cat's ears. The finished beret is thick, velvety, and rustic, like something a farmhouse cat would wear while napping in a sunbeam. Every stitch is explained below, so even a complete beginner can make this today.
Materials Needed
- Yarn: Chenille plush yarn, super bulky (weight 6), approx. 55 yds (50 m) per 50 g skein. You need 1 skein sage green (MC) and 1 skein cream (CC). The sample uses approx. 38 yds sage and 22 yds cream.
- Crochet hook: Size L/11 (8.0 mm), or whatever size gives you the gauge below.
- Stitch markers: At least 2, to mark the first stitch of each round and your color changes.
- Tapestry needle: A blunt, large-eye needle for gathering, seaming, and weaving in ends.
- Scissors for cutting yarn.
- Finished size: Crown circle approx. 7 in (18 cm) diameter, flat, before gathering. Band approx. 9 in (23 cm) circumference x 1 in (2.5 cm) tall, ribbed. Fits a cat head 8.5–10 in (21.5–25.5 cm) around.
Abbreviations and Beginner Glossary
All terms are US crochet terms. Read each one slowly — you will know them all by the end.
- ch – chain: wrap yarn over hook, pull it through the loop on your hook. One chain made.
- sl st – slip stitch: insert hook into stitch, yarn over, pull through the stitch and the loop on your hook at the same time. Makes a nearly invisible joining stitch.
- sc – single crochet: insert hook into stitch, yarn over, pull up a loop (2 loops on hook), yarn over, pull through both loops.
- hdc – half double crochet: yarn over, insert hook, pull up a loop (3 loops), yarn over, pull through all 3 loops.
- dc – double crochet: yarn over, insert hook, pull up a loop (3 loops), yarn over, pull through 2 loops, yarn over, pull through last 2 loops.
- dc3tog – double crochet 3 together (a decrease over 3 stitches): start a dc in the first stitch but stop with 2 loops on hook; start a dc in the next stitch, stop with 3 loops; start a dc in the third stitch, then yarn over and pull through all 4 loops. Three stitches become one.
- sc2tog – single crochet 2 together: insert hook in stitch, pull up a loop, insert hook in next stitch, pull up a loop, yarn over, pull through all 3 loops.
- st(s) – stitch(es). sp – space.
- MC – main color (sage green). CC – contrasting color (cream).
- BLO – back loop only: each stitch has two top loops; work into only the loop farthest from you. This makes stretchy ridges.
- Magic ring – an adjustable loop you crochet into, then pull tight so there is no hole in the center.
- Turn – flip your work over so you crochet back the other direction.
- Join – connect the last stitch of the round to the first with a sl st.
Gauge
Gauge: In the chevron pattern, 1 full ripple repeat (14 sts) = 3 in (7.5 cm) wide; 4 rounds = 2 in (5 cm).
Why gauge matters: Gauge is how big your stitches come out. If your stitches are bigger than the pattern's, the hat will be too loose and slide off; if smaller, it will be too tight. How to check: With your hook and yarn, chain 15 and work 2 rows of the ripple pattern (Round 7 instructions below). Lay it flat and measure across 14 stitches — it should be about 3 inches. If it is wider, try a smaller hook; if narrower, a larger hook. Chenille is fuzzy, so measure gently and do not stretch.
Beginner Tips Before You Start
- Mark your first stitch. Place a stitch marker in the first stitch of every round so you always know where the round begins and ends.
- Do not pull the yarn tight. Chenille is thick and snaps easily. Keep your tension relaxed and let the hook do the work.
- Count your ripple repeats. After Round 6 you must have exactly 84 stitches — that is 6 ripple repeats of 14. Count before you continue.
- Carry the unused color loosely. When you switch between sage and cream, leave the resting yarn loose along the inside; do not cut it between bands.
- Turn at the end of each crown round. This keeps the ripple flat and puts your color changes neatly at the back.
- Practice the decrease first. Work one dc3tog on scrap yarn before starting; it is the only tricky stitch in the pattern.
Step-by-Step Instructions
Crown (worked in the round, turning each round)
With MC (sage), make a magic ring.
Round 1 (MC): Ch 3 (counts as first dc), 13 dc in ring, join with sl st to top of ch-3. Turn. (14 dc)
Round 2 (MC): Ch 3, dc in same st, 2 dc in each st around, join with sl st to top of ch-3. Turn. (28 dc)
Round 3 (MC): Ch 3, 2 dc in next st, *dc in next st, 2 dc in next st; rep from * around, join. Turn. (42 dc)
Round 4 (MC): Ch 3, dc in next st, 2 dc in next st, *dc in next 2 sts, 2 dc in next st; rep from * around, join. Turn. (56 dc)
Round 5 (MC): Ch 3, dc in next 2 sts, 2 dc in next st, *dc in next 3 sts, 2 dc in next st; rep from * around, join. Turn. (70 dc)
Round 6 (MC): Ch 3, dc in next 3 sts, 2 dc in next st, *dc in next 4 sts, 2 dc in next st; rep from * around, join. Turn. (84 dc = 6 ripple repeats of 14 sts)
Ripple Round (the pattern repeat used from here on): Ch 3, dc in next 4 sts, dc3tog over next 3 sts, dc in next 5 sts, 3 dc in next st, *dc in next 5 sts, dc3tog over next 3 sts, dc in next 5 sts, 3 dc in next st; rep from * around, join. Turn. (84 sts)
Round 7 (MC): Work Ripple Round. (84 sts)
Round 8 (CC): Join cream, work Ripple Round. (84 sts)
Round 9 (CC): Work Ripple Round. (84 sts)
Round 10 (MC): Change back to sage, work Ripple Round. (84 sts)
Round 11 (MC): Work Ripple Round. (84 sts)
Round 12 (CC): Join cream, work Ripple Round. (84 sts)
Round 13 (CC): Work Ripple Round. Do not turn. Fasten off, leaving a 24 in (60 cm) tail for gathering. (84 sts)
The crown now measures approx. 7 in (18 cm) across, with a softly scalloped ripple edge.
Gathering the Crown
Thread the long tail onto your tapestry needle. Work a running stitch (simple up-and-down stitches) around the final round, through the back loops only, every 2 sts. Pull gently to gather the crown edge down to approx. 9 in (23 cm) circumference, matching the band length. Distribute the gathers evenly so the ripple bands fan out over the band. Do not knot yet.
Band (worked flat in cream, BLO rib)
With CC (cream), ch 10.
Row 1: Sc in 2nd ch from hook and in each ch across. Turn. (9 sc)
Row 2: Ch 1, sc in BLO of each st across. Turn. (9 sc)
Rows 3–24: Repeat Row 2 until the band measures approx. 9 in (23 cm) unstretched, ending after a wrong-side row. (9 sc) Do not fasten off.
Joining Band to Crown
With right sides facing, pin the gathered crown edge evenly along one long edge of the band. Working through both layers, sl st the crown to the band across the full length. Fasten off. Seam the short ends of the band together with a whipstitch (small stitches over the edge, like a spiral) to form a ring, taking care not to twist. Weave in all ends.
Assembly and Finishing
Turn the beret right side out. Weave in ends: thread each tail on the tapestry needle and run it back and forth through the inside of a few stitches, then trim close. Blocking: lightly steam the crown over an upturned bowl to set the ripple and slouch — hold the steamer a few inches away and let the fibers relax; do not press flat or you will crush the ripple. Let it dry fully. Try it on your cat: the band should sit just behind the ears with the gathered crown falling softly to one side. If the band is loose, work one more short row and re-seam; if tight, undo the seam and remove one row.
Pro Tips and Variations
- Change the colors: Swap sage and cream for dusty rose and oatmeal, or charcoal and mustard, for a different farmhouse mood. Keep two colors so the ripple bands stay visible.
- Adjust the size: For a smaller cat, work the band to 8 in (20 cm) and gather the crown tighter; for a larger cat, add rows to the band until it measures 10 in (25 cm).
- Substitute yarn: Any super bulky (weight 6) yarn works — velvet, blanket, or thick acrylic. Always re-check your gauge, since chenille and acrylic behave differently.
- Add a tiny pom: Sew a small cream pom-pom to the gathered point at the back for extra charm.