Retro Petal Ankle Warmers Free Crochet Pattern
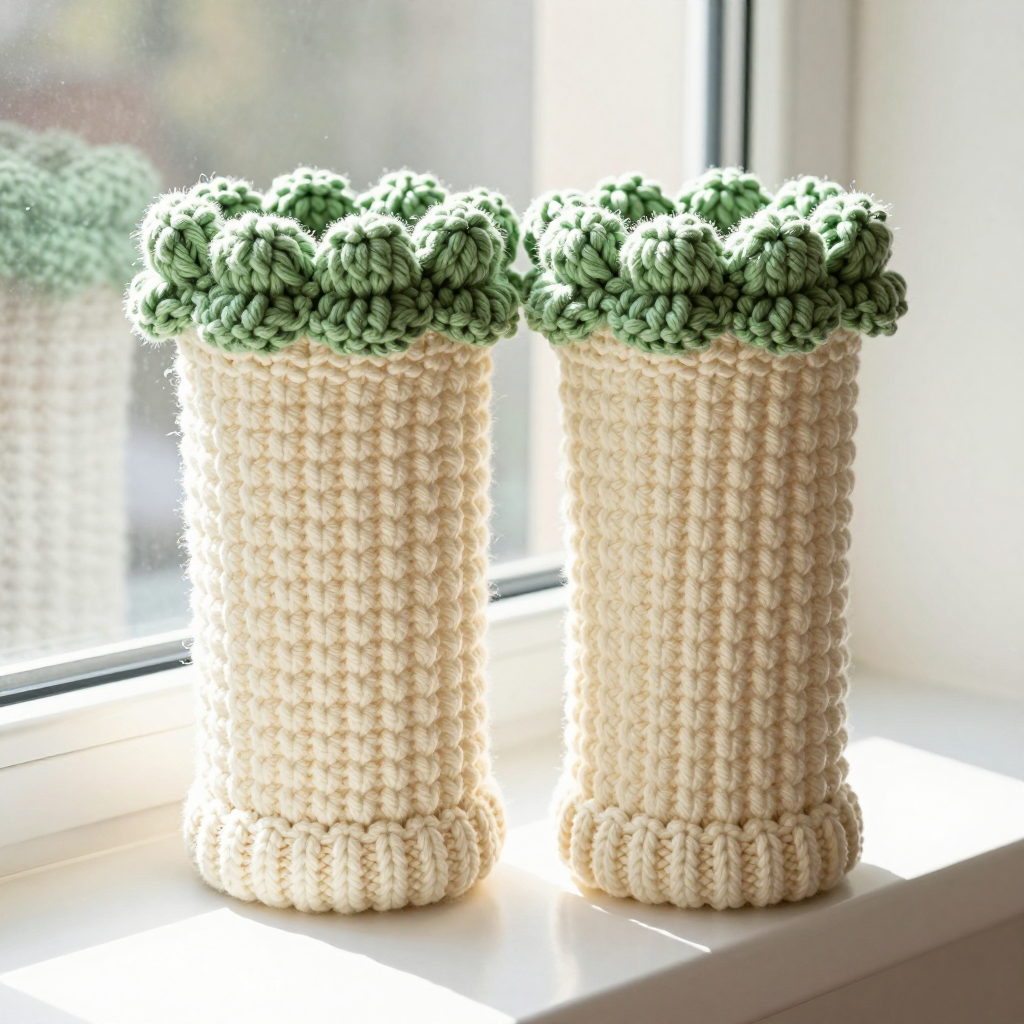
Retro Petal Ankle Warmers: A Free Beginner-Friendly Crochet Pattern
Introduction
These Retro Petal Ankle Warmers are the perfect first "real" project for anyone who has just learned to hold a hook and make a single crochet. Each warmer is simply a short cream tube that hugs your ankle, topped with a cheerful ring of chunky sage-green puff-stitch petals that look like a little 1970s flower blooming around your leg. The bulky wool makes them thick, cozy, and quick to work up, while the scalloped petal edge adds a mid-century flair that looks far more complicated than it actually is. If you can make a single crochet and a slip stitch, you can absolutely make these. In a weekend or two of relaxed evenings, you will have a soft, stretchy, handmade pair that feels like a warm hug around your ankles all winter long.
Materials Needed
- Yarn (main color): Bulky (weight 5) wool yarn, approximately 110 yd / 100 m cream for the pair.
- Yarn (petals): Bulky (weight 5) wool yarn, approximately 40 yd / 37 m sage green for the pair.
- Crochet hook: 6.0 mm (US J-10), or whatever size you need to match the gauge below.
- Stitch marker: 1 (or a scrap of contrasting yarn) to mark the start of your spiral rounds.
- Tapestry needle: A blunt-tipped yarn needle for weaving in ends.
- Scissors: Any sharp pair for cutting yarn.
- Finished size (per warmer): 8 in / 20 cm circumference unstretched (stretches comfortably to fit a 9–11 in / 23–28 cm ankle or calf), and 5 in / 12.5 cm tall including the petal trim.
Abbreviations and Beginner Glossary
- ch – chain. Yarn over the hook and pull that loop through the loop already on your hook. This makes a small link.
- sc – single crochet. Insert your hook into the stitch, yarn over, pull up a loop (2 loops on hook), yarn over again, pull through both loops. One sc made.
- sl st – slip stitch. Insert your hook into the stitch, yarn over, and pull that loop straight through both the stitch and the loop on your hook. It makes a nearly invisible joining stitch.
- hdc – half double crochet. Yarn over, insert hook into stitch, yarn over, pull up a loop (3 loops on hook), yarn over, pull through all 3 loops at once.
- dc – double crochet. Yarn over, insert hook into stitch, yarn over, pull up a loop (3 loops on hook), yarn over, pull through 2 loops, yarn over, pull through the last 2 loops.
- ps – puff stitch. [Yarn over, insert hook into the indicated stitch, yarn over, pull up a loop to the height of a double crochet] 3 times in the same stitch, giving 7 loops on your hook. Yarn over and pull through all 7 loops, then ch 1 to close it. The closing ch 1 does not count as a stitch.
- st / sts – stitch / stitches. One completed loop or "V" in your fabric.
- sp – space. The little gap made by a chain; you work into the gap rather than into a stitch.
- back loop – Every single crochet stitch has two top loops (a front loop facing you and a back loop behind it). "Back loop only" means you insert your hook under just the rear loop.
- magic ring – An adjustable loop of yarn you crochet into, then pull tight so the center closes with no hole.
- join with sl st – Finish a round by making a slip stitch into the first stitch of that round so the round closes into a circle.
- continuous spiral – Working round after round without joining, so the rounds flow into a spiral. You keep track with a stitch marker.
- fasten off – Cut the yarn a few inches from your work and pull the tail all the way through the last loop to lock it.
Gauge
12 sc x 14 rounds = 4 in / 10 cm in single crochet worked in the round with the 6.0 mm (J-10) hook.
Why gauge matters: Gauge is simply how big your stitches turn out. If your stitches are bigger than the pattern's, your warmers will be baggy and slide down; if they are smaller, the cuff will be too tight to pull over your foot. Making a swatch first saves you from ripping out a finished warmer.
How to make a gauge swatch: With cream yarn and your 6.0 mm hook, make a magic ring, then work 24 sc into it and join. Work 14 rounds of sc in the round (joining each round). Lay the swatch flat and measure across the middle: 12 stitches should measure 4 in / 10 cm, and 14 rounds should measure 4 in / 10 cm. If you have more stitches than 12 in 4 in, your stitches are too small — go up a hook size. If you have fewer, go down a hook size. Try again until it matches.
Beginner Tips Before You Start
- Use your stitch marker every single round. Because the cream body is worked in a continuous spiral, there is no seam to tell you where a round begins. Clip the marker into the first stitch of each round and move it up as you finish each round.
- Don't pull your yarn tight. Tension is the number-one beginner struggle. Keep your loops relaxed and even; the wool should glide, not squeak. Tight stitches make a stiff, unwearable cuff.
- Count your stitches at the end of every round. The pattern tells you the count in parentheses after each round — check it before moving on. Fixing one round is easy; fixing ten is not.
- Work the puff stitches loosely. Puff stitches need room to puff. If you tug them tight they flatten into lumps. Pull each loop up to the full height of a double crochet before closing.
- Keep the right side facing out. When you work in a spiral, the fabric can curl. Push the tube so the smooth "V" side of the stitches faces outward as you go.
- Make both warmers with the same hook and yarn. Even the same yarn can vary between skeins, so finish one warmer completely before starting the second to keep them matching.
Step-by-Step Instructions
Make 2 identical warmers. Each warmer is worked top-down: the sage petal ring first, then the cream cuff joined into the base of the petals.
Part 1: Petal Top (make 2)
With sage green, make a magic ring.
Round 1: Ch 1, work 8 sc into the ring, join with sl st to first sc. (8 sc)
Round 2: Ch 1, work 1 ps in the first sc, ch 1, *1 ps in next sc, ch 1; repeat from * around, join with sl st to top of first ps. (8 puff petals, 8 ch-1 spaces)
Round 3 (petal scallop): Ch 1, *[sc, hdc, dc] in the next ch-1 space, [dc, hdc, sc] in the following ch-1 space; repeat from * around, join with sl st to first sc. (8 scalloped petals)
Fasten off sage green. Do not cut the cream join yet — you will join cream into the base of the petals.
Part 2: Cream Cuff
Join cream with a sl st into the back loop of any sc from Round 1 (the base ring of the petals).
Round 4: Ch 1, sc in each back loop around, join with sl st to first sc. (8 sc)
Round 5: Ch 1, 2 sc in each st around, join with sl st to first sc. (16 sc)
Round 6: Ch 1, *2 sc in next st, sc in next st; repeat from * around, join with sl st to first sc. (24 sc)
Round 7: Ch 1, sc in each st around, join with sl st to first sc. (24 sc)
Rounds 8–17: Sc in each st around in continuous spirals (do not join; place a stitch marker in the first st of each round and move it up as you go). (24 sc per round)
Round 18 (ribbed-look edge): Ch 1, *sc in next st, sl st in next st; repeat from * around, join with sl st to first sc. (24 sts)
Fasten off cream. Weave in all ends.
Part 3: Assembly
There is no seaming — each warmer is already a finished tube. Simply repeat Parts 1 and 2 to make the second warmer, then move on to finishing below.
Assembly and Finishing
Weaving in ends: Thread each yarn tail onto your tapestry needle. Turn the warmer inside out and weave the tail back and forth through the backs of several stitches (about 1 in / 2.5 cm), then reverse direction and weave back the other way to lock it. Trim the yarn close to the fabric. Do this for the sage tail at the top and the cream tail at the bottom of each warmer.
Blocking: Gently steam-block the petal round only. Pin each scallop flat on a towel or blocking mat, hold a steam iron an inch or two above the petals (never press the iron directly onto the wool), and let the steam settle the fabric. Allow it to dry completely before unpinning. Do not stretch the cream cylinder — it should keep its snug, hugging shape.
Fit check: Try the warmer on. The cream cuff should hug the ankle without gaping. If it feels loose, simply work the cream rounds again with one hook size smaller; the petals stay as they are.
Pro Tips and Variations
- Change the colors: Swap the sage petals for mustard, rust, or dusty pink for a different retro palette, and try oatmeal or ecru instead of cream. Keep the petals in a contrasting color so the puff stitches stand out.
- Make them taller or shorter: Each extra round of cream single crochet adds about ¼ in / 6 mm of height. Add or remove rounds in the Rounds 8–17 section (keeping the count at 24 sc per round) to make boot cuffs or a shorter ankle warmer — just remember to finish with Round 18 as your last round.
- Substitute the yarn: Any bulky (weight 5) yarn works, but wool gives the best stretch and warmth. If you use a smooth acrylic, check your gauge again, as it behaves differently from wool.
- Add a second petal ring: For extra flair, work a second Round 2 and Round 3 in sage at the very bottom edge instead of the ribbed-look Round 18, giving you flowers at both ends.