Parched Earth Drop Hoodie Free Knitting Pattern: Beginner Tweed Drop-Stitch Pullover
Parched Earth Drop Hoodie: A Beginner-Friendly Tweed Drop-Stitch Pullover
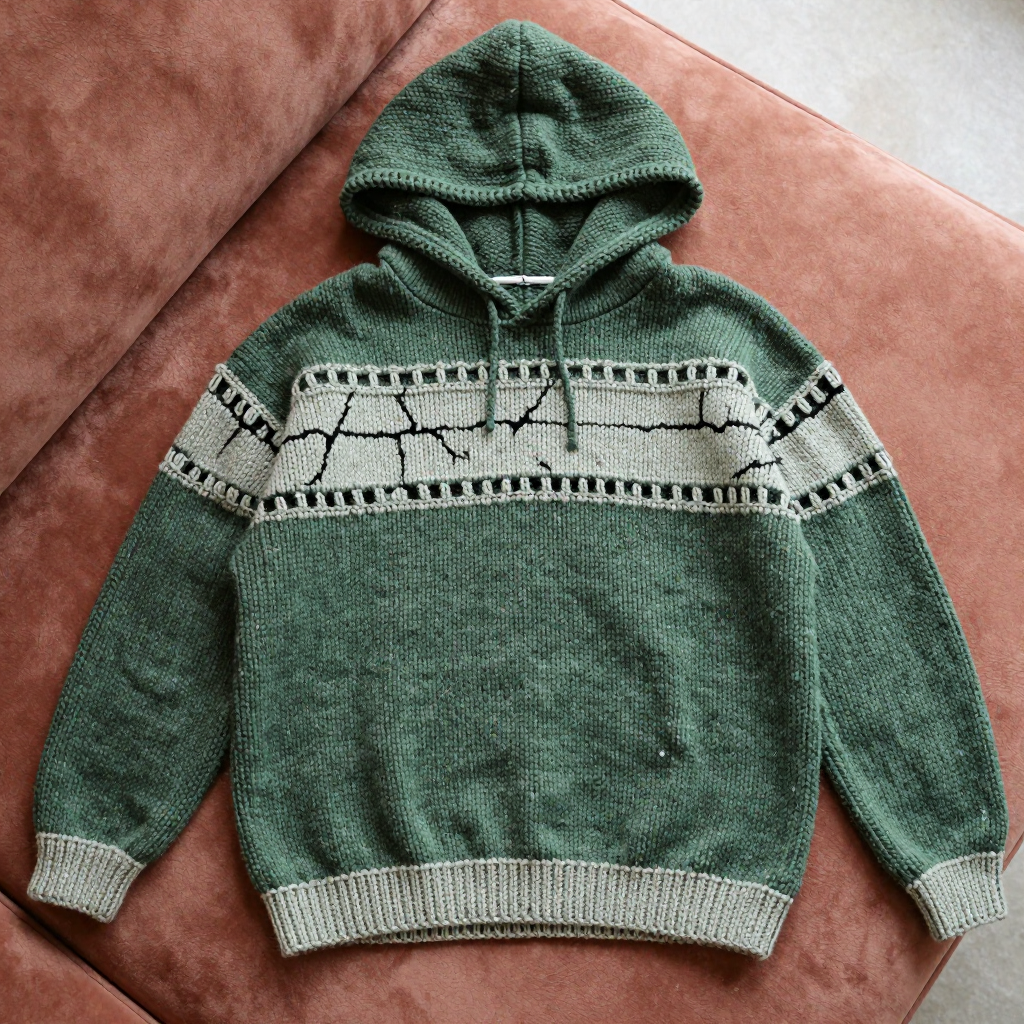
If you have never knitted a stitch in your life, this is the project that will make you fall in love with yarn. The Parched Earth Drop Hoodie is built from two big, flat rectangles (a front and a back) and two straight sleeve tubes, so there is no complicated shaping to fear. What makes it special is the "crackle band": rows of long, dropped yarn overs that look like sun-baked desert earth splitting into beautiful horizontal cracks. Knitted in moss-green and pale sage-grey tweed wool, the finished hoodie is boxy, roomy, and softly structured, with a matte, woolly surface flecked with lighter fibres. It feels like wearing a warm, earthy hug, and it looks far more advanced than it is.
Materials Needed
- Yarn: Worsted-weight tweed wool (approx. 200 yd / 183 m per 100 g skein). You need 4 skeins in Moss (MC), a deep olive-green tweed, and 3 skeins in Lichen (CC), a pale sage-grey tweed. Total approx. 680 yd / 620 m for size M.
- Main needle: US 8 (5.0 mm) circular needle, 32 in / 80 cm long. (You knit flat on a circular needle because it holds many stitches comfortably.)
- Sleeve needles: US 8 (5.0 mm) double-pointed needles (a set of 4 or 5 short needles), or use the magic loop method with a long circular needle.
- Spare needle: One needle one size smaller (US 7 / 4.5 mm) for catching dropped stitches.
- Stitch markers: At least 4, to mark the beginning of rounds and the sides.
- Stitch holders or a second circular needle: For holding the neck and hood stitches.
- Tapestry needle: A large, blunt sewing needle for seaming and weaving in ends.
- Scissors: Sharp, for cutting yarn.
- Finished size (shown in M): Bust 40 (44, 48, 52) in / 102 (112, 122, 132) cm; length 24 (25, 26, 27) in / 61 (64, 66, 69) cm. Designed with 6–8 in / 15–20 cm of positive ease (extra roominess).
Abbreviations and Beginner Glossary
- st / sts – stitch / stitches. One "stitch" is one loop of yarn on your needle.
- k – knit. Insert the right needle into the front of the stitch from left to right, wrap yarn around, and pull a new loop through.
- p – purl. Insert the right needle into the front of the stitch from right to left, wrap yarn around the front, and pull a loop through to the back.
- yo – yarn over. Wrap the yarn once around the right needle to create an extra loop. This makes a hole (a "float") that we later drop.
- RS / WS – right side / wrong side. The RS is the outside of the hoodie that everyone sees; the WS is the inside.
- MC / CC – main colour (Moss) / contrast colour (Lichen).
- beg – beginning.
- rep – repeat. Do the same instruction again.
- dec – decrease. Reduce the stitch count by working two stitches together as one.
- inc – increase. Add a stitch (here, knit into the front and back of the same stitch).
- rnd / rnds – round / rounds. One complete circle of knitting when working in the round (in a tube).
- bind off – the way to finish an edge so stitches don't unravel. Knit two stitches, then lift the first over the second and off the needle; repeat across.
- cast on – the very first step: creating the starting loops on your needle.
- stockinette stitch – knit on RS rows, purl on WS rows. Flat fabric with smooth "V" shapes on the front.
- garter stitch – knit every stitch on every row. Gives a bumpy, stretchy fabric.
- three-needle bind-off – joining two sets of live stitches by knitting them together and binding off at the same time.
- pick up and knit – inserting the needle into an edge and knitting new stitches from it.
Gauge
16 sts and 22 rows = 4 in / 10 cm in stockinette stitch on US 8 (5.0 mm), after blocking. Each drop-stitch crackle band measures approx. 1.5 in / 4 cm tall.
Why gauge matters: Gauge is how many stitches fit into one inch. If your stitches are bigger than ours, your hoodie will come out too large; if smaller, too tight. How to swatch: Cast on 24 sts and knit 30 rows in stockinette. Lay it flat, gently stretch it, and count how many stitches fit across 4 in / 10 cm. If you have more than 16, go up a needle size; if fewer, go down. Always measure after blocking, because wool relaxes when washed.
Beginner Tips Before You Start
- Use stitch markers generously. Place one at the beginning of every round and one at each side seam so you always know where you are.
- Do not pull your yarn too tight. Tension should feel relaxed. Tight stitches make the drop-stitch floats impossible to drop cleanly.
- Drop the yarn overs slowly. On Row 2 of each crackle band, let each yo slide off the needle and stretch out gently with your fingers before you purl the next stitch.
- Count your stitches after every crackle band. The stitch count should never change during a crackle band.
- Keep a spare smaller needle nearby. If a float slips too far, you can catch it easily with the US 7 needle.
- Work a small practice crackle band first. Cast on 14 sts and work the 4-row Crackle Band once to learn the motion before starting the real panels.
Step-by-Step Instructions
Crackle Band Stitch Guide (worked over a multiple of 4 sts + 2)
Row 1 (RS): With CC, k1, *yo, k1; rep from * to last st, k1.
Row 2 (WS): With CC, purl all sts, dropping every yo off the needle to create long floats.
Row 3: With MC, knit all sts, catching each long float behind the next stitch (insert the right needle into the float and knit it together with the following stitch).
Row 4: With MC, purl.
These 4 rows form one Crackle Band. The Stockinette Ground is simply knit on RS rows and purl on WS rows in MC.
Back Panel (make 1)
Row 1 (set-up): With MC, cast on 82 (90, 98, 106) sts. (82 [90, 98, 106] sts)
Rows 2–7: Work in stockinette (knit RS, purl WS). (82 [90, 98, 106] sts)
Row 8: Work Crackle Band Row 1. (82 [90, 98, 106] sts)
Row 9: Crackle Band Row 2. (82 [90, 98, 106] sts)
Row 10: Crackle Band Row 3. (82 [90, 98, 106] sts)
Row 11: Crackle Band Row 4. (82 [90, 98, 106] sts)
Rows 12–17: Work 6 rows stockinette. (82 [90, 98, 106] sts)
Rows 18–77: Repeat Rows 8–17 five more times (60 rows total). You now have 6 crackle bands and the piece measures approx. 15 (15.5, 16, 16.5) in / 38 (39, 41, 42) cm from cast-on, ending with a WS row. (82 [90, 98, 106] sts)
Shape armholes — Row 78: Bind off 4 (5, 6, 7) sts, work to end. (78 [85, 92, 99] sts)
Row 79: Bind off 4 (5, 6, 7) sts, work to end. (74 [80, 86, 92] sts)
Rows 80–127: Work even in pattern (continuing crackle bands and stockinette ground) until armhole measures 8 (8.5, 9, 9.5) in / 20 (22, 23, 24) cm, ending with a WS row. (74 [80, 86, 92] sts)
Shape shoulders and neck — Row 128: Bind off 6 (7, 8, 9) sts, work to end. (68 [73, 78, 83] sts)
Row 129: Bind off 6 (7, 8, 9) sts, work to end. (62 [66, 70, 74] sts)
Row 130: Bind off 6 (7, 8, 9) sts, work to end. (56 [59, 62, 65] sts)
Row 131: Bind off 6 (7, 8, 9) sts, work to end. (50 [52, 54, 56] sts)
Place remaining 50 (52, 54, 56) sts on a holder for the hood.
Front Panel (make 1)
Work exactly as for the Back through Row 127 (armhole measures 5 [5.5, 6, 6.5] in / 13 [14, 15, 17] cm), ending with a WS row. (74 [80, 86, 92] sts)
Shape neck — Row 128: Work 28 (31, 34, 37) sts, place center 18 sts on a holder, join a second ball of MC and work to end. (28 [31, 34, 37] sts each side)
Row 129: Dec 1 st at each neck edge. (27 [30, 33, 36] sts each side)
Row 130: Work even. (27 [30, 33, 36] sts each side)
Row 131: Dec 1 st at each neck edge. (26 [29, 32, 35] sts each side)
Row 132: Work even. (26 [29, 32, 35] sts each side)
Row 133: Dec 1 st at each neck edge. (25 [28, 31, 34] sts each side)
Row 134: Work even. (25 [28, 31, 34] sts each side)
Row 135: Dec 1 st at each neck edge. (24 [27, 30, 33] sts each side)
Rows 136–143: Work even until armhole matches the Back. (24 [27, 30, 33] sts each side)
Bind off shoulders: Bind off 6 (7, 8, 9) sts at beg of next 4 rows, working each side separately. (0 sts remaining each side)
Sleeves (make 2)
Rnd 1: With MC and double-pointed needles, cast on 42 (46, 50, 54) sts. Join for working in the round, placing a marker at the beginning of the round. (42 [46, 50, 54] sts)
Rnds 2–7: Work in stockinette (knit every round). (42 [46, 50, 54] sts)
Rnd 8: Crackle Band in the round — yo, k1 around. (42 [46, 50, 54] sts)
Rnd 9: Purl, dropping all yos. (42 [46, 50, 54] sts)
Rnd 10: Knit, catching floats. (42 [46, 50, 54] sts)
Rnd 11: Purl. (42 [46, 50, 54] sts)
Rnds 12–17: Work 6 rnds stockinette. (42 [46, 50, 54] sts)
Rnds 18–77: Repeat Rnds 8–17 five more times (60 rnds total), at the same time increase 1 st each side of the marker every 8th rnd 8 (9, 10, 11) times. (58 [64, 70, 76] sts)
Rnds 78–97: Work even until sleeve measures 18 (19, 20, 21) in / 46 (48, 51, 53) cm from cast-on, ending after a Crackle Band. (58 [64, 70, 76] sts)
Final rnd: Bind off all sts loosely. (0 sts)
Hood
Set-up: Sew shoulder seams. With RS facing and circular needle, pick up and knit 50 (52, 54, 56) sts from the Back holder, 18 sts from the Front neck holder, and 22 (24, 26, 28) sts along each front neck edge. (112 [118, 124, 130] sts)
Rows 1–11: Work in stockinette for 2 in / 5 cm. (112 [118, 124, 130] sts)
Rows 12–15: Work Crackle Band once. (112 [118, 124, 130] sts)
Rows 16–81: Work in stockinette until hood measures 12 (12.5, 13, 13.5) in / 30 (32, 33, 34) cm from pick-up. (112 [118, 124, 130] sts)
Finish: Fold hood in half with RS together and graft or bind off the top edge using the three-needle bind-off. (0 sts)
Assembly and Finishing
Side seams: Lay the Front and Back panels flat with RS together. Thread your tapestry needle with MC and, starting at the armhole, sew a simple running stitch (in and out) down the side edge to the hem, matching row for row. Repeat on the other side.
Sleeve caps: Pin each sleeve into its armhole with RS together, matching the centre of the sleeve to the shoulder seam. Sew around the armhole with a running stitch, easing in any extra fabric. Repeat for the second sleeve.
Weave in ends: Thread each loose yarn tail onto the tapestry needle and weave it in and out through the back of several stitches for about 2 in / 5 cm, then trim. Never knot your ends.
Blocking: Soak the hoodie in cool water for 15 minutes, gently squeeze (never wring) in a towel, then lay flat to the finished measurements. Press gently on the WS with a warm iron over a cloth to open the drop-stitch floats without flattening the tweed texture. Let dry completely.
Optional edging: With CC and the circular needle, pick up and knit 1 st for every bound-off st around the hem and cuffs. Work 2 rnds garter stitch (purl 1 rnd, knit 1 rnd), then bind off loosely. This gives a soft lichen-toned finish that echoes the crackle bands.
Pro Tips and Variations
- Colour play: Swap MC and CC for a bolder look, or use a single colour throughout for a subtle, all-over crackle texture.
- Size adjustments: To make the body wider or narrower, add or subtract 8 sts (two pattern repeats) to the cast-on; this keeps the crackle band maths correct.
- Yarn substitution: Any worsted-weight wool works. Always swatch first, because a smoother yarn will make the drop-stitch floats less crisp than tweed.
- Length: Add or remove 10-row repeats before the armhole shaping to make the hoodie longer or cropped, then re-check your total row count against the gauge.