Prairie Dusk Waffle Stitch Scarf Free Pattern – Country Cotton Men's Knit
Introducing the Prairie Dusk Waffle Stitch Scarf
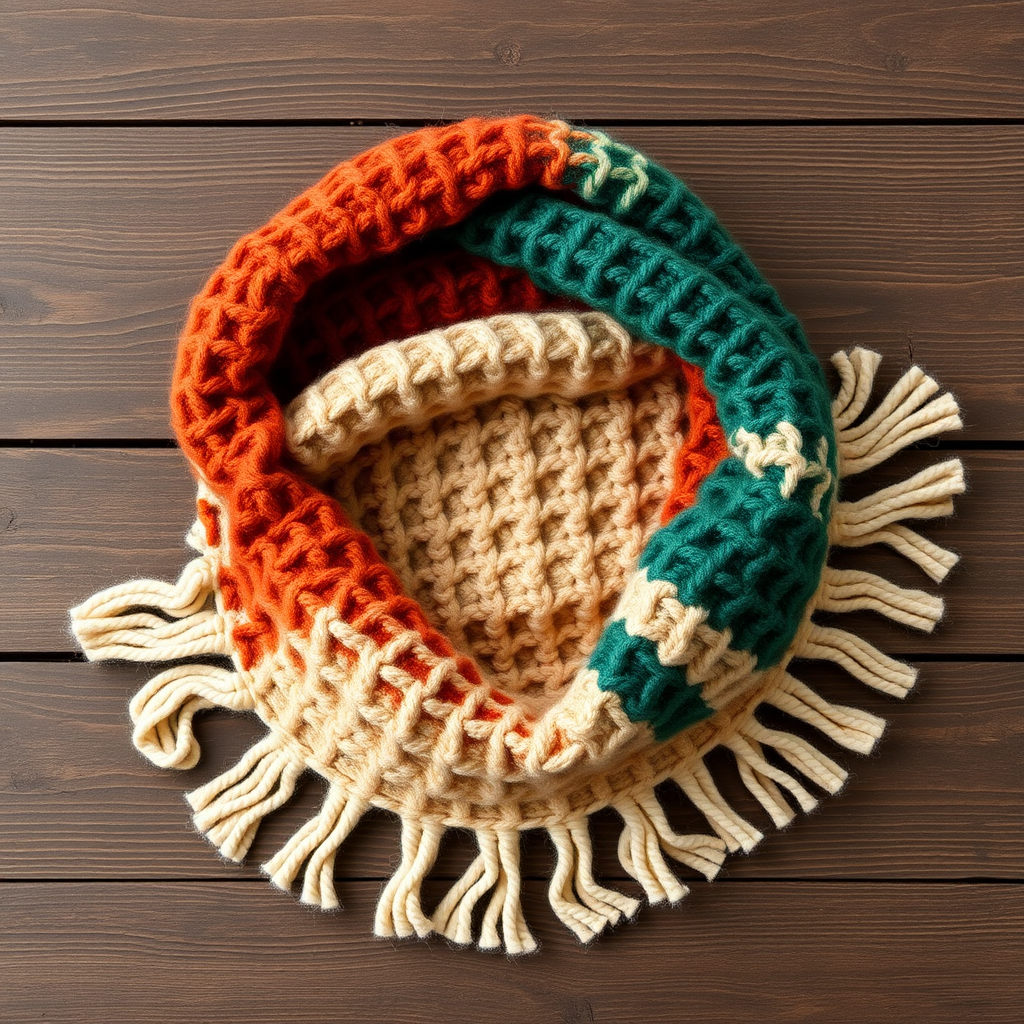
There's something deeply satisfying about a scarf that feels as good as it looks. The Prairie Dusk Waffle Stitch Scarf is exactly that—a rugged, textured knit in soft country cotton that traps warmth without the bulk. Designed with a masculine aesthetic in mind, this scarf features earthy dusk tones that transition from warm oatmeal cream to rich rust orange, and finally to deep forest green. It's the perfect weekend layer for cool autumn evenings, whether you're heading to a farmers market or sitting by a bonfire.
This free pattern is ideal for intermediate knitters looking to expand their stitch repertoire, but it's also accessible to confident beginners who want to tackle a textured pattern. The waffle stitch creates a beautiful grid of raised squares and recessed pockets, giving the scarf a plush, cozy appearance that's both visually striking and wonderfully functional.
Materials Needed
Before you begin, gather the following materials to ensure a smooth knitting experience:
- Yarn: Lion Brand 24/7 Cotton (worsted weight, 100% cotton) in Oatmeal, Rust, and Forest Green – 2 skeins each
- Needles: US 7 (4.5 mm) knitting needles
- Notions: Tapestry needle for weaving in ends and attaching fringe
- Crochet hook: (optional, for fringe attachment)
Gauge: 20 stitches and 28 rows = 4 inches in waffle stitch (blocked). Be sure to check your gauge before starting to ensure your scarf matches the finished measurements.
Finished Size & Stitch Abbreviations
Finished Size: 8 inches wide x 72 inches long (including fringe)
Stitch Abbreviations:
- K = knit
- P = purl
- Sl = slip stitch purlwise
- Yo = yarn over
- K2tog = knit two together
Waffle Stitch Pattern
This pattern uses a multiple of 3 + 2 stitches. Here's the stitch repeat you'll be working with:
- Row 1 (RS): K2, *P1, K2; repeat from * to end.
- Row 2 (WS): P2, *K1, P2; repeat from * to end.
- Row 3: K2, *Yo, K2tog, K1; repeat from * to end.
- Row 4: Purl all stitches.
Repeat rows 1-4 for the pattern. The combination of knit and purl stitches creates the waffle texture, while the yarn over and knit two together in row 3 add the subtle eyelet detail that gives the fabric its dimensional quality.
Step-by-Step Instructions
Getting Started
Step 1: With Oatmeal yarn, cast on 38 stitches loosely. A loose cast-on is essential here—if your cast-on is too tight, the edges of your scarf will pucker and prevent the waffle pattern from lying flat. Consider using a larger needle for the cast-on row if you tend to knit tightly.
Knitting the First Section (Oatmeal)
Step 2: Work in the waffle stitch pattern for 24 inches, ending with a row 4. This means you'll complete the full 4-row repeat multiple times until your piece measures 24 inches from the cast-on edge. Remember to end on a row 4 (purl row) so that your color transition happens on the right side of the work.
Pro tip: Place a stitch marker or a piece of contrasting thread at the 24-inch mark so you know exactly when to stop. Measure your work flat, without stretching it.
Transitioning to the Rust Section
Step 3: Cut the Oatmeal yarn, leaving a 6-inch tail for weaving in later. Attach the Rust yarn at the beginning of the next row. To avoid a visible jog in your color change, you can start the new color at the beginning of a right-side row. Continue working in the waffle stitch pattern with Rust for 24 inches, again ending with a row 4.
Pro tip: When joining a new color, leave a tail long enough to weave in securely—at least 6 inches. You can also twist the old and new yarns together on the wrong side for the first stitch to prevent gaps.
Knitting the Final Section (Forest Green)
Step 4: Cut the Rust yarn, leaving a 6-inch tail. Attach the Forest Green yarn and continue in the waffle stitch pattern for 24 inches, ending with a row 4. This completes the main body of the scarf.
Binding Off
Step 5: Bind off loosely in pattern. This means you'll bind off following the stitch pattern—knit the knit stitches and purl the purl stitches as you bind off. A loose bind-off is crucial to match the flexibility of your cast-on edge. If you find your bind-off is too tight, use a needle one size larger for this row.
Weaving in Ends
Step 6: Thread your tapestry needle with the yarn tails from your color changes and cast-on/bind-off edges. Weave each tail through the wrong side of the work, following the path of the stitches to hide them completely. Weave in at least 2-3 inches of yarn to ensure the ends don't work their way out with wear. Trim any excess yarn.
Adding the Fringe
The fringe is what gives this scarf its rustic, handcrafted charm. Here's how to create it:
Step 7: Cut 12-inch strands of each color. You'll need enough strands to create fringe clusters every 2 stitches along both short ends of the scarf. For a scarf that's 38 stitches wide, you'll have approximately 19 fringe clusters per end.
Step 8: For each fringe cluster, fold 3 strands in half. Insert your crochet hook through the edge stitch from the wrong side to the right side. Pull the folded loop of the strands through the edge stitch. Then, pull the loose ends through the loop and tighten gently. This creates a secure fringe knot.
Step 9: Place fringe every 2 stitches along both short ends. For a cohesive look, you can alternate colors or use all three colors in each cluster. The pattern suggests using strands of each color, so you might mix Oatmeal, Rust, and Forest Green in each cluster for a blended effect, or keep them uniform for a cleaner look.
Step 10: Trim fringe evenly to 4 inches. Lay the scarf flat and use sharp scissors to trim all fringe ends to the same length. A rotary cutter and cutting mat can also work well for this step if you have them.
Finishing Touches
Step 11: Block the scarf gently by wetting it and laying it flat to dry. This is an essential step for cotton yarn—it helps even out the stitches, relaxes the fabric, and ensures your scarf reaches its proper measurements. Here's how to do it:
- Fill a sink or basin with cool water and add a drop of mild detergent.
- Submerge the scarf and let it soak for 15-20 minutes. Don't agitate or wring—this can felt cotton.
- Gently press out excess water, then roll the scarf in a clean towel to remove more moisture.
- Lay the scarf flat on a blocking mat or dry towel, shaping it to the correct measurements (8 inches wide x 72 inches long including fringe).
- Pin the edges if needed to help them lie flat, and let it dry completely before wearing.
Wearing and Caring for Your Scarf
Once your Prairie Dusk Waffle Stitch Scarf is complete and blocked, it's ready to wear. The 100% cotton yarn makes it breathable yet warm—perfect for transitional weather. The waffle stitch creates natural pockets of air that trap body heat, making this scarf surprisingly warm for its weight.
To care for your scarf, hand wash in cool water with mild detergent and lay flat to dry. Cotton can shrink if washed in hot water or dried on high heat, so always err on the side of gentle care. With proper maintenance, this scarf will be a staple in your wardrobe for years to come.
Happy knitting! We'd love to see your finished Prairie Dusk Waffle Stitch Scarf—share your creation on social media with the hashtag #PrairieDuskScarf and inspire other knitters in the community.