Frostfire Nordic Mittens Free Pattern – Knit with Lush Cables and Fair Isle
Frostfire Nordic Mittens Free Pattern – Knit with Lush Cables and Fair Isle
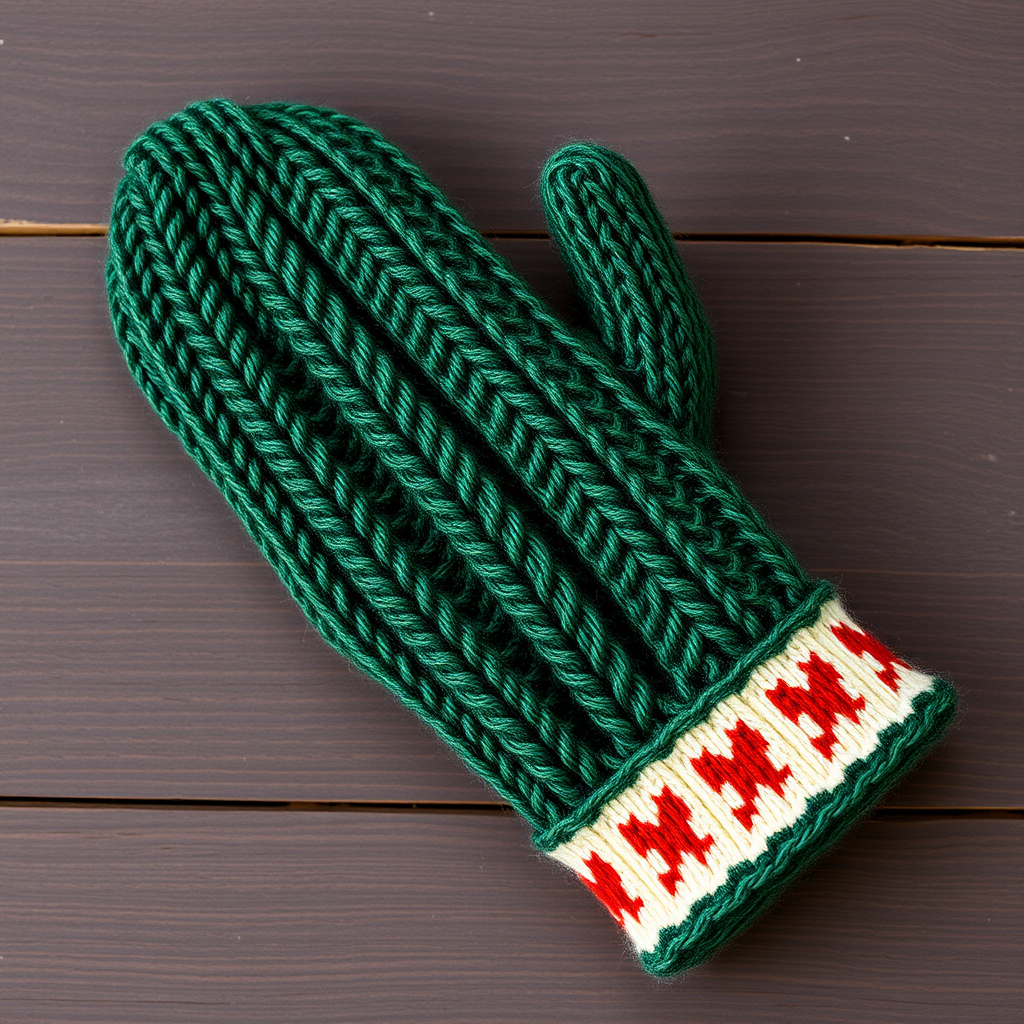
Wrap your hands in the cozy embrace of these Nordic-inspired mittens, featuring a lush cable panel and a vibrant Fair Isle cuff. This free pattern offers a modern twist on a classic winter essential, perfect for keeping the chill at bay in style. Whether you're a seasoned knitter looking for a rewarding project or a brave beginner ready to tackle cables and colorwork, these mittens are a delightful way to create a handmade treasure that is both functional and beautiful.
The rich deep forest green base, accented with cream and rust orange, evokes a sense of winter woodland. The central braided cable adds texture and warmth, while the Fair Isle cuff provides a pop of color and a nod to traditional Nordic craftsmanship. Let's dive into this project and create a pair of mittens that will be the envy of every cozy gathering.
Materials Needed
Before you begin, gather all your materials. Having everything ready will make your knitting experience smooth and enjoyable.
- Yarn: Worsted weight yarn in 3 colors:
- Main Color (MC): Deep Forest Green – approximately 150 grams (300 yards)
- Contrast Color 1 (CC1): Cream – approximately 20 grams (40 yards)
- Contrast Color 2 (CC2): Rust Orange – approximately 20 grams (40 yards)
- Needles:
- US 6 (4.0 mm) double-pointed needles (or circular for magic loop) – for the main body
- US 5 (3.75 mm) double-pointed needles – for ribbing and Fair Isle trim
- Notions:
- Cable needle
- Stitch holders or waste yarn (for thumb)
- Tapestry needle for weaving in ends
- Stitch markers (optional, but helpful)
- Gauge: 20 stitches and 26 rows = 4 inches in stockinette stitch on larger needles. Always check your gauge to ensure a proper fit!
Step-by-Step Instructions
This pattern is for Adult Medium (approx. 8 inches hand circumference, 10.5 inches length). Follow these detailed instructions carefully, and you'll have beautiful mittens in no time.
Abbreviations
- CO: Cast on
- K: Knit
- P: Purl
- K2tog: Knit two together (right-leaning decrease)
- SSK: Slip, slip, knit (left-leaning decrease)
- C4F: Slip 2 stitches to cable needle, hold in front, knit 2, knit 2 from cable needle
- C4B: Slip 2 stitches to cable needle, hold in back, knit 2, knit 2 from cable needle
- M1L: Make one left (increase)
- M1R: Make one right (increase)
- St(s): Stitch(es)
- Rnd: Round
Cuff (Make 2)
We'll start with the ribbed cuff, which provides a snug fit around the wrist.
- Using the smaller needles (US 5) and MC, CO 40 sts.
- Distribute the stitches evenly on 4 double-pointed needles (10 sts each).
- Join in the round, being very careful not to twist your stitches. Place a stitch marker to indicate the beginning of the round.
- Work K2, P2 ribbing for 2.5 inches. This creates a stretchy, comfortable cuff.
Hand (Make 2)
Now we'll switch to the larger needles and begin shaping the thumb gusset.
- Switch to larger needles (US 6).
- Rnd 1: K all sts.
- Rnd 2: K all sts.
- Rnd 3 (Increase Rnd): K1, M1L, K18, M1R, K1 – you now have 42 sts.
- Rnd 4: K all sts.
- Rnd 5 (Increase Rnd): K1, M1L, K20, M1R, K1 – you now have 44 sts.
- Rnd 6: K all sts.
- Continue increasing every other round, working 2 more sts between increases each time (K1, M1L, K22, M1R, K1; then K1, M1L, K24, M1R, K1; and so on).
- Continue this pattern until you have 52 sts total (this means you've completed 6 increases on each side of the thumb gusset).
Cable Panel Setup
Now we'll introduce the beautiful cable pattern that runs down the back of the hand.
- Rnd 1: K1, P2, C4F, P2, K1 (this creates the center 10 sts for the cable), then K the remaining sts.
- Rnd 2: K1, P2, K4, P2, K1, then K the remaining sts.
- Repeat these 2 rounds for 2 inches, while continuing the thumb gusset increases as established (every other round) until you have 56 sts total (the thumb gusset now has 16 sts).
Thumb Opening
Time to separate the thumb from the main hand!
- Place the 16 thumb gusset sts on a stitch holder or waste yarn. These will be worked later.
- CO 2 sts over the gap using the backward loop method. This bridges the thumb and hand sections.
- Continue working the cable pattern across the remaining sts. You now have 42 sts for the hand.
Hand Body
Now we knit the main body of the mitten until it reaches the perfect length.
- Continue in pattern (cable panel on top, stockinette on the rest) until the mitten measures 4 inches from the thumb opening, or until it covers your pinky finger when tried on.
Decreases for Top
We'll now shape the rounded top of the mitten.
- Rnd 1 (Decrease Rnd): K1, P2, C4F, P2, K1 (work the cable as established), then K2tog, K to last 3 sts, SSK, K1 (this decreases 2 sts).
- Rnd 2: K all sts (maintaining the cable pattern as established).
- Repeat these 2 rounds until 20 sts remain.
- Next Rnd: K2tog around – you now have 10 sts.
- Cut yarn, leaving a 6-inch tail. Thread the tail through a tapestry needle, slide it through the remaining 10 sts, pull tight to close the top, and weave in the end securely.
Thumb
Let's finish the thumb!
- Transfer the 16 thumb sts from the holder onto your larger needles.
- Pick up 2 sts from the CO edge at the gap – you now have 18 sts.
- Work in stockinette (knit every round) for 2 inches, or until the thumb is covered when tried on.
- Decrease Rnd: K2tog around – you now have 9 sts.
- Cut yarn, thread through remaining sts, pull tight, and weave in the end.
Fair Isle Cuff Trim (Optional but Stunning)
This final touch adds the vibrant Nordic flair that makes these mittens truly special.
- After completing both mittens, you can add a decorative Fair Isle band at the cuff edge using CC1 and CC2.
- With smaller needles (US 5), pick up 40 sts around the cast-on edge of the cuff.
- Work 4 rounds of Fair Isle pattern:
- Rnd 1: *K1 with CC1, K1 with CC2* repeat around.
- Rnd 2: *K1 with CC2, K1 with CC1* repeat around.
- Repeat Rnds 1 and 2 once more (for a total of 4 rounds).
- Bind off loosely with CC1. Be careful not to bind off too tightly, as this will make the cuff too snug.
Finishing Touches
- Weave in all ends using a tapestry needle. Make sure to secure them well so they don't come loose with wear.
- Block gently to shape. Wet blocking is recommended to even out the stitches and bring out the cable definition. Lay flat to dry.
Congratulations! You've just created a beautiful pair of Frostfire Nordic Mittens. These are perfect for gifting or keeping for yourself. The combination of cables and Fair Isle creates a timeless piece that you'll reach for all winter long. Happy knitting!


