Frosted Pinecone Napkin Ring Free Pattern – Textured Knit Holiday Accent
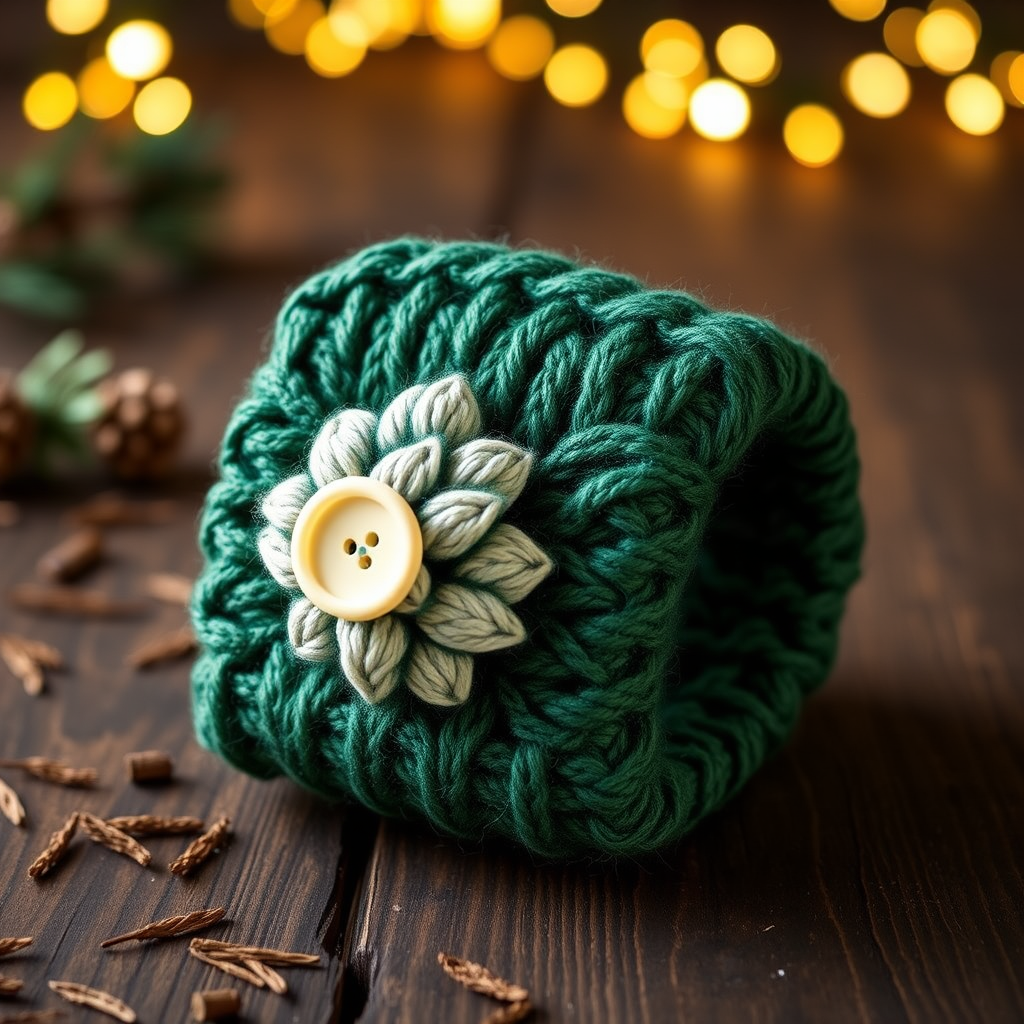
Frosted Pinecone Napkin Ring Free Pattern – Textured Knit Holiday Accent
Wrap your table in woodland charm with these knitted napkin rings, featuring a dimensional pinecone stitch and a soft, snowy white finish. Each ring is a quick, satisfying project that elevates any festive tablescape. Whether you're hosting a cozy Thanksgiving dinner or a sparkling Christmas brunch, these charming rings add a handcrafted touch that store-bought decor simply can't match. Best of all, this pattern is beginner-friendly, works up in an evening, and uses just a few yards of worsted weight yarn—making it the perfect last-minute handmade gift or holiday craft fair staple.
Why You'll Love This Pattern
This pattern combines simple knit and purl stitches with clever increases and decreases to create a richly textured pinecone motif. The result is a dimensional, organic-looking accent that feels both rustic and refined. The button closure makes it practical and adjustable, while the optional hanging loop adds versatility—use these rings for napkins, as ornament toppers, or even as gift tie-ons. Plus, the two-color design (deep forest green with cream detailing) captures the essence of a frosted winter forest.
Materials Needed
Before you begin, gather the following supplies. All items are readily available at craft stores or online.
- Yarn: Worsted weight yarn in two colors:
- Main Color (MC) – Forest Green (approx. 20g per ring)
- Contrast Color (CC) – Cream/White (approx. 10g per ring)
- Needles: US Size 6 (4.0 mm) knitting needles (or size needed to obtain gauge)
- Notions: Tapestry needle for weaving ends, one button (approx. 1/2 inch / 12 mm diameter)
- Optional: Stitch markers (helpful for tracking pattern repeats)
Gauge
20 stitches and 28 rows = 4 inches (10 cm) in stockinette stitch (after blocking). Gauge is important for achieving the correct finished size, but since this is a small project, slight variations won't ruin the piece. If your ring turns out too loose or too tight, adjust needle size accordingly.
Abbreviations
Familiarize yourself with these standard knitting abbreviations before starting:
- K = knit
- P = purl
- K2tog = knit two stitches together (right-leaning decrease)
- M1 = make one (increase) – pick up the horizontal strand between stitches and knit into the back of it
- Sl1 = slip one stitch purlwise (insert needle as if to purl, slip stitch to right needle)
- psso = pass slipped stitch over (after knitting the next stitch, lift the slipped stitch over it and off the needle – a left-leaning decrease)
- YO = yarn over (bring yarn to front, then over needle to back – creates an eyelet hole)
- BO = bind off
Step-by-Step Instructions
Ring Body (Worked Flat)
The ring is knit flat in rows, then seamed and finished with a button closure. Follow these steps carefully for a professional result.
Step 1: Cast On
With MC (Forest Green), cast on 12 stitches using your preferred method (long-tail cast on works well). Leave a 6-inch tail for weaving in later.
Step 2: Establish the Base
Row 1 (RS): Knit all stitches.
Row 2 (WS): Purl all stitches.
Row 3: K1, M1, K10, M1, K1 – you now have 14 stitches.
Row 4: Purl all stitches.
Row 5: K1, M1, K12, M1, K1 – you now have 16 stitches.
Row 6: Purl all stitches.
Step 3: Begin the Pinecone Texture Pattern
This 4-row repeat creates the dimensional pinecone scales. Repeat these rows until the piece measures approximately 4.5 inches (11.5 cm) from the cast-on edge, ending with a WS row (Row 8 or Row 10).
Row 7 (RS): K1, *Sl1, K1, psso, K2tog, M1, K1, M1, K2tog, K1* – repeat from * to * once more, K1. (Stitch count remains 16)
Tip: The Sl1, K1, psso and K2tog are paired decreases that slant toward each other, creating a diamond shape. The M1 increases between them add width for the scale effect.
Row 8 (WS): Purl all stitches.
Row 9 (RS): K1, *K2tog, M1, K1, M1, K2tog, Sl1, K1, psso* – repeat from * to * once more, K1. (Stitch count remains 16)
Note: This row mirrors Row 7, with the decreases and increases swapped in position. This creates the staggered scale pattern.
Row 10 (WS): Purl all stitches.
Continue repeating Rows 7–10 until your work measures 4.5 inches from the cast-on edge. The texture should look like overlapping pinecone scales.
Step 4: Create the Buttonhole
Buttonhole Row (RS): K1, K2tog, YO, K to last 3 stitches, YO, K2tog, K1. (Still 16 stitches – the YO replaces the decreased stitch)
This creates two small eyelets that will serve as the buttonhole. The YO (yarn over) makes a hole, and the K2tog balances the stitch count.
Next Row (WS): Purl all stitches.
Step 5: Decrease for Shaping
Now you'll taper the ring back to its original width for a neat finish.
Row 1 (RS): K1, K2tog, K10, K2tog, K1 – you now have 14 stitches.
Row 2 (WS): Purl all stitches.
Row 3 (RS): K1, K2tog, K8, K2tog, K1 – you now have 12 stitches.
Row 4 (WS): Purl all stitches.
Step 6: Bind Off
Bind off all stitches loosely (use a larger needle or a loose bind-off method to keep the edge stretchy). Cut yarn, leaving a 10-inch tail for seaming. Weave in the cast-on tail.
Pinecone Embellishment (Make 1)
This leaf-shaped piece is the star of the design. It's knit flat and then sewn onto the ring body.
Step 1: Cast On
With MC, cast on 6 stitches.
Step 2: Increase Section
Row 1 (RS): Knit all stitches.
Row 2 (WS): Purl all stitches.
Row 3: K1, M1, K4, M1, K1 – 8 stitches.
Row 4: Purl all stitches.
Row 5: K1, M1, K6, M1, K1 – 10 stitches.
Row 6: Purl all stitches.
Row 7: K1, M1, K8, M1, K1 – 12 stitches.
Row 8: Purl all stitches.
Step 3: Decrease Section
Row 9: K1, K2tog, K6, K2tog, K1 – 10 stitches.
Row 10: Purl all stitches.
Row 11: K1, K2tog, K4, K2tog, K1 – 8 stitches.
Row 12: Purl all stitches.
Row 13: K1, K2tog, K2, K2tog, K1 – 6 stitches.
Row 14: Purl all stitches.
Row 15: K1, K2tog, K2tog, K1 – 4 stitches.
Row 16: Purl all stitches.
Row 17: K2tog twice – 2 stitches.
Row 18: K2tog, cut yarn and pull through the remaining loop. This creates a leaf/pinecone scale shape.
Step 4: Add Scale Details
With CC (Cream/White), thread a tapestry needle. Embroider small straight stitches across the pinecone shape to mimic scale details. Work horizontally across the piece, making 3–4 short stitches per row, spacing them evenly. This creates the "frosted" look. Weave in ends.
Step 5: Attach to Ring Body
Position the pinecone shape in the center of the ring body, overlapping the seam. Sew it securely in place using the tail from the pinecone piece and a whip stitch. Make sure it's centered and lies flat.
Finishing
Step 1: Seam the Ring
Fold the ring so the buttonhole end overlaps the opposite end by about 1 inch (2.5 cm). Using the long tail from the bind-off, sew the short edges together with a mattress stitch or whip stitch, creating a circular band. The buttonhole should be on the outside, facing up.
Step 2: Attach the Button
Sew the button (approx. 1/2 inch) on the inside of the ring, directly opposite the buttonhole. Position it so it aligns with the eyelets when the ring is folded. Use a doubled thread for security, and leave a small shank (space between button and fabric) so it's easy to fasten.
Step 3: Weave in All Ends
Thread any remaining tails through the tapestry needle and weave them into the wrong side of the work. Trim excess yarn.
Step 4: Block Gently
Soak the finished ring in lukewarm water with a drop of mild soap for 10 minutes. Gently squeeze out excess water (don't wring). Lay flat on a towel, shape the ring into a perfect circle, and allow to dry completely. This evens out the stitches and enhances the pinecone texture.
Step 5: Optional Hanging Loop
For a decorative touch, cut a 6-inch piece of CC yarn. Fold it in half and attach it to the top of the ring (opposite the button) using a simple knot or by sewing it in place. This allows the ring to be hung on a tree branch or hook.
Tips for Perfect Results
- Count your stitches after each pattern row, especially Rows 7 and 9. The decreases and increases can be tricky, but the stitch count should always remain 16.
- Use a lifeline – thread a piece of contrasting scrap yarn through the stitches after completing Row 6. If you make a mistake, you can easily rip back to this point without losing your work.
- Blocking is essential – it transforms the piece, making the pinecone texture pop and the edges lie flat.
- Customize the size – for larger napkins, add one more repeat of Rows 7–10 before the buttonhole row. For smaller rings, remove one repeat.
- Experiment with colors – try burgundy and gold for a classic holiday look, or silver and white for a winter wonderland theme.
Creative Variations
Once you've mastered the basic pattern, try these fun twists:
- Double Pinecone: Make two smaller pinecone embellishments (stop at Row 13) and place them on either side of the ring.
- Felted Version: Use wool yarn and felt the finished ring in the washing machine for a denser, more rustic look.
- Beaded Accents: Thread small wooden beads onto the CC yarn before embroidering the scale details for extra texture.
- Match Your Decor: Create a full set of six or eight rings in coordinating colors for a complete tablescape.
Care Instructions
These napkin rings are durable but should be handled with care. Spot clean with a damp cloth if needed, or hand wash gently and lay flat to dry. Avoid ironing directly on the pinecone motif. Store flat or rolled in a drawer to maintain their shape.
With just a few hours of knitting time, you'll have a beautiful set of napkin rings that will be treasured for years to come. The combination of the textured pinecone stitch, the snowy white detailing, and the natural button closure creates a piece that feels both handmade and high-end. Whether you're making them for your own holiday table or as gifts for loved ones, these Frosted Pinecone Napkin Rings are sure to become a seasonal favorite.
Happy knitting, and may your holidays be filled with warmth, creativity, and the joy of handmade decor!


