Fern Frond Relief Square Free Crochet Pattern: An Art Deco Raised Motif Block
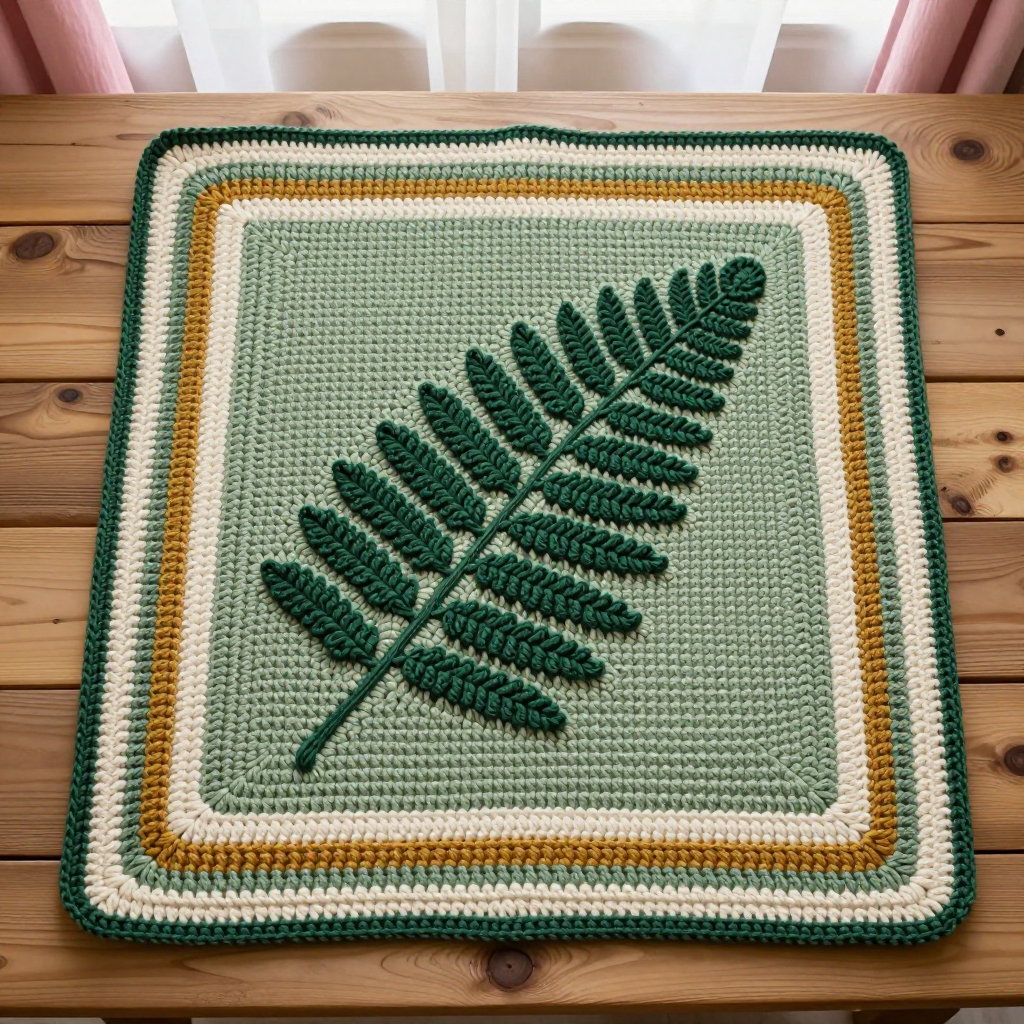
Fern Frond Relief Square: A Beautiful Botanical Block for Your First Real Project
If you have ever admired a crocheted blanket and thought, "I could never make that," this square is for you. The Fern Frond Relief Square is a 6-inch (15 cm) afghan block that looks far more complicated than it actually is, and it is the perfect first "real" project for a complete beginner who has just learned a few basic stitches. It combines a flat sage green background with a raised, sculptural fern frond worked in front-post stitches and clusters, then frames the whole thing in clean, geometric Art Deco borders. The finished square feels soft and slightly bumpy under your fingers, with the fern standing proud of the surface like a tiny bas-relief carving. Best of all, you only need about 55 yards of yarn and a single afternoon to make one, and you will finish with something you are genuinely proud to show off.
Materials Needed
- Yarn: Worsted weight (category 4) acrylic or cotton blend. You will need four colors:
- Color A (sage green): approximately 25 yards
- Color B (deep forest green): approximately 15 yards
- Color C (antique gold): approximately 10 yards
- Color D (cream): approximately 5 yards
- Crochet hook: Size I/9 (5.5 mm), or whatever size you need to match gauge.
- Stitch marker: 1 removable stitch marker (or a scrap of contrasting yarn tied in a loop).
- Tapestry needle: A blunt-tipped needle with a large eye, for weaving in ends.
- Scissors: Any small, sharp pair.
- Finished size: 6 inches x 6 inches (15 cm x 15 cm) after blocking.
Abbreviations and Beginner Glossary
Do not worry if these look like a secret code. Every single one is explained below in plain English. Read through this list once before you begin, and keep it open beside you as you work.
- ch – chain. Make a loop with your yarn, then pull a new loop through it. Each loop you pull through is one chain. Chains are the foundation you build on.
- sl st – slip stitch. Insert your hook into the stitch, yarn over, and pull the loop straight through both the stitch and the loop already on your hook. It makes an almost invisible join.
- sc – single crochet. Insert hook into stitch, yarn over, pull up a loop (2 loops on hook), yarn over, pull through both loops. This is the shortest, tightest basic stitch.
- hdc – half double crochet. Yarn over first, insert hook into stitch, yarn over, pull up a loop (3 loops on hook), yarn over, pull through all 3 loops at once.
- dc – double crochet. Yarn over, insert hook into stitch, yarn over, pull up a loop (3 loops on hook), yarn over, pull through 2 loops, yarn over, pull through last 2 loops.
- FPdc – front post double crochet. Instead of putting your hook into the top of the stitch, you slide it horizontally around the vertical post of the stitch below, from front to back to front. Then you work a normal double crochet. This is what makes the fern stand up above the fabric.
- FPhdc – front post half double crochet. Same idea as FPdc, but you work a half double crochet around the post instead.
- dc2tog – double crochet 2 together (a cluster). Work the first half of a double crochet in the first stitch (yarn over, insert, pull up loop, yarn over, pull through 2 loops), then start a second double crochet in the next stitch the same way, then yarn over and pull through all 3 loops on your hook. Two stitches become one.
- dc3tog – double crochet 3 together (a cluster). Same as above, but you start three double crochets and pull through all 4 loops at the end. Three stitches become one.
- sp – space. The little gap between stitches.
- st / sts – stitch / stitches.
- beg – beginning.
- yo – yarn over. Wrap the working yarn over your hook from back to front.
- fasten off – cut the yarn a few inches from your work, then pull the tail all the way through the last loop to lock it.
Gauge
Gauge in single crochet: 4 stitches and 4.5 rows = 1 inch. Because the finished square is 6 inches across, that works out to roughly 24 stitches across the width.
Why gauge matters: Gauge is simply how big your stitches come out. If your stitches are bigger than mine, your square will be larger than 6 inches and will not match other squares in a blanket. If they are smaller, it will be too small. The good news is that for this pattern, exact gauge is not critical — the important thing is that your tension is consistent, so the square stays flat and does not ruffle or cup.
How to make a gauge swatch: With Color A and your hook, chain 14. Work 1 single crochet into the second chain from the hook and into each chain across (13 stitches). Work 10 more rows of single crochet. Lay the swatch flat and measure a 1-inch section in the middle with a ruler. Count how many stitches fit in that inch. If you have about 4, you are right on target. If you have more than 4, your stitches are tight — try a larger hook. If you have fewer than 4, your stitches are loose — try a smaller hook.
Beginner Tips Before You Start
- Use your stitch marker. Place it in the very first stitch of each round. When you come back around, you will know exactly where to join and you will never lose your place. Move the marker up each round.
- Do not pull your yarn too tight. Beginners tend to choke the hook. Keep a relaxed, even tension — the yarn should glide, not squeak. Tight stitches make the fern pull the square out of shape.
- Count every round. The stitch counts in parentheses are your safety net. If a round does not match, stop and fix it before moving on. It is much easier to fix one round than to discover a mistake five rounds later.
- Keep the fern loose and proud. When you work the front-post stitches, do not yank them down flat. Let them sit slightly above the base fabric — that raised look is the whole point of this design.
- Work the fern with the right side facing you. The base circle has a smooth "right side" (the side facing out as you worked in the round). Keep that side toward you so the fern sits on the front.
- Take breaks. Front-post stitches use slightly different hand movements than regular stitches. If your hand cramps, stop, stretch, and come back. This is a marathon, not a sprint.
Step-by-Step Instructions
Part 1: The Base Square (Color A)
The base is worked in joined rounds — meaning each round ends by joining back to the beginning with a slip stitch, then you start the next round fresh. This keeps the circle perfectly flat.
Round 1: With Color A, ch 4, join with sl st to form a ring. Ch 1, work 12 sc into the ring, join with sl st to first sc. (12 sc)
Round 2: Ch 1, work 2 sc in each st around, join with sl st to first sc. (24 sc)
Round 3: Ch 1, [sc in next st, 2 sc in next st] around, join with sl st to first sc. (36 sc)
Round 4: Ch 1, [sc in next 2 sts, 2 sc in next st] around, join with sl st to first sc. (48 sc)
Round 5: Ch 1, [sc in next 3 sts, 2 sc in next st] around, join with sl st to first sc. (60 sc)
Round 6: Ch 1, [sc in next 4 sts, 2 sc in next st] around, join with sl st to first sc. (72 sc)
Round 7 (square shaping): Ch 1, sc in next 8 sts, [2 sc in next st, sc in next 8 sts] around, join with sl st to first sc. (80 sc) Fasten off Color A.
Note: The base is a flat circle. The square corners are formed in the border rounds later. Place your stitch marker at the center of one side to orient the fern.
Part 2: The Raised Fern Frond (Color B)
The fern is worked as a continuous meandering line of raised stitches across the center of the square, from the lower left toward the upper right, with paired leaflets branching off. You will work over the base fabric, anchoring each stitch around the post of a base stitch. Each row is turned at the end, so you are working back and forth in short rows on top of the circle.
Row 1 (stem): Join Color B with sl st around the post of the 10th sc from the marker on the lower edge. Ch 2, FPdc around same post, FPdc around next 2 posts, dc2tog over next 2 posts, FPdc around next 3 posts, dc2tog over next 2 posts, FPdc around next 2 posts. Turn. (10 raised sts)
Row 2 (first leaflet pair): Ch 2, FPdc around first FPdc, ch 2, sl st around same post (leaflet tip), FPdc around next 2 FPdc, ch 3, sl st around same post (leaflet tip), FPdc around next 3 FPdc, ch 2, sl st around same post, FPdc around last 2 FPdc. Turn. (leaflets formed)
Row 3 (stem continuation): Ch 2, FPdc around each of next 4 FPdc, dc3tog over next 3 FPdc, FPdc around each of next 4 FPdc. Turn. (9 raised sts)
Row 4 (second leaflet pair): Ch 2, FPdc around first FPdc, ch 3, sl st around same post, FPdc around next 3 FPdc, ch 2, sl st around same post, FPdc around next 2 FPdc, ch 3, sl st around same post, FPdc around last 2 FPdc. Turn. (leaflets formed)
Row 5 (stem taper): Ch 2, FPdc around next 2 FPdc, dc2tog over next 2 FPdc, FPdc around next 2 FPdc, dc2tog over next 2 FPdc, FPdc around last FPdc. Turn. (7 raised sts)
Row 6 (tip): Ch 2, FPdc around next FPdc, dc2tog over next 2 FPdc, FPdc around next FPdc, dc2tog over next 2 FPdc, FPdc around last FPdc. Turn. (5 raised sts)
Row 7 (fiddlehead curl): Ch 4, sl st around last FPdc, ch 3, sl st around same post, ch 2, sl st around same post. Fasten off Color B. (curl formed)
Note: The fern sits raised above the base fabric. Keep tension firm so the frond stands proud without pulling the square.
Part 3: The Art Deco Border
Now we turn the circle into a square and frame it with four concentric border rounds. Each round works single crochet evenly around the perimeter, with 3 sc in each corner to create a crisp 90-degree turn.
Round 8 (Color C, antique gold): Join Color C with sl st in any corner st of the base square. Ch 1, work sc evenly around the perimeter, working 3 sc in each corner to square the circle, join with sl st to first sc. Fasten off Color C.
Round 9 (Color A, sage): Join Color A with sl st in any corner sc. Ch 1, [sc in each st to corner, 3 sc in corner sc] around, join with sl st to first sc. Fasten off Color A.
Round 10 (Color C, antique gold): Join Color C with sl st in any corner sc. Ch 1, [sc in each st to corner, 3 sc in corner sc] around, join with sl st to first sc. Fasten off Color C.
Round 11 (Color D, cream): Join Color D with sl st in any corner sc. Ch 1, [sc in each st to corner, 3 sc in corner sc] around, join with sl st to first sc. Fasten off Color D.
Round 12 (Color A, sage, final edge): Join Color A with sl st in any corner sc. Ch 1, [sc in each st to corner, 3 sc in corner sc] around, join with sl st to first sc. Fasten off Color A. Weave in all ends.
Assembly and Finishing
Weaving in ends: Thread each yarn tail onto your tapestry needle. Turn the square to the wrong side and weave the tail in and out through the backs of several stitches, changing direction once or twice so it cannot work loose. Trim the excess close to the fabric. Do this for every color change — there will be several, and that is normal.
Blocking: Blocking is simply dampening the square and pinning it to its final shape so it dries flat and even. Fill a spray bottle with cool water and mist the square lightly until it is damp but not soaking. Lay it on a towel or blocking mat and pin each corner out to exactly 6 inches (15 cm) from the opposite corner, using rust-proof pins. Gently pin the fern frond so it lies flat and raised, not squashed. Steam gently by holding a steam iron a few inches above the surface — never press the iron directly onto the stitches, especially the raised fern. Allow the square to dry completely before removing the pins, usually overnight.
Joining squares (optional): If you are making a blanket, join finished squares with a simple whipstitch or single crochet seam along the edges, matching corner to corner.
Pro Tips and Variations
- Change the color story. Swap the sage and forest greens for dusty rose and burgundy, or teal and navy, for a completely different mood. Keep the antique gold and cream as your neutral frame — they are what give the block its Art Deco feel.
- Adjust the size. To make a larger square, add one more increase round to the base circle (Round 8 would be [sc in next 5 sts, 2 sc in next st] around) and lengthen the fern by adding two more stem rows before the taper. To make a smaller square, stop the base one round earlier.
- Substitute yarn. This pattern works beautifully in cotton for a crisper, more defined relief, or in a soft acrylic for a squishier blanket. Just check your gauge swatch — cotton tends to crochet a little tighter, so you may need to go up one hook size.
- Make it a set. Work the same square in four different colorways and join them into a pillow front or a baby blanket. The repeating fern motif creates a lovely rhythmic texture across a larger piece.