Emberglow Split Finger Mitts Free Pattern – A Knitted Sunset Ridge Hand Warmer
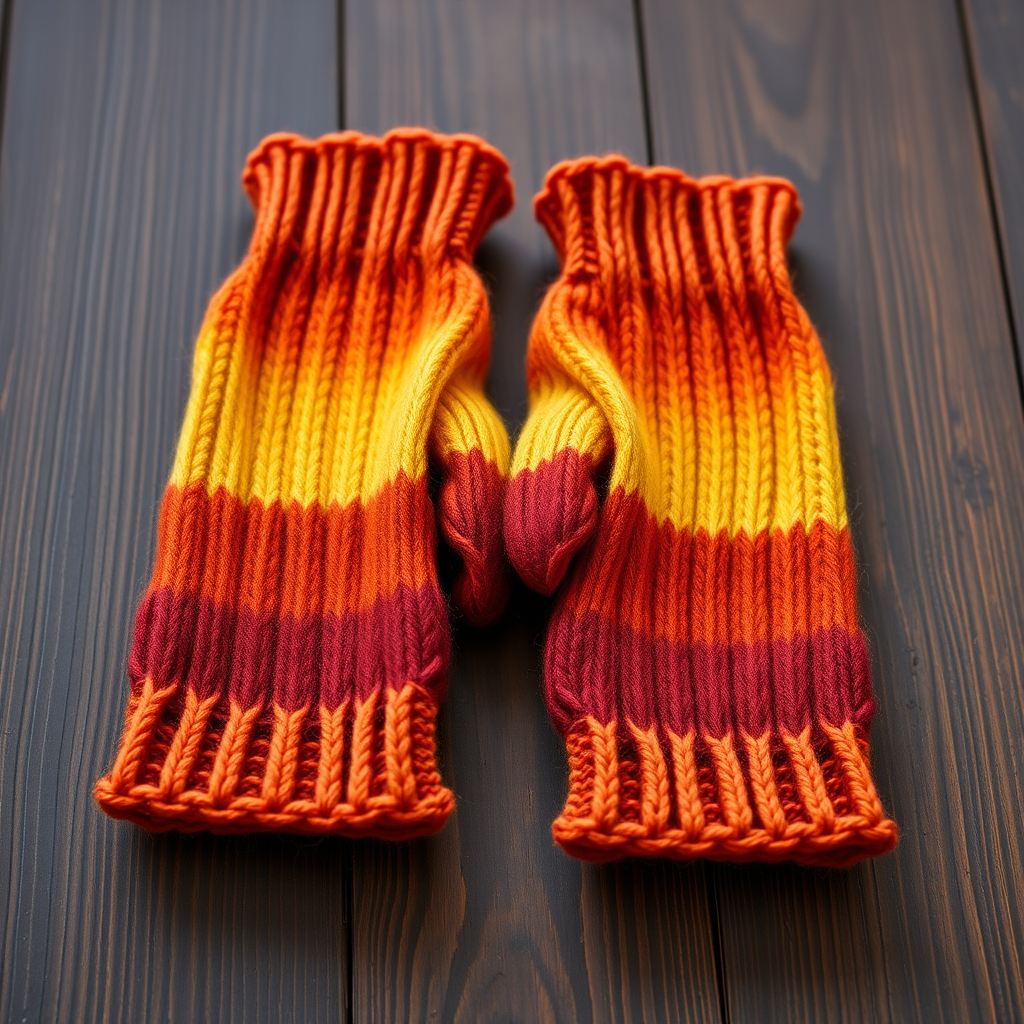
Emberglow Split Finger Mitts: A Free Knitting Pattern for Cozy Autumn Hands
Wrap your hands in the warm hues of a fading autumn sky with these uniquely textured split finger mitts. The clever thumb gusset and finger slits offer dexterity while the gradient yarn creates a stunning ombre effect. This free pattern is perfect for intermediate knitters looking to create a functional, fashionable accessory that captures the essence of a sunset ridge hand warmer.
Whether you're a seasoned knitter or a confident beginner ready for a challenge, these mitts are a rewarding project that combines practical design with artistic colorwork. The split finger construction allows for easy phone use and fingertip sensitivity, while the worsted weight yarn ensures quick, satisfying progress.
Materials Needed
Before you begin, gather the following materials to ensure a smooth knitting experience:
- Yarn: Worsted weight yarn in 3 colors – Color A (burnt orange), Color B (golden yellow), Color C (deep rust) – approximately 200g total. A soft wool or wool-blend yarn works beautifully for warmth and stitch definition.
- Needles: US 6 (4.0 mm) double-pointed needles (or circular needles for magic loop technique)
- Notions: Stitch markers (at least 4), stitch holders (or waste yarn), tapestry needle for weaving in ends, scissors
- Gauge: 22 stitches and 30 rows = 4 inches in stockinette stitch (knit every round)
Pro tip: Always knit a gauge swatch before starting to ensure your mitts fit perfectly. If your gauge is off, adjust your needle size accordingly.
Pattern Overview
Size: Women's Medium (7.5 inch hand circumference)
Abbreviations:
- CO: cast on
- K: knit
- P: purl
- K2tog: knit two together
- SSK: slip slip knit
- M1L: make one left (increase)
- M1R: make one right (increase)
- St(s): stitch(es)
- PM: place marker
- RM: remove marker
- SM: slip marker
Step-by-Step Instructions
Cuff
With Color A (burnt orange), CO 40 stitches. Distribute evenly on 3 double-pointed needles (13, 13, 14 stitches). Join in the round, being careful not to twist your stitches.
Work K1, P1 ribbing for 2.5 inches. This creates a stretchy, snug cuff that will keep the mitts securely in place.
Hand Body
Switch to stockinette stitch (knit every round) and work 2 rounds even. This smooth base will showcase the beautiful gradient color changes.
Thumb Gusset
Now we'll create the thumb gusset – the triangular increase section that provides room for your thumb:
Round 1: K19, PM, M1R, K1, M1L, PM, K20. (42 stitches total)
Round 2: Knit all stitches.
Round 3: K19, SM, M1R, K3, M1L, SM, K20. (44 stitches total)
Round 4: Knit all stitches.
Continue in this manner, increasing 2 stitches every other round, knitting one more stitch between the increases each time. You'll notice the gusset growing between your markers. Keep going until you have 13 stitches between the markers. (52 stitches total on needles)
Understanding the increases: M1R (make one right) and M1L (make one left) are invisible increases that lean in opposite directions, creating a neat, symmetrical gusset. To M1R, pick up the bar between stitches from back to front and knit through the front loop. To M1L, pick up the bar from front to back and knit through the back loop.
Separate Thumb
Next round: K19, RM, place next 13 stitches on a stitch holder (or waste yarn), CO 1 stitch (this creates the underarm bridge), RM, K20. (40 stitches on needles)
You now have the main hand body on your needles and the thumb stitches safely held aside.
Hand Body Continued
Continue in stockinette stitch for 2 inches. Switch to Color B (golden yellow) and knit 2 rounds. The color transition should be smooth and seamless – simply start knitting with the new color at the beginning of a round.
Split Finger Openings
This is where the magic happens – creating the finger slits that give these mitts their unique functionality:
Round 1: K20, place next 20 stitches on a stitch holder (for back of hand).
Now work back and forth on the 20 palm stitches in stockinette stitch for 1.5 inches. End with a wrong side row (purl row). Cut yarn, leaving a tail. Place these 20 stitches on a holder.
Back of Hand: Rejoin Color B to the 20 held back-of-hand stitches. Work back and forth in stockinette stitch for 1.5 inches, ending with a wrong side row.
Why this matters: Working the palm and back of hand separately creates the opening for your fingers to peek through. This split design offers both warmth and dexterity.
Rejoin for Fingers
Next round (right side): K20 from back of hand, then K20 from palm holder. (40 stitches total)
Knit 2 rounds even. Switch to Color C (deep rust) and knit 2 rounds. The gradient is now complete – from burnt orange through golden yellow to deep rust, like a sunset captured in yarn.
Finger Slits
Now we'll create the individual finger openings:
Round 1: K10, place next 10 stitches on a holder (for index finger), CO 2 stitches (bridge), K10, place next 10 stitches on a holder (for ring finger), CO 2 stitches (bridge). (24 stitches on needles: 10 middle + 2 bridge + 10 middle + 2 bridge)
Understanding the construction: You're essentially creating three finger tubes – the middle finger (largest, with 24 stitches), and the index and ring fingers (each with 12 stitches). The cast-on bridges connect the fingers at the base.
Middle Finger
Work on these 24 stitches in the round for 1 inch. Then bind off loosely. Tip: Use a larger needle or a loose bind-off method (like the Russian bind-off) to ensure the finger opening isn't too tight.
Index Finger
Place 10 held stitches on needles. Pick up and knit 2 stitches from the bridge. (12 stitches total)
Knit in the round for 0.75 inch. Bind off loosely.
Ring Finger
Place 10 held stitches on needles. Pick up and knit 2 stitches from the bridge. (12 stitches total)
Knit in the round for 0.75 inch. Bind off loosely.
Thumb
Place 13 held thumb stitches on needles. Pick up and knit 1 stitch from the underarm. (14 stitches total)
Knit in the round for 1 inch. Bind off loosely.
Finishing
Weave in all ends using a tapestry needle. Block gently by wetting the mitts and laying them flat to dry, shaping them to size.
Repeat for second mitt, making sure to mirror the thumb gusset placement. For the second mitt, place the gusset at the beginning of the round instead of after 19 stitches. This ensures you have a left and right mitt that fit properly.
Tips for Success
- Stitch markers are your friends: Don't skip them – they help you track your increases and sections clearly.
- Try on as you go: The beauty of knitting in the round is that you can test the fit as you progress. If the hand feels too tight or loose, adjust your stitch count accordingly.
- Color transitions: When switching colors, knit the first stitch of the new color firmly to avoid gaps. You can also twist the old and new yarns together on the first stitch for a seamless join.
- Loose bind-offs: For all finger openings, use a stretchy bind-off method to ensure comfortable wear.
Why You'll Love These Mitts
These Emberglow Split Finger Mitts are more than just a knitting project – they're a wearable piece of autumn art. The gradient colorway evokes memories of crisp fall evenings, while the split finger design offers practical functionality for everyday tasks. Whether you're sipping hot cider at a pumpkin patch, typing at your desk, or simply enjoying a chilly morning walk, these mitts will keep your hands warm without sacrificing dexterity.
The pattern is thoughtfully designed for intermediate knitters, but confident beginners can absolutely tackle it with patience and attention to detail. The step-by-step instructions break down each section clearly, and the techniques used (gusset increases, split knitting, picking up stitches) are valuable skills to add to your knitting repertoire.
So grab your yarn in sunset hues, settle into your favorite chair, and let the rhythm of the needles carry you through this rewarding project. Your hands – and everyone who admires your handiwork – will thank you.
Happy knitting, and may your days be filled with the warm glow of handmade comfort!


