Celestial Driftwood Garland Free Pattern – A Knitted Starry Night Mobile
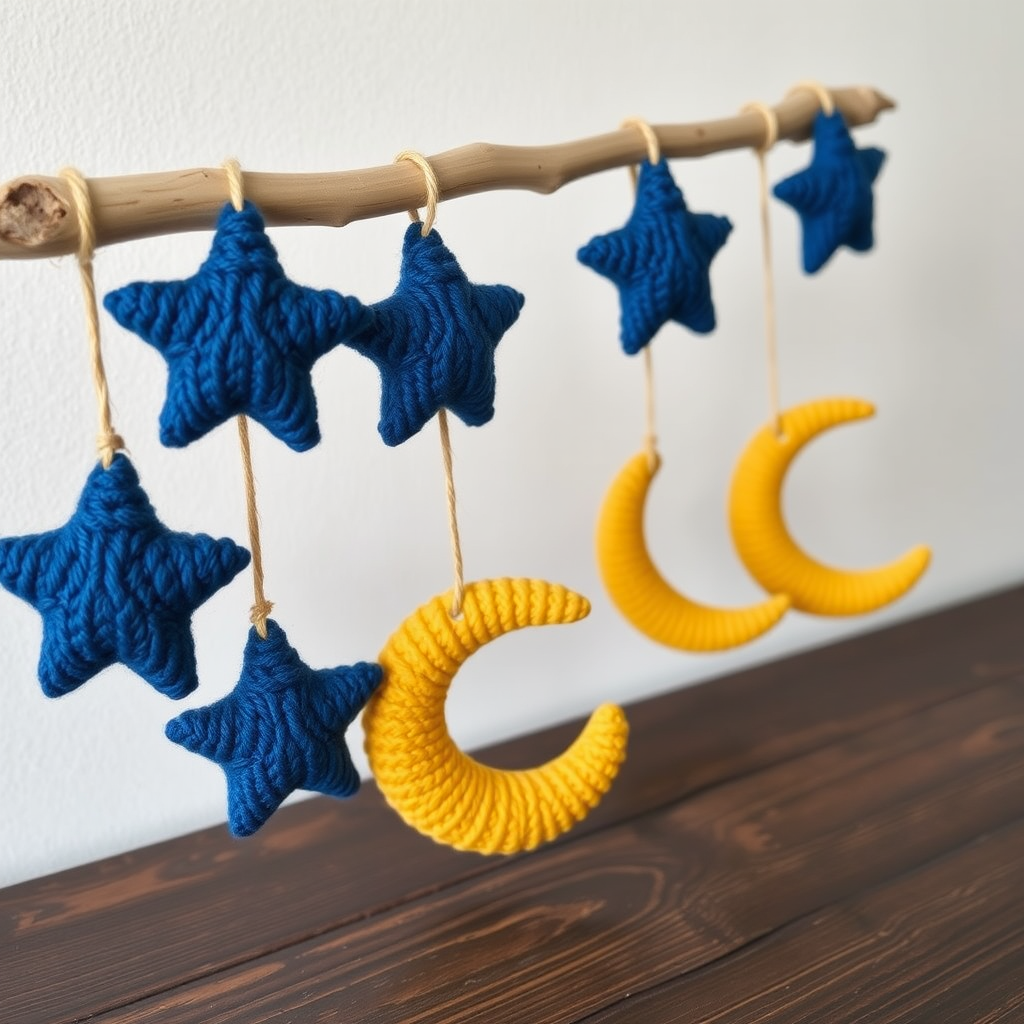
Celestial Driftwood Garland Free Pattern – A Knitted Starry Night Mobile
Bring the quiet magic of a starry night indoors with this enchanting knitted garland of softly textured stars and crescent moons, strung on rustic driftwood. Each celestial charm is crafted from chunky wool-blend yarn in twilight blues and warm golds, creating a dreamy, tactile decoration perfect for nurseries, reading nooks, or festive gatherings. This beginner-friendly project uses simple knit and purl stitches to create plump, 3D shapes that will add a cozy, bohemian touch to any space.
Materials Needed
Before you begin, gather the following supplies to ensure a smooth crafting experience:
- Yarn: Worsted weight wool-blend yarn in three colors:
- Deep Indigo (approx. 50g) – for the stars
- Golden Mustard (approx. 50g) – for the moons
- Soft Silver (optional, for accents or tassels)
- Knitting Needles: US 7 (4.5 mm) knitting needles
- Fiberfill: Small amount of polyester stuffing for the charms
- Tapestry Needle: For seaming and weaving in ends
- Driftwood or Sturdy Twig: Approximately 24 inches long
- Twine or Yarn: 8 pieces, each about 12 inches long, for hanging
- Scissors
Gauge: 20 stitches and 28 rows = 4 inches in stockinette stitch. Gauge is not critical for this project, but maintaining consistent tension will ensure your charms are uniform in size.
Step-by-Step Instructions
Star Motif (Make 5)
Using Deep Indigo yarn, follow these instructions to create each star. The star is worked flat in stockinette stitch, then folded and seamed to create a plump, 3D shape.
- Cast On: Cast on 5 stitches.
- Row 1 (RS): Knit all stitches.
- Row 2: Purl all stitches.
- Row 3: K1, kfb (knit front and back), k1, kfb, k1 — you now have 7 stitches.
- Row 4: Purl all stitches.
- Row 5: K1, kfb, k3, kfb, k1 — 9 stitches.
- Row 6: Purl all stitches.
- Row 7: K2, kfb, k3, kfb, k2 — 11 stitches.
- Row 8: Purl all stitches.
- Row 9: K2, kfb, k5, kfb, k2 — 13 stitches.
- Row 10: Purl all stitches.
- Row 11: K1, k2tog (knit two together), k7, k2tog, k1 — 11 stitches.
- Row 12: Purl all stitches.
- Row 13: K1, k2tog, k5, k2tog, k1 — 9 stitches.
- Row 14: Purl all stitches.
- Row 15: K1, k2tog, k3, k2tog, k1 — 7 stitches.
- Row 16: Purl all stitches.
- Row 17: K1, k2tog, k1, k2tog, k1 — 5 stitches.
- Row 18: Purl all stitches.
- Bind Off: Bind off all stitches loosely. Cut yarn, leaving a long tail (about 12 inches) for seaming.
Finishing the Star:
- Weave in the cast-on tail and the bind-off tail using a tapestry needle, but do not cut the bind-off tail yet — you will use it for seaming.
- Block the star flat by lightly misting with water and pinning it to shape. Allow to dry completely.
- Fold the star in half lengthwise, with the right sides together, so the pointed tips meet.
- Using the long tail, sew the side seams together with a whip stitch, starting from the bottom point and working up to the top. Leave a small opening (about 1 inch) at the center.
- Turn the star right side out through the opening.
- Stuff the star lightly with fiberfill, using a pencil or knitting needle to push the stuffing into the points.
- Sew the opening closed with a ladder stitch or whip stitch. Weave in the end.
- Repeat these steps to create all 5 stars.
Moon Motif (Make 3)
Using Golden Mustard yarn, follow these instructions to create each crescent moon. The moon is worked flat with increases on every right-side row, then folded and seamed to form a crescent shape.
- Cast On: Cast on 3 stitches.
- Row 1 (RS): Knit all stitches.
- Row 2: Purl all stitches.
- Row 3: K1, kfb, k1 — 4 stitches.
- Row 4: Purl all stitches.
- Row 5: K1, kfb, k1, kfb — 6 stitches.
- Row 6: Purl all stitches.
- Row 7: K2, kfb, k2, kfb — 8 stitches.
- Row 8: Purl all stitches.
- Row 9: K3, kfb, k3, kfb — 10 stitches.
- Row 10: Purl all stitches.
- Row 11: K4, kfb, k4, kfb — 12 stitches.
- Row 12: Purl all stitches.
- Row 13: K5, kfb, k5, kfb — 14 stitches.
- Row 14: Purl all stitches.
- Row 15: K6, kfb, k6, kfb — 16 stitches.
- Row 16: Purl all stitches.
- Row 17: K7, kfb, k7, kfb — 18 stitches.
- Row 18: Purl all stitches.
- Row 19: K8, kfb, k8, kfb — 20 stitches.
- Row 20: Purl all stitches.
- Row 21: K9, kfb, k9, kfb — 22 stitches.
- Row 22: Purl all stitches.
- Row 23: K10, kfb, k10, kfb — 24 stitches.
- Row 24: Purl all stitches.
- Row 25: K11, kfb, k11, kfb — 26 stitches.
- Row 26: Purl all stitches.
- Row 27: K12, kfb, k12, kfb — 28 stitches.
- Row 28: Purl all stitches.
- Row 29: K13, kfb, k13, kfb — 30 stitches.
- Row 30: Purl all stitches.
- Bind Off: Bind off all stitches loosely. Cut yarn, leaving a long tail (about 12 inches) for seaming.
Finishing the Moon:
- Weave in the cast-on tail. Keep the bind-off tail for seaming.
- Block the moon flat, then fold it in half lengthwise with the right sides together. The wider end will form the outer curve of the crescent, and the narrower end will form the inner curve.
- Sew along the curved edges using a whip stitch, starting at the narrow end and working toward the wide end. Leave a small opening (about 1 inch) at the center of the curve.
- Turn the moon right side out through the opening.
- Stuff lightly with fiberfill, pushing the filling into the curved ends.
- Sew the opening closed and weave in the end.
- Repeat to create all 3 moons.
Assembly
Now that all your celestial charms are complete, it's time to string them onto the driftwood to create your garland.
- Prepare the Driftwood: Cut a piece of driftwood or a sturdy twig to your desired length (about 24 inches). Ensure it is clean and dry.
- Cut Hanging Strings: Cut 8 pieces of twine or yarn, each about 12 inches long. You will need one for each star and moon.
- Attach Strings to Charms: Thread a tapestry needle with one piece of twine. Insert the needle through the top of a star or moon (at the point where the seams meet) and pull through, leaving a small loop. Tie a secure knot to attach the twine to the charm. Repeat for all 8 charms.
- Attach Charms to Driftwood: Tie the free end of each twine to the driftwood, spacing the charms evenly. For a dynamic look, vary the lengths of the twine so the charms hang at different heights. A typical arrangement might be: star, moon, star, moon, star, moon, star, star — or arrange them however you prefer.
- Trim and Finish: Trim any excess twine ends. Optionally, add a few small knitted beads or tassels between the charms for extra texture and visual interest.
Tips for Success
- Consistent Tension: Keep your tension even throughout to ensure your stars and moons are uniform in size.
- Blocking: Blocking is essential for achieving crisp, defined shapes. Don't skip this step!
- Stuffing: Use small amounts of fiberfill — the charms should be plump but not overstuffed, so they maintain their shape while remaining soft.
- Customization: Feel free to experiment with different yarn colors to match your decor. Soft silver yarn could be used for a few stars to add variety.
Once assembled, hang your Celestial Driftwood Garland in a nursery, above a reading nook, or along a mantelpiece. The soft, handcrafted charm of these knitted stars and moons will bring a touch of dreamy, bohemian magic to any room. Happy knitting!


