Apricot Shell Stitch Crochet Potholder Free Pattern
Apricot Shell Stitch Crochet Potholder – Free Beginner Pattern
Introduction
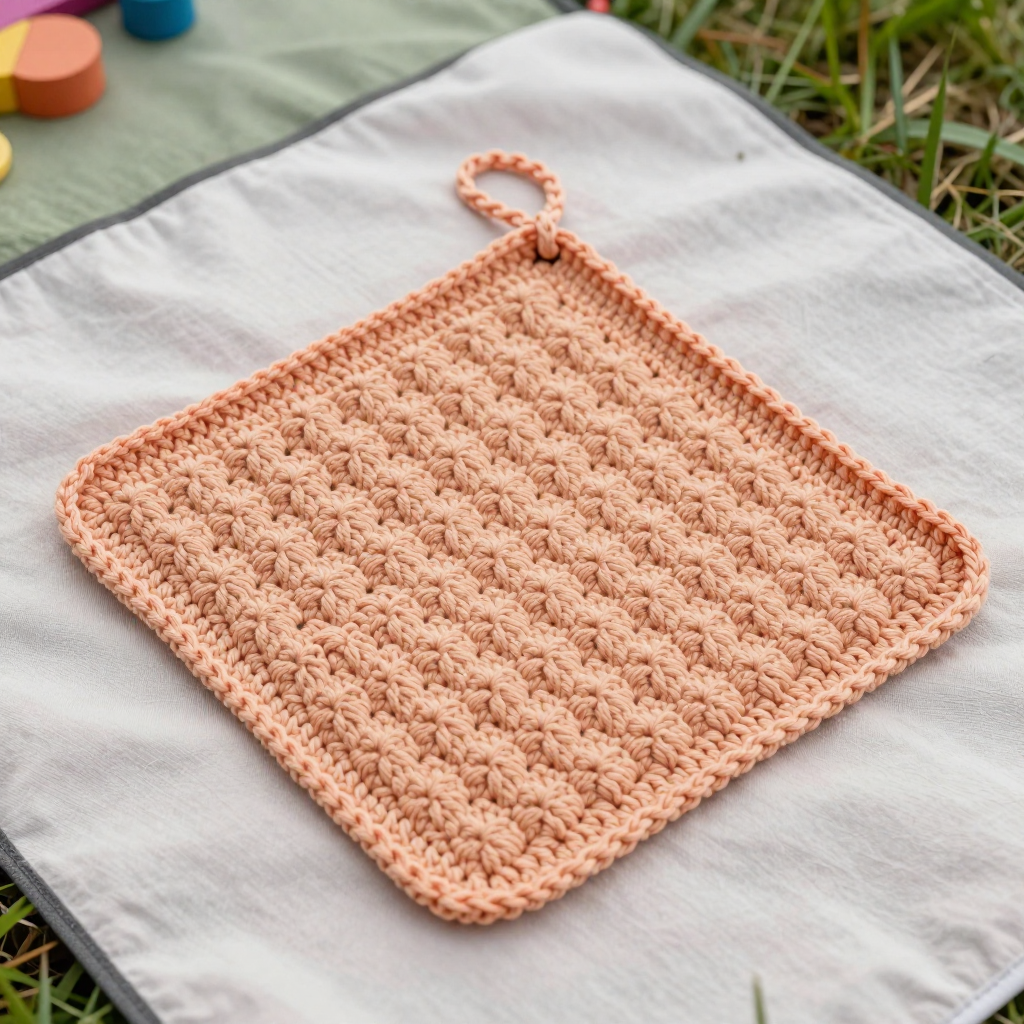
If you have never held a crochet hook before, this is the perfect very first project for you. This cozy little potholder is worked flat in classic shell stitch, which means you only ever repeat two simple rows — and the pattern does all the pretty work for you. It is quick enough to finish in an evening or two, small enough to keep on your lap, and useful enough that you will actually want to use it in your kitchen. The finished piece is a soft, dense 8 x 8 inch square in warm apricot, framed by a peachy shell border with a little hanging loop at one corner. It feels sturdy and slightly textured under your fingers, like a hug for your hands when you lift a hot pan.
Materials Needed
- Yarn: Worsted weight (category 4) 100% cotton yarn, approx. 90 yards total — 65 yards apricot (Color A) and 25 yards peach (Color B). The sample used Lily Sugar 'n Cream in "Apricot" and "Peach." Cotton is important here because it handles heat well and does not melt like acrylic.
- Crochet hook: Size H/8 (5.0 mm), or whatever size gives you the gauge below.
- Stitch markers: At least 4, to mark corners and your first stitch of each round.
- Tapestry needle: A blunt-tipped yarn needle for weaving in ends.
- Scissors: Sharp small scissors for cutting yarn.
- Finished size: Approximately 8 x 8 inches (20 x 20 cm) including the border. The body measures about 7 x 7 inches before the border is added.
Abbreviations and Beginner Glossary
- ch – chain. Make a loop with the yarn, pull the hook through it. Each loop you pull through counts as one chain.
- sc – single crochet. Insert hook into stitch, yarn over (wrap yarn around hook), pull up a loop (2 loops on hook), yarn over again, pull through both loops. One loop remains.
- dc – double crochet. Yarn over, insert hook into stitch, yarn over, pull up a loop (3 loops on hook), yarn over, pull through 2 loops, yarn over, pull through last 2 loops.
- sl st – slip stitch. Insert hook into stitch, yarn over, pull the loop straight through the loop on your hook. No height added — used to join rounds.
- shell – 5 double crochet stitches worked into the same stitch or space. This creates the fan shape.
- sp – space. The gap between stitches, usually under a chain.
- st(s) – stitch(es).
- turn – flip your work over so you can work back the other way.
- yarn over – wrap the working yarn over your hook from back to front.
- fasten off – cut the yarn leaving a 6-inch tail, pull the tail through the last loop, and tighten.
- join with sl st – after working a round, slip stitch into the first stitch of that round to close the circle.
Gauge
Gauge: 1 shell (5 dc) = 1.25 inches wide; 4 rows of shell stitch = 1.5 inches tall.
Why gauge matters: Gauge is how big your stitches turn out. If your stitches are bigger than the pattern's, your potholder will be too large; if smaller, it will be too small. Because this potholder is meant to be a specific 8 x 8 inches, matching gauge keeps it square and useful.
How to make a gauge swatch: Chain 26 and work Rows 1–3 of the body pattern below. Measure across one shell — it should be about 1.25 inches. Measure 4 rows — they should be about 1.5 inches. If your shell is wider, switch to a smaller hook (size G/6, 4.0 mm). If narrower, switch to a larger hook (size I/9, 5.5 mm).
Beginner Tips Before You Start
- Count your shells every row. Every Row 3 should have exactly 4 shells and 5 single crochets. If you lose count, stop and recount before moving on.
- Use a stitch marker in the first stitch of each border round. It is very easy to lose your place when working in the round.
- Do not pull your yarn too tight. Tension should feel relaxed. Tight stitches make a stiff, curled potholder that is hard to work into.
- Keep your turning chain loose. The ch 3 at the start of Row 2 counts as your first double crochet — if it is tight, the edge will pucker.
- Work the border evenly. Along the sides, place one single crochet in each row-end. Do not skip or double up, or the border will wave.
- Cotton has no stretch. That is a good thing for potholders, but it means you cannot tug your work into shape. Let the stitches be.
Step-by-Step Instructions
Main Body (Color A – Apricot)
Note: The potholder is worked flat, back and forth in rows. Turn at the end of every row. Shells sit in the single crochets of the row below, and single crochets sit in the center of each shell below.
Row 1: Ch 26. Sc in 2nd ch from hook, skip next 2 ch, shell (5 dc) in next ch, *skip next 2 ch, sc in next ch, skip next 2 ch, shell in next ch; repeat from * to last 3 ch, skip next 2 ch, sc in last ch. Turn. (4 shells, 5 sc)
Row 2: Ch 3 (counts as first dc), 2 dc in first sc (half shell made), sc in center dc of next shell, *shell in next sc, sc in center dc of next shell; repeat from * across, ending with 3 dc in last sc. Turn. (3 full shells, 2 half shells at the edges, 4 sc)
Row 3: Ch 1, sc in first dc, *shell in next sc, sc in center dc of next shell; repeat from * across, ending with sc in top of turning ch. Turn. (4 shells, 5 sc)
Rows 4–21: Repeat Rows 2 and 3 alternately — that is 9 more times each, ending after a Row 3 repeat. Do not fasten off. (4 shells, 5 sc on each Row 3 repeat)
Check: Your piece should now measure approximately 7 x 7 inches before the border.
Border (Color B – Peach)
Note: Now you will work in the round around the entire outer edge of your square. Place a stitch marker in the first stitch of each round.
Round 1: Ch 1, sc evenly around the entire outer edge — work 1 sc in each stitch along the top and bottom, and 1 sc in each row-end along the sides, with 3 sc in each corner. Join with sl st to first sc. (approx. 84 sc)
Round 2: Ch 1, sc in first sc, *skip next 2 sc, shell (5 dc) in next sc, skip next 2 sc, sc in next sc; repeat from * around, working a shell into each corner sc and adjusting the last repeat so the round ends with a sc. Join with sl st to first sc. Fasten off Color B and weave in ends.
Hanging Loop (Color B – Peach)
Row 1: Join B with sl st to the center sc of one corner shell. Ch 12, sl st back into the same sc to form a loop, then work 14 sc around the chain loop. Join with sl st to first sc. Fasten off and weave in ends securely.
Assembly and Finishing
Weaving in ends: Thread each yarn tail onto your tapestry needle. Turn the potholder to the wrong side (the back). Weave the needle in and out through the backs of several stitches in one direction, then turn and weave back the other way. This locks the tail so it will not work loose in the wash. Trim close to the fabric.
Blocking: Soak the potholder in cool water for 10 minutes, gently squeeze out the water (do not wring), and roll it in a towel to remove excess. Lay it flat on a towel or blocking mat and pin each corner to an 8 x 8 inch square using rust-proof pins. Pat the edges straight. Let it dry completely — usually overnight. This opens up the shell stitches and makes the corners crisp and square.
Optional double thickness: If you plan to use this as a hot pad for very hot pans, make a second identical potholder and single crochet the two together around the outer edge, wrong sides facing, working 1 sc in each stitch around. This doubles the thickness and heat protection.
Pro Tips and Variations
- Change colors: Work the body in any worsted cotton color you love — sage green, dusty rose, or cream — and pick a contrasting border. Two colors make the shell border pop.
- Make it bigger or smaller: To change the size, start with a chain that is a multiple of 6 plus 2. For example, ch 32 for a slightly larger potholder, or ch 20 for a small coaster. Add or remove rows in pairs to keep the shell pattern aligned.
- Substitute yarn: Any worsted weight 100% cotton works. Avoid acrylic for anything that touches hot pans, as it can melt. If you use a thinner cotton, go down a hook size and check your gauge again.
- Add a hanging ring: Instead of a crocheted loop, sew a small metal or wooden ring to one corner with your tapestry needle and matching thread for a different look.