Tulip Bulb Garden Amigurumi Set Free Crochet Pattern
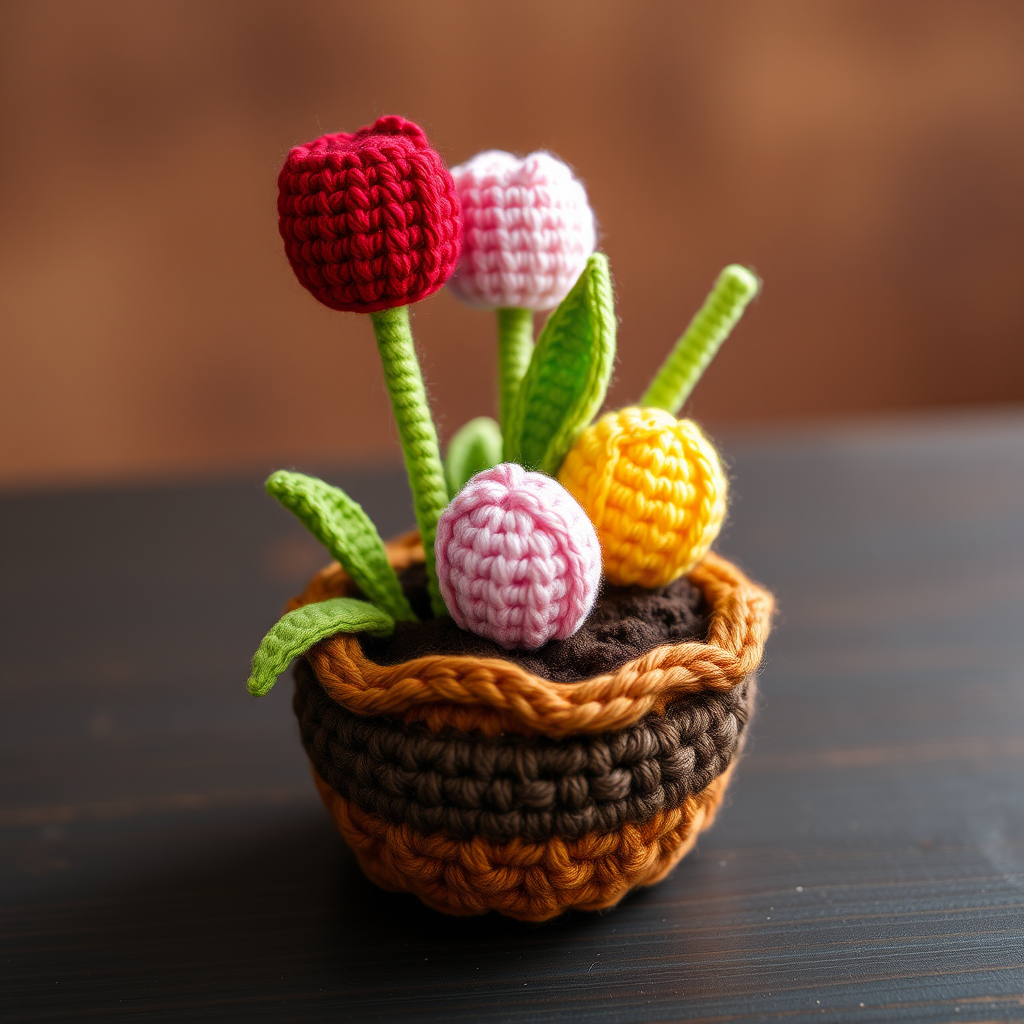
Bring Spring Indoors: Free Crochet Tulip Bulb Garden Amigurumi Pattern
Are you ready to add a permanent touch of spring to your home? This adorable crochet tulip bulb garden amigurumi set is the perfect project for both beginners and experienced crafters. With a cozy terracotta pot, rich dark soil, and three vibrant tulips in red, pink, and yellow, this handmade creation will brighten any shelf, desk, or windowsill—no watering required!
This pattern is worked in continuous spirals, uses basic single crochet stitches, and comes together quickly. Whether you're new to amigurumi or looking for a relaxing weekend project, this tulip garden is sure to delight. Let's gather our supplies and get started!
Materials Needed
Before you begin, make sure you have the following materials on hand. This project uses worsted weight cotton yarn, which gives the tulips a crisp, defined texture and helps them hold their shape beautifully.
Yarn Requirements
- Tulip red – worsted weight cotton yarn (for one tulip bulb)
- Soft pink – worsted weight cotton yarn (for one tulip bulb)
- Sunny yellow – worsted weight cotton yarn (for one tulip bulb)
- Leaf green – worsted weight cotton yarn (for stems and leaves)
- Earthy brown – worsted weight cotton yarn (for the pot)
- Dark brown – small amount for the soil disc
Tools & Notions
- 3.5mm (E) crochet hook
- Stitch marker (to keep track of rounds)
- Yarn needle for sewing and weaving in ends
- Polyester fiberfill stuffing
- Scissors
Gauge: Not critical for this project. However, aim for a tight stitch to prevent the stuffing from showing through. If your stitches are loose, consider using a smaller hook.
Step-by-Step Instructions
This pattern is worked in continuous spirals unless otherwise noted. Always use a stitch marker to keep track of your rounds. Let's begin with the tulip bulbs!
Tulip Bulb (Make 3 – One in Each Color: Red, Pink, Yellow)
Each tulip bulb is shaped like a rounded teardrop with a slightly pointed tip. Follow these instructions for each color.
Round 1: Start with a magic ring. Work 6 single crochet (sc) into the ring. (6 stitches)
Round 2: Work 2 sc in each stitch around. (12 stitches)
Round 3: *Sc in the next stitch, 2 sc in the next stitch* – repeat from * to * around. (18 stitches)
Round 4: *Sc in the next 2 stitches, 2 sc in the next stitch* – repeat from * to * around. (24 stitches)
Rounds 5-7: Sc in each stitch around. (24 stitches)
Round 8: *Sc in the next 2 stitches, sc2tog (single crochet 2 together)* – repeat from * to * around. (18 stitches)
Round 9: *Sc in the next stitch, sc2tog* – repeat from * to * around. (12 stitches)
Stuff the bulb firmly with polyester fiberfill. Make sure it's packed well so the tulip holds its shape.
Round 10: Sc2tog around. (6 stitches)
Fasten off, leaving a long tail (about 12 inches). Thread the tail through a yarn needle, weave it through the front loops of the remaining 6 stitches, pull tight to close the opening, and secure with a knot. Weave in the end.
Tulip Stem and Leaves (Make 3 Stems and 6 Leaves)
Now let's create the stems and leaves that will connect the bulbs to the pot.
Stem (Make 3)
With leaf green yarn:
- Chain (ch) 12.
- Starting in the 2nd chain from the hook, sc in each chain across. (11 stitches)
- Fasten off, leaving a long tail (about 8 inches) for sewing. Set aside.
Leaf (Make 6)
With leaf green yarn:
- Chain (ch) 10.
- Starting in the 2nd chain from the hook, sc in each chain across. (9 stitches)
- Fasten off, leaving a long tail (about 8 inches).
- Shape the leaf: Fold each leaf in half lengthwise (bringing the two long edges together). Sew the edges together using the yarn needle and tail, creating a pointed, elongated leaf shape. Weave in the end.
Pot (Make 1)
This creates a cozy, slightly flared terracotta pot. With earthy brown yarn:
Round 1: Start with a magic ring. Work 6 sc into the ring. (6 stitches)
Round 2: 2 sc in each stitch around. (12 stitches)
Round 3: *Sc in the next stitch, 2 sc in the next stitch* – repeat around. (18 stitches)
Round 4: *Sc in the next 2 stitches, 2 sc in the next stitch* – repeat around. (24 stitches)
Round 5: *Sc in the next 3 stitches, 2 sc in the next stitch* – repeat around. (30 stitches)
Round 6: *Sc in the next 4 stitches, 2 sc in the next stitch* – repeat around. (36 stitches)
Rounds 7-12: Sc in each stitch around. (36 stitches)
Round 13: Working in the back loops only, sc in each stitch around. (36 stitches) – This creates a neat ridge that defines the rim of the pot.
Rounds 14-18: Sc in each stitch around. (36 stitches)
Fasten off and weave in the end.
Soil Disc (Make 1)
This disc sits inside the pot to hold the stems. With dark brown yarn:
Round 1: Start with a magic ring. Work 6 sc into the ring. (6 stitches)
Round 2: 2 sc in each stitch around. (12 stitches)
Round 3: *Sc in the next stitch, 2 sc in the next stitch* – repeat around. (18 stitches)
Round 4: *Sc in the next 2 stitches, 2 sc in the next stitch* – repeat around. (24 stitches)
Round 5: *Sc in the next 3 stitches, 2 sc in the next stitch* – repeat around. (30 stitches)
Round 6: *Sc in the next 4 stitches, 2 sc in the next stitch* – repeat around. (36 stitches)
Fasten off, leaving a long tail (about 12 inches) for sewing.
Assembly
Now comes the fun part—bringing all the pieces together to create your tulip garden!
Step 1: Attach Stems to Bulbs
Using the long tail from each stem, sew the stem to the bottom (the pointed end) of each tulip bulb. Position it centrally so the tulip sits upright. Secure with a few firm stitches and weave in the ends.
Step 2: Attach Leaves to Stems
Take two leaves and sew them to each stem, positioning them about halfway up the stem. Angle them outward slightly for a natural look. Use the leaf tails to sew them securely, then weave in the ends.
Step 3: Place the Soil Disc in the Pot
Insert the soil disc into the pot, pushing it down so it sits snugly at the bottom. Using the long tail from the soil disc, sew it to the pot around the edge. Make sure it's secure so it doesn't shift when you insert the stems.
Pro tip: Before sewing the soil disc completely, you can add a small amount of stuffing underneath it. This will help the stems stand upright and give the garden a fuller look.
Step 4: Insert the Tulip Stems
Insert the three tulip stems into the soil, spacing them evenly apart. Push them down firmly so they stay in place. If needed, add a few extra stitches of dark brown yarn around the base of each stem to secure them.
Step 5: Add Texture to the Soil (Optional)
For a more realistic look, add a few extra stitches of dark brown yarn on the soil surface. This creates a textured, "earthy" appearance that enhances the overall charm.
Your Tulip Bulb Garden Is Complete!
Congratulations! You've just created a beautiful, everlasting tulip bulb garden that will bring a smile to your face all year round. Display it proudly on a shelf, desk, or windowsill, or gift it to a fellow craft lover. The vibrant colors and cozy handmade aesthetic make it a truly special piece.
We'd love to see your finished tulip garden! Share your photos on social media with the hashtag #TulipGardenCrochet and tag us. Happy crocheting!



