The Whimsical Woodland Fawn: A Free Crochet Pattern for a Textured, Heirloom-Quality Baby's First Doll
Introduction: A Cherished Heirloom for Little Hands
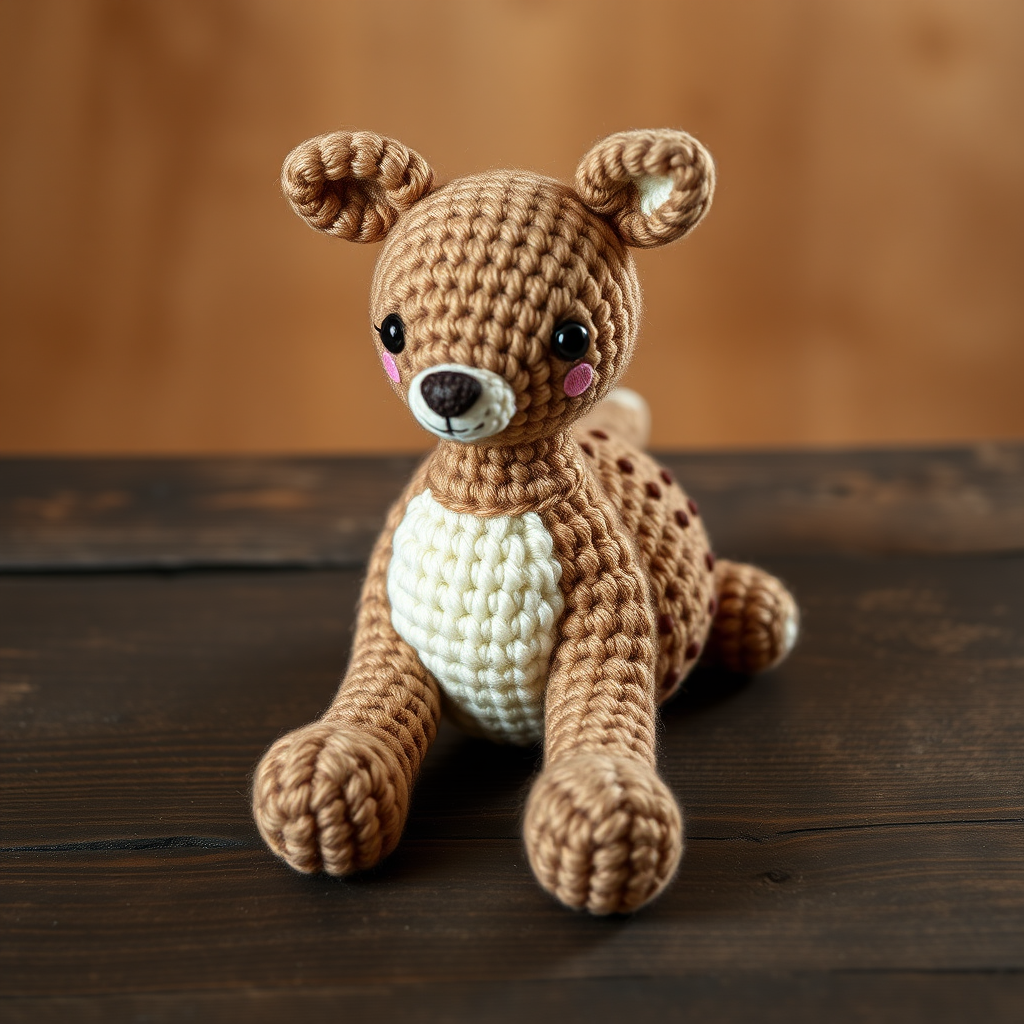
There is something truly magical about creating a toy that will be loved, chewed, hugged, and passed down through generations. This Whimsical Woodland Fawn is more than just a crochet project—it's a labor of love designed to become a baby's first treasured companion. With its gentle, earthy color palette of warm taupe, creamy ivory, and rich chocolate brown, this fawn is crafted to be soft, safe, and utterly huggable. The unique, hand-stitched face gives it a sweet, serene expression that will captivate both baby and parent alike. Whether you are a seasoned amigurumi maker or a confident beginner looking for a rewarding challenge, this free pattern will guide you through every step to create an heirloom-quality doll that will be cherished for years to come.
Materials Needed
Before you begin, gather the following supplies. Using the exact yarn weight and hook size will ensure your fawn turns out the perfect size and texture.
Yarn
- Main Color (MC) - Warm Taupe/Fawn Brown: Approx 150 yards of worsted weight (Category 4) yarn. This is the primary color for the head, body, ears, arms, and legs.
- Accent Color (AC) - Cream/Ivory: Approx 50 yards of worsted weight (Category 4) yarn. Used for the tail and belly (optional, but recommended for a classic fawn look).
- Spot Color (SC) - Dark Chocolate Brown: Approx 20 yards of worsted weight (Category 4) yarn. For the adorable spots on the head and back.
- Embroidery Floss or Small Amounts of Yarn: Black for the eyes, and pink for the nose, mouth, and blush.
Tools & Notions
- Crochet Hook: Size G/6 (4.0 mm). Using this size with worsted weight yarn will create a tight, firm fabric that prevents stuffing from showing.
- Polyester Fiberfill Stuffing: Enough to firmly stuff the head and body, and lightly stuff the limbs.
- Yarn Needle: For sewing pieces together and embroidering the face.
- Stitch Markers: To help keep track of your rounds.
- Scissors: For cutting yarn.
Gauge
Gauge is not critical for this project, but consistency is key. Aim for a tight tension so that the stuffing does not peek through the stitches. A good target is 4 single crochet stitches and 4 rows = 1 inch. If your stitches are looser, try going down a hook size (to 3.5 mm) to achieve a denser fabric.
Step-by-Step Instructions
This pattern is worked in continuous rounds (spiral) unless otherwise stated. Do not join at the end of each round; simply continue around. Use a stitch marker to mark the first stitch of each round.
Abbreviations
- ch = chain
- sc = single crochet
- inc = increase (2 single crochet in the same stitch)
- dec = decrease (single crochet 2 stitches together)
- sl st = slip stitch
- st(s) = stitch(es)
- Rnd = Round
- MC = Main Color (warm taupe)
- AC = Accent Color (cream/ivory)
- SC = Spot Color (dark chocolate brown)
Head (Make 1 - MC)
The head is worked from the top down. Stuff firmly before closing.
- Rnd 1: Make a magic ring, work 6 sc into the ring. (6 sts)
- Rnd 2: Inc in each st around. (12 sts)
- Rnd 3: (Sc in next st, inc) repeat around. (18 sts)
- Rnd 4: (Sc in next 2 sts, inc) repeat around. (24 sts)
- Rnd 5: (Sc in next 3 sts, inc) repeat around. (30 sts)
- Rnd 6-10: Sc in each st around. (30 sts) – This is the straight section that forms the sides of the head.
- Rnd 11: (Sc in next 3 sts, dec) repeat around. (24 sts)
- Rnd 12: (Sc in next 2 sts, dec) repeat around. (18 sts)
- Rnd 13: (Sc in next st, dec) repeat around. (12 sts)
- Stuff firmly: Add stuffing, making sure the head is round and firm. Do not overstuff to the point of distorting stitches.
- Fasten off, leaving a long tail (approx 18 inches) for sewing to the body. Weave the tail through the front loops of the remaining 12 stitches and pull tight to close the hole. Secure with a knot.
Ears (Make 2 - MC)
These are worked flat in the round, then folded and closed.
- Rnd 1: Magic ring, 4 sc in ring. (4 sts)
- Rnd 2: Inc in each st around. (8 sts)
- Rnd 3: Sc in each st around. (8 sts)
- Rnd 4: (Sc in next st, inc) repeat around. (12 sts)
- Rnd 5: Sc in each st around. (12 sts)
- Fold and close: Flatten the ear so the last round is a straight line. Insert your hook through both layers and work sc across to close the opening. This creates a neat, pointed ear shape.
- Fasten off, leaving a tail (approx 8 inches) for sewing.
Body (Make 1 - MC)
The body is worked from the bottom up. Stuff firmly before closing.
- Rnd 1: Magic ring, 6 sc in ring. (6 sts)
- Rnd 2: Inc in each st around. (12 sts)
- Rnd 3: (Sc in next st, inc) repeat around. (18 sts)
- Rnd 4: (Sc in next 2 sts, inc) repeat around. (24 sts)
- Rnd 5-8: Sc in each st around. (24 sts) – This is the straight section that forms the body height.
- Rnd 9: (Sc in next 2 sts, dec) repeat around. (18 sts)
- Rnd 10: Sc in each st around. (18 sts)
- Rnd 11: (Sc in next st, dec) repeat around. (12 sts)
- Stuff firmly: Fill the body with stuffing, shaping it into a plump, slightly pear-shaped form.
- Fasten off, leaving a long tail (approx 18 inches) for sewing to the head. Close the hole as you did for the head.
Legs (Make 2 - MC)
These are worked from the foot up. Stuff lightly to keep them flexible.
- Rnd 1: Magic ring, 6 sc in ring. (6 sts)
- Rnd 2: Inc in each st around. (12 sts)
- Rnd 3-4: Sc in each st around. (12 sts)
- Rnd 5: (Sc in next 2 sts, dec) repeat around. (9 sts)
- Rnd 6-7: Sc in each st around. (9 sts)
- Stuff lightly: Add just enough stuffing to give the leg shape, but keep it soft.
- Fasten off, leaving a tail (approx 10 inches) for sewing.
Arms (Make 2 - MC)
These are worked from the hand up. Stuff lightly.
- Rnd 1: Magic ring, 5 sc in ring. (5 sts)
- Rnd 2: Inc in each st around. (10 sts)
- Rnd 3-4: Sc in each st around. (10 sts)
- Rnd 5: (Sc in next 3 sts, dec) repeat around. (8 sts)
- Rnd 6-7: Sc in each st around. (8 sts)
- Stuff lightly: Add a small amount of stuffing.
- Fasten off, leaving a tail (approx 8 inches) for sewing.
Tail (Make 1 - AC)
A tiny, fluffy tail.
- Rnd 1: Magic ring, 4 sc in ring. (4 sts)
- Rnd 2: Inc in each st around. (8 sts)
- Rnd 3: Sc in each st around. (8 sts)
- Fasten off, leaving a tail (approx 6 inches) for sewing. Do not stuff.
Spots (Make 3-4 - SC)
These are simple, flat circles.
- Rnd 1: Magic ring, 6 sc in ring. (6 sts)
- Fasten off, leaving a tail (approx 6 inches) for sewing. Do not stuff.
Assembly
Now it's time to bring your fawn to life! Use the long tails left from each piece and a yarn needle to sew everything together securely.
- Attach the head to the body: Position the head on top of the body, making sure it is centered. Using the tail from the head, sew around the neck opening, catching stitches from both the head and body. Sew in a circle, pulling gently to secure. Weave in the end.
- Attach the ears: Sew the ears to the top of the head, about 4-5 stitches apart. Position them so they point slightly outward and backward. Use the tail from each ear to sew securely.
- Attach the arms: Sew the arms to the sides of the body, just below the neck. Position them so they hang down naturally. Use the tail from each arm.
- Attach the legs: Sew the legs to the bottom of the body. Position them so the fawn can sit upright (the legs should be slightly forward). Use the tail from each leg.
- Attach the tail: Sew the tail to the back of the body, centered and just above the bottom.
- Attach the spots: Sew the spots randomly on the head and back. Use the tail from each spot, and weave the end inside the doll for a clean finish.
Embroidering the Face
The face is what gives your fawn its sweet personality. Take your time and use small, neat stitches.
- Eyes: Using black embroidery floss or a single strand of black yarn, embroider two small French knots for the eyes. Place them about 4-5 stitches apart, centered on the face, roughly at the level of Rnd 8-9.
- Nose: Using pink embroidery floss or a single strand of pink yarn, embroider a small 'V' shape for the nose. Place it centered below the eyes, about 2-3 rounds down.
- Mouth: From the bottom point of the 'V', embroider a short, straight line downward. This creates a sweet, simple mouth.
- Blush: Using pink yarn, make a tiny, straight stitch (or a small satin stitch) on each cheek, just below and to the side of the eyes. This adds a gentle, rosy glow.
Finishing
Once all pieces are attached and the face is embroidered, weave in all remaining ends securely. Use the yarn needle to hide the tails inside the doll, then trim any excess yarn close to the surface. Give your fawn a gentle squeeze to shape it, and it's ready to be loved!
Congratulations! You have just created a beautiful, heirloom-quality Whimsical Woodland Fawn. This soft, safe, and utterly charming doll is sure to become a beloved companion for years to come.



