The Whimsical Woodland Fawn: A Free Crochet Pattern for a Textured, Heirloom-Quality Baby Toy
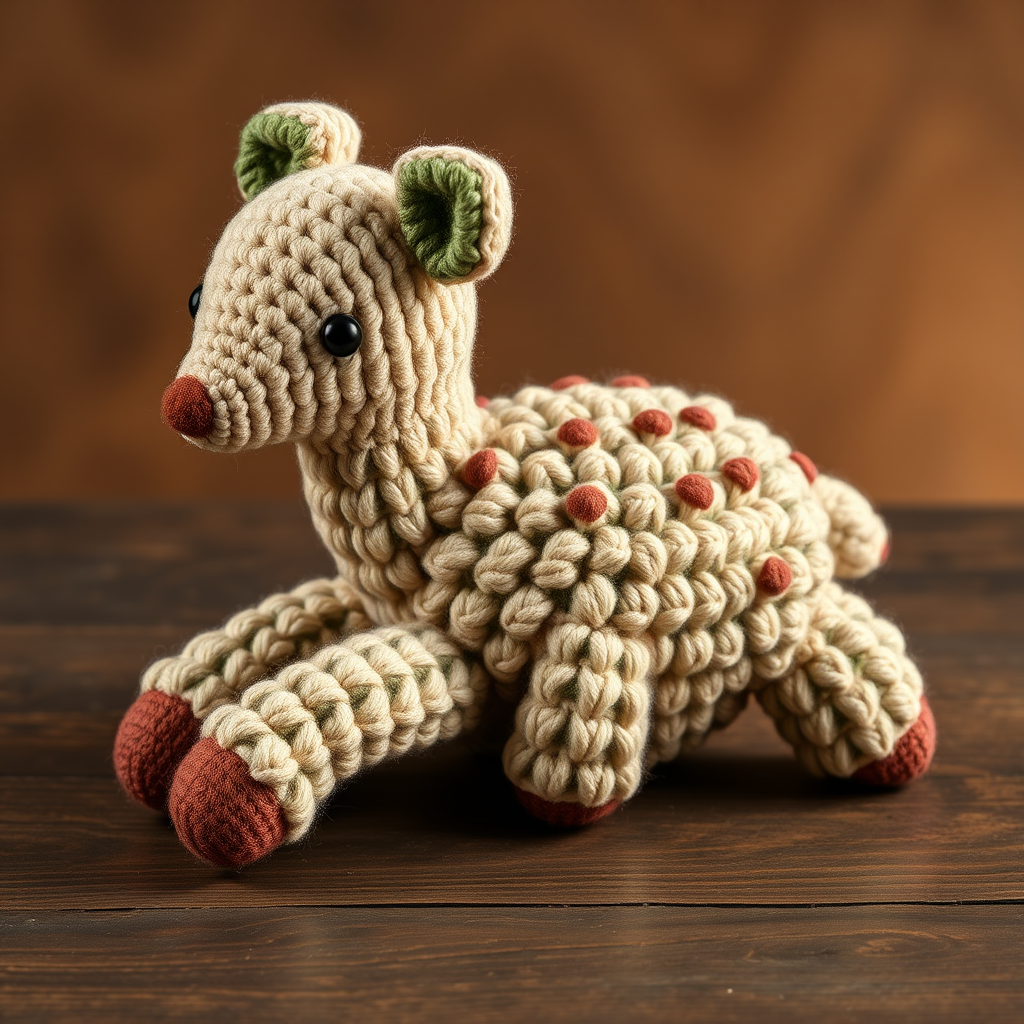
Introducing the Whimsical Woodland Fawn
Welcome to a world of gentle texture and heirloom charm! Today, we're crafting a truly special baby toy: the Whimsical Woodland Fawn. This isn't just any amigurumi; it's a project designed to create a soft, textured keepsake using a unique combination of loop stitch and bobble stitch. The result is a fawn with a hand-dyed, woolly appearance that is both modern and timeless.
Using a gentle, earthy palette of oatmeal, moss green, and dusty rose, this pattern is perfect for a gender-neutral nursery or a thoughtful handmade gift. Whether you're a seasoned crocheter or a confident beginner looking for a rewarding challenge, this pattern will guide you through every step to create a plush, heirloom-quality toy that will be cherished for years to come.
Materials Needed
Before you begin, gather the following materials. Using the exact yarn weight and hook size will ensure your fawn turns out the perfect size and texture.
- Yarn: Worsted weight (#4) cotton or cotton-blend yarn in the following colors:
- Oatmeal (Main Color - MC) - for body, head, ears, legs, and tail
- Moss Green (Contrast Color 1 - CC1) - for antlers
- Dusty Rose (Contrast Color 2 - CC2) - for embroidery (mouth)
- Small amount of dark brown - for spots and nose
- Crochet Hook: 3.5 mm (E) crochet hook
- Other Supplies:
- Stitch markers
- Yarn needle for weaving in ends and sewing pieces together
- Polyester fiberfill stuffing
- Scissors
Gauge: 4 single crochet stitches and 4 rows = 1 inch in single crochet. Gauge is not critical for this project, but maintaining consistent tension will give you a neat, professional finish.
Step-by-Step Instructions
Abbreviations (US Terms)
- MR: Magic ring
- sc: single crochet
- inc: increase (2 sc in same stitch)
- dec: decrease (sc 2 together)
- sl st: slip stitch
- ch: chain
- st(s): stitch(es)
- BLO: back loop only
- FLO: front loop only
- loop st: loop stitch (see special stitch below)
- bobble: bobble stitch (see special stitch below)
Special Stitches
- Loop Stitch (loop st): Insert hook into the front loop only (FLO) of the next stitch. Yarn over and pull up a loop (2 loops on hook). Yarn over and pull through both loops. This creates a loop on the surface. Work all loop stitches in the FLO for a defined, fluffy texture.
- Bobble Stitch (bobble): Yarn over, insert hook into the next stitch, yarn over and pull up a loop, yarn over and pull through 2 loops (2 loops on hook). Repeat this step 3 more times in the same stitch (5 loops on hook). Yarn over and pull through all 5 loops. Chain 1 to close the bobble.
Head (Make 1)
Using Main Color (MC).
- Round 1: Make a magic ring with 6 sc. (6 stitches)
- Round 2: Inc in each stitch around. (12 stitches)
- Round 3: (Sc in next stitch, inc) repeat around. (18 stitches)
- Round 4: (Sc in next 2 stitches, inc) repeat around. (24 stitches)
- Round 5: (Sc in next 3 stitches, inc) repeat around. (30 stitches)
- Rounds 6-10: Sc in each stitch around. (30 stitches)
- Round 11: (Sc in next 4 stitches, inc) repeat around. (36 stitches)
- Rounds 12-14: Sc in each stitch around. (36 stitches)
- Round 15: (Sc in next 4 stitches, dec) repeat around. (30 stitches)
- Round 16: (Sc in next 3 stitches, dec) repeat around. (24 stitches)
- Round 17: (Sc in next 2 stitches, dec) repeat around. (18 stitches)
- Round 18: (Sc in next stitch, dec) repeat around. (12 stitches)
- Round 19: Dec around. (6 stitches)
Fasten off, leaving a long tail for sewing. Stuff the head firmly with fiberfill. Weave the tail through the front loops of the last round and pull tight to close the opening. Set aside.
Ears (Make 2)
Using Main Color (MC).
- Round 1: Make a magic ring with 4 sc. (4 stitches)
- Round 2: (Sc in next stitch, inc) repeat around. (6 stitches)
- Round 3: (Sc in next 2 stitches, inc) repeat around. (8 stitches)
- Rounds 4-5: Sc in each stitch around. (8 stitches)
- Round 6: (Sc in next 2 stitches, dec) repeat around. (6 stitches)
- Round 7: Sc in each stitch around. (6 stitches)
Fasten off, leaving a long tail. Fold the ear flat and sew the bottom edge closed. Sew the ears to the head between rounds 5-7, positioning them symmetrically.
Body (Make 1)
Using Main Color (MC).
- Round 1: Make a magic ring with 6 sc. (6 stitches)
- Round 2: Inc in each stitch around. (12 stitches)
- Round 3: (Sc in next stitch, inc) repeat around. (18 stitches)
- Round 4: (Sc in next 2 stitches, inc) repeat around. (24 stitches)
- Round 5: (Sc in next 3 stitches, inc) repeat around. (30 stitches)
- Rounds 6-12: Sc in each stitch around. (30 stitches)
- Round 13: (Sc in next 3 stitches, dec) repeat around. (24 stitches)
- Round 14: (Sc in next 2 stitches, dec) repeat around. (18 stitches)
- Round 15: (Sc in next stitch, dec) repeat around. (12 stitches)
Fasten off, leaving a long tail. Stuff the body firmly with fiberfill. Sew the head to the body, making sure it is centered and secure.
Legs (Make 4)
Using Main Color (MC).
- Round 1: Make a magic ring with 6 sc. (6 stitches)
- Round 2: Inc in each stitch around. (12 stitches)
- Rounds 3-5: Sc in each stitch around. (12 stitches)
- Round 6: (Sc in next 2 stitches, dec) repeat around. (9 stitches)
- Rounds 7-10: Sc in each stitch around. (9 stitches)
Fasten off, leaving a long tail. Stuff the legs lightly with fiberfill. Sew the legs to the body, positioning them evenly for a stable base.
Tail (Make 1)
Using Main Color (MC).
- Round 1: Make a magic ring with 4 sc. (4 stitches)
- Round 2: Inc in each stitch around. (8 stitches)
- Rounds 3-4: Sc in each stitch around. (8 stitches)
Fasten off, leaving a long tail. Stuff the tail lightly with fiberfill. Sew the tail to the back of the body.
Antlers (Make 2)
Using Moss Green (CC1).
- Round 1: Make a magic ring with 4 sc. (4 stitches)
- Round 2: (Sc in next stitch, inc) repeat around. (6 stitches)
- Rounds 3-5: Sc in each stitch around. (6 stitches)
- Round 6: (Sc in next 2 stitches, inc) repeat around. (8 stitches)
- Rounds 7-8: Sc in each stitch around. (8 stitches)
Fasten off, leaving a long tail. Stuff the antlers lightly with fiberfill. Sew the antlers to the head between rounds 3-5, positioning them symmetrically.
Spots (Make 5-7)
Using dark brown yarn.
- Round 1: Make a magic ring with 6 sc. (6 stitches)
- Round 2: Inc in each stitch around. (12 stitches)
Fasten off, leaving a long tail. Sew the spots randomly onto the body and head for a whimsical, woodland look.
Nose (Make 1)
Using dark brown yarn.
- Round 1: Make a magic ring with 6 sc. (6 stitches)
- Round 2: Sc in each stitch around. (6 stitches)
Fasten off, leaving a long tail. Sew the nose to the center of the face, just above the mouth area.
Embroidery
Using dark brown yarn, embroider two small eyes using satin stitch above the nose. Using Dusty Rose (CC2), embroider a small mouth using backstitch just below the nose.
Finishing
Weave in all ends securely using a yarn needle. Gently shape the fawn by adjusting the stuffing and positioning the ears, legs, and tail. Your Whimsical Woodland Fawn is now complete!



