The Sugarplum Spruce Gnome Free Pattern – A Whimsical Knitted Holiday Decoration with Berry Accents
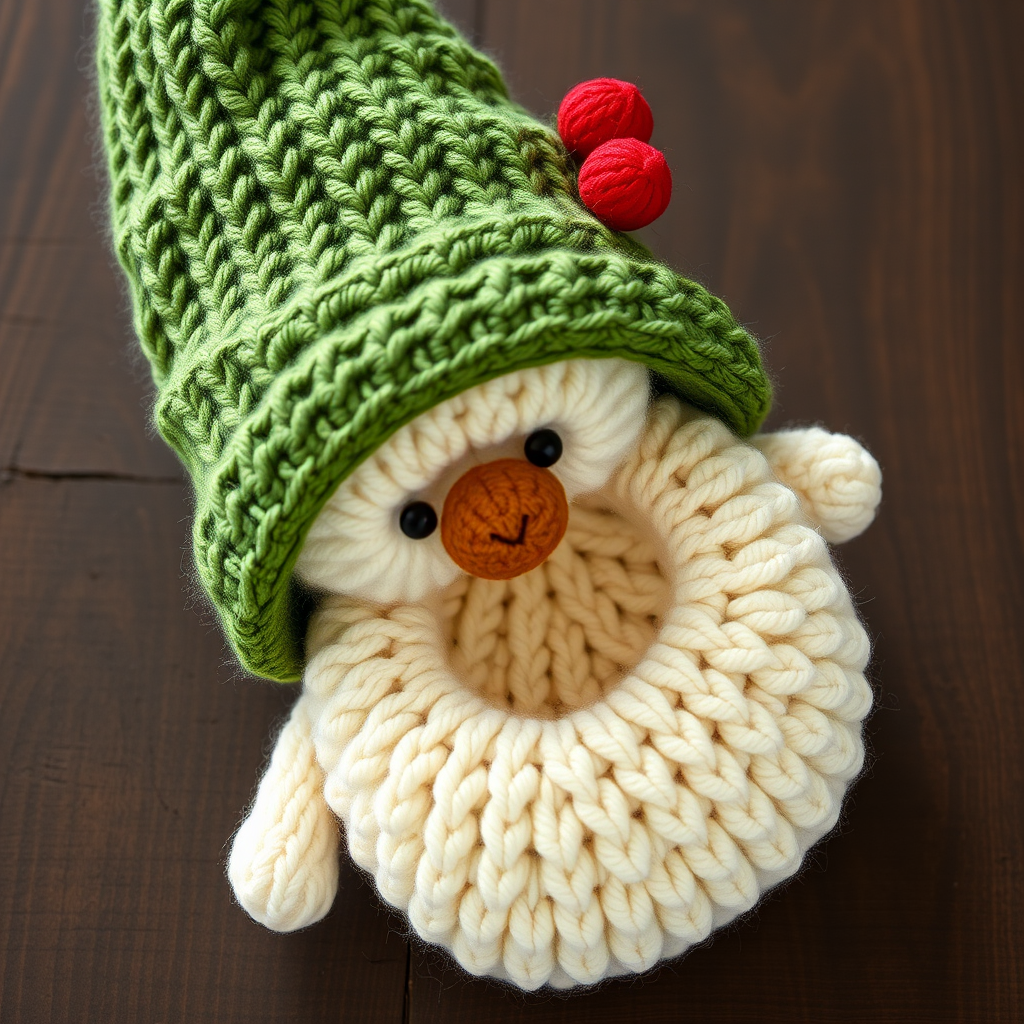
The Sugarplum Spruce Gnome: A Whimsical Knitted Holiday Decoration
Bring a touch of woodland magic to your holiday decor with this adorable knitted gnome, complete with a plush spruce-green hat and sweet red berry accents. This charming amigurumi is perfect for gifting or adding a cozy, handmade touch to your mantel. Whether you're a seasoned knitter or a curious beginner, this pattern is designed to be approachable, rewarding, and utterly delightful. Let's get started on creating your very own Sugarplum Spruce Gnome!
Materials Needed
Before you begin, gather the following supplies. Having everything ready will make your crafting session smooth and enjoyable.
- Yarn: Worsted weight yarn in the following colors:
- Spruce green (for the hat)
- Cream (for the body)
- Red (for the berry accents)
- Brown (for the nose)
- Small amount of black (for embroidering eyes, or use safety eyes)
- Needles: US 5 (3.75 mm) knitting needles or double-pointed needles (DPNs) for working in the round.
- Notions: Tapestry needle for weaving in ends and sewing pieces together.
- Stuffing: Polyester fiberfill stuffing for a soft, plush body.
- Extras: Stitch markers to keep track of your rounds.
Gauge & Abbreviations
Gauge: 5 stitches and 7 rows = 1 inch in stockinette stitch. (Gauge is not critical for this project, but matching it will ensure your gnome is the intended size.)
Abbreviations:
- K: Knit
- P: Purl
- K2tog: Knit two together (decrease)
- M1: Make one (increase)
- St(s): Stitch(es)
- Rnd: Round
Step-by-Step Instructions
Follow these detailed instructions carefully. The gnome is worked in the round from the bottom up, starting with the body and then moving to the hat. Take your time, and don't hesitate to refer back to the abbreviations if needed.
Body (Worked in the Round from the Bottom Up)
This section creates the gnome's plush, rounded body. We'll start with a small number of stitches and increase gradually to form the shape.
- Cast On: With cream yarn, cast on 6 stitches. Distribute them evenly across your DPNs (2 stitches per needle if using 3 needles). Join in the round, being careful not to twist your stitches. Place a stitch marker to mark the beginning of the round.
- Rnd 1: Knit all stitches. (6 sts)
- Rnd 2: M1 in each stitch around. (12 sts) Tip: To M1, pick up the bar between the stitch you just knit and the next stitch, place it on the left needle, and knit through the back loop.
- Rnd 3: Knit all stitches. (12 sts)
- Rnd 4: *K1, M1* repeat around. (18 sts)
- Rnd 5: Knit all stitches. (18 sts)
- Rnd 6: *K2, M1* repeat around. (24 sts)
- Rnd 7: Knit all stitches. (24 sts)
- Rnd 8: *K3, M1* repeat around. (30 sts)
- Rnds 9-14: Knit all stitches. (30 sts) This creates the straight sides of the body.
- Begin Stuffing: Start stuffing the body firmly with polyester fiberfill. Make sure it's packed well so the gnome stands upright.
- Rnd 15: *K3, K2tog* repeat around. (24 sts)
- Rnd 16: Knit all stitches. (24 sts)
- Rnd 17: *K2, K2tog* repeat around. (18 sts)
- Rnd 18: Knit all stitches. (18 sts)
- Rnd 19: *K1, K2tog* repeat around. (12 sts) Add more stuffing here to ensure the top of the body is plump.
- Rnd 20: K2tog around. (6 sts)
- Finish: Cut the yarn, leaving a 6-inch tail. Thread the tail through a tapestry needle, then pass it through the remaining 6 stitches. Pull tight to close the hole, and secure with a knot. Weave in the end.
Hat (Worked in the Round)
The hat is the gnome's signature feature. It's knitted similarly to the body but with a longer straight section to create the tall, slouched shape.
- Cast On: With spruce green yarn, cast on 6 stitches. Join in the round, being careful not to twist. Place a marker.
- Rnd 1: Knit all stitches. (6 sts)
- Rnd 2: M1 in each stitch around. (12 sts)
- Rnd 3: Knit all stitches. (12 sts)
- Rnd 4: *K1, M1* repeat around. (18 sts)
- Rnd 5: Knit all stitches. (18 sts)
- Rnd 6: *K2, M1* repeat around. (24 sts)
- Rnd 7: Knit all stitches. (24 sts)
- Rnd 8: *K3, M1* repeat around. (30 sts)
- Rnds 9-16: Knit all stitches. (30 sts) This longer straight section gives the hat its height.
- Begin Decreasing for the Hat Tip:
- Rnd 17: *K3, K2tog* repeat around. (24 sts)
- Rnd 18: Knit all stitches. (24 sts)
- Rnd 19: *K2, K2tog* repeat around. (18 sts)
- Rnd 20: Knit all stitches. (18 sts)
- Rnd 21: *K1, K2tog* repeat around. (12 sts)
- Rnd 22: K2tog around. (6 sts)
- Finish: Cut the yarn, leaving a long tail (at least 12 inches) for sewing the hat to the body. Thread the tail through the remaining 6 stitches, pull tight, and secure. Do not weave in this tail yet.
Nose
The nose is a simple, small piece that adds character to your gnome's face.
- Cast On: With brown yarn, cast on 4 stitches.
- Work: Work in stockinette stitch (knit one row, purl one row) for 4 rows.
- Finish: Cut the yarn, leaving a 6-inch tail. Thread the tail through the stitches on the needle, pull tight, and secure. Roll the piece into a small ball and use the tail to sew the edges together, forming a round nose. Set aside.
Assembly
Now it's time to bring your gnome to life! Follow these steps to assemble all the pieces.
- Attach the Hat: Position the hat on top of the body, slightly angled to one side for a whimsical look. Using the long tail from the hat, sew it securely to the body with a whip stitch or mattress stitch. Make sure it's firmly attached.
- Add the Eyes: Embroider two small eyes with black yarn, placing them about 1 inch apart, centered on the face. Alternatively, you can attach safety eyes before stuffing the body, but embroidering is simpler for this pattern. Use a French knot or a few small straight stitches for each eye.
- Attach the Nose: Sew the brown nose to the center of the face, just below the eyes. Position it so it sits prominently.
- Create the Berry Cluster: With red yarn, create a small berry cluster. You can do this by knitting a tiny i-cord (cast on 3 stitches, knit them, slide to the other end of the needle, repeat until the cord is about 1 inch long) or by making a small crochet chain. Make 3 small cords/chains and attach them together at the base. Sew the cluster to the brim of the hat, slightly off-center.
- Weave in Ends: Use your tapestry needle to weave in any remaining loose ends on the body, hat, and nose.
Finishing Touches
Your gnome is almost complete! Here are a few optional finishing touches to make it truly special.
- Hanging Loop: If you'd like to hang your gnome on a tree or wreath, create a small loop of yarn at the top of the hat. Simply thread a piece of yarn through the tip, tie it in a knot, and trim the ends.
- Personalize: Feel free to add a small embroidered heart on the body or a tiny scarf around the neck for extra charm.
Congratulations! You've just created your very own Sugarplum Spruce Gnome. This whimsical little fellow is sure to bring a smile to anyone who sees it. Whether you keep it for yourself or gift it to a loved one, it's a handmade treasure that captures the cozy spirit of the season. Happy knitting!



