The Slice of Heaven Pizza Pillow: A Free Crochet Pattern for a Textured, Oversized Cushion
Introduction: Bring the Cozy Vibe of a Pizzeria Home
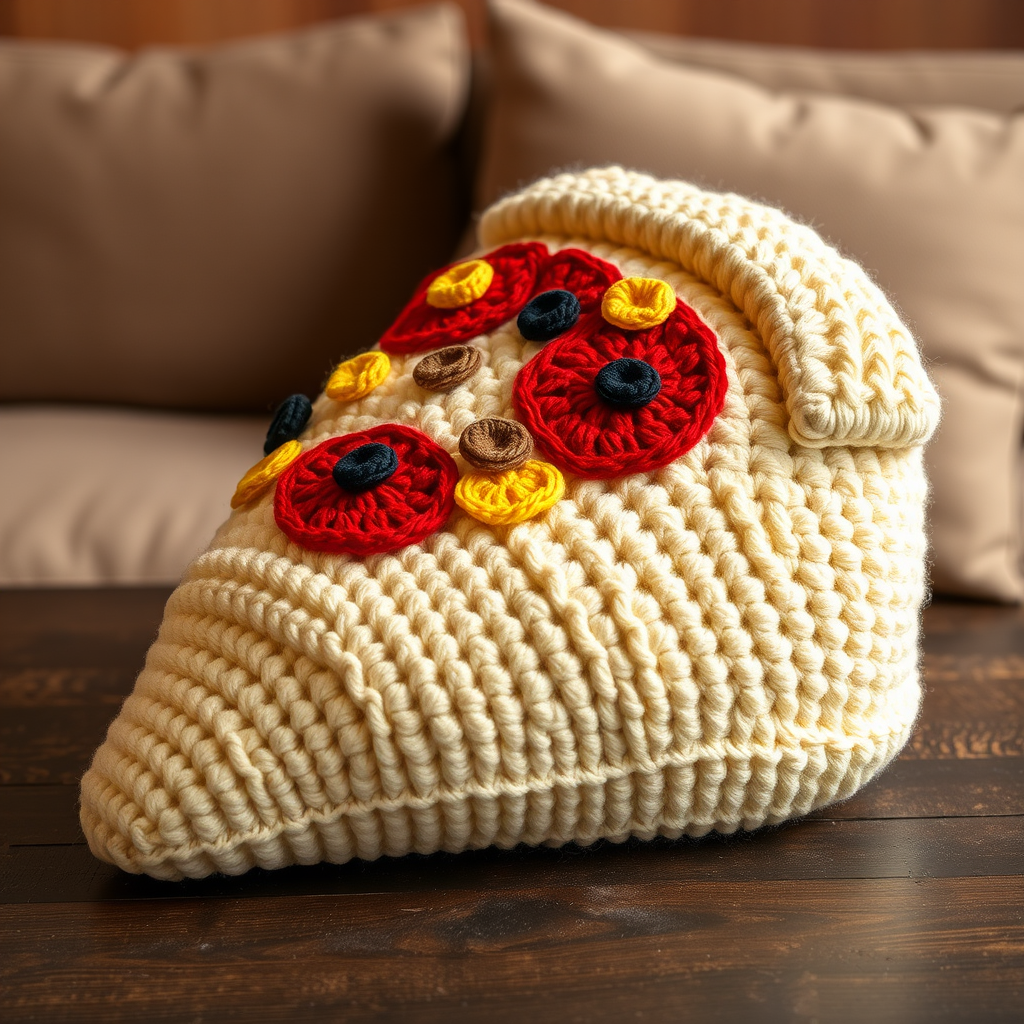
Imagine sinking into your sofa after a long day, leaning against a giant, plush slice of pizza. That dream is now a reality with our Slice of Heaven Pizza Pillow crochet pattern. This oversized, textured cushion is more than just a conversation starter—it's a cozy, huggable companion that adds a playful, whimsical touch to any room. Featuring a thick, ribbed crust, a vibrant sauce layer, and a blanket of melty cheese topped with colorful pepperoni, peppers, and olives, this project is perfect for intermediate crocheters looking to create a stunning piece of functional art. Get ready to turn your living space into the coziest pizzeria on the block!
Materials Needed: Gather Your Yarn & Tools
To create your own Slice of Heaven Pizza Pillow, you'll need the following supplies. All yarn is super bulky weight (#6) for that plush, oversized look.
Yarn Requirements
- Crust (Cream): 300g (approx. 300 yards) – for the front and back crust pieces.
- Sauce (Red): 200g (approx. 200 yards) – for the sauce layer.
- Cheese (Yellow): 150g (approx. 150 yards) – for the cheese layer.
- Toppings:
- Green (Pepper): 50g
- Brown (Pepperoni): 50g
- Black (Olive): 50g
Tools & Notions
- Crochet Hook: 8.0 mm (L) crochet hook
- Yarn Needle: Tapestry needle for sewing pieces together and weaving in ends
- Stitch Markers: To mark the beginning of rounds
- Polyester Fiberfill: Approximately 2-3 pounds for stuffing the pillow firmly
- Scissors
Gauge
10 single crochet stitches x 12 rows = 4 inches (10 cm) in single crochet. Achieving this gauge is important for the final size and shape of your pillow.
Step-by-Step Instructions: Crochet Your Pizza Pillow
This pattern is worked in continuous rounds (spiral) unless stated otherwise. Use a stitch marker to mark the first stitch of each round. The final pillow measures approximately 24 inches long and 12 inches wide at the crust.
Abbreviations
- ch = chain
- sc = single crochet
- inc = increase (2 sc in the same stitch)
- dec = decrease (sc 2 together)
- sl st = slip stitch
- st(s) = stitch(es)
- rnd = round
Part 1: The Crust (Make 2 identical pieces)
Using cream yarn. This forms the front and back of the pillow.
- Rnd 1: Ch 2, work 6 sc in the 2nd ch from the hook. (6 sts)
- Rnd 2: Inc in each st around. (12 sts)
- Rnd 3: (Sc in next st, inc) repeat around. (18 sts)
- Rnd 4: (Sc in next 2 sts, inc) repeat around. (24 sts)
- Rnd 5: (Sc in next 3 sts, inc) repeat around. (30 sts)
- Rnd 6: (Sc in next 4 sts, inc) repeat around. (36 sts)
- Rnd 7: (Sc in next 5 sts, inc) repeat around. (42 sts)
- Rnd 8: (Sc in next 6 sts, inc) repeat around. (48 sts)
- Rnd 9: (Sc in next 7 sts, inc) repeat around. (54 sts)
- Rnd 10: (Sc in next 8 sts, inc) repeat around. (60 sts)
- Rnd 11: (Sc in next 9 sts, inc) repeat around. (66 sts)
- Rnd 12: (Sc in next 10 sts, inc) repeat around. (72 sts)
- Rnd 13: (Sc in next 11 sts, inc) repeat around. (78 sts)
- Rnd 14: (Sc in next 12 sts, inc) repeat around. (84 sts)
- Rnd 15: (Sc in next 13 sts, inc) repeat around. (90 sts)
- Rnd 16: (Sc in next 14 sts, inc) repeat around. (96 sts)
- Rnd 17: (Sc in next 15 sts, inc) repeat around. (102 sts)
- Rnd 18: (Sc in next 16 sts, inc) repeat around. (108 sts)
- Rnd 19: (Sc in next 17 sts, inc) repeat around. (114 sts)
- Rnd 20: (Sc in next 18 sts, inc) repeat around. (120 sts)
- Fasten off. Repeat all 20 rounds to make a second identical crust piece.
Part 2: The Sauce Layer (Make 1)
Using red yarn.
- Repeat Rounds 1 through 20 exactly as written for the Crust.
- Fasten off.
Part 3: The Cheese Layer (Make 1)
Using yellow yarn.
- Repeat Rounds 1 through 20 exactly as written for the Crust.
- Fasten off.
Part 4: The Toppings (Make Multiple)
These are small, flat circles that will be sewn onto the cheese layer.
- Pepperoni (make 5-6): With brown yarn, ch 2, work 6 sc in the 2nd ch from hook. (6 sts) Fasten off, leaving a long tail (approx. 8 inches) for sewing. Flatten into a circle.
- Green Peppers (make 4-5): With green yarn, ch 2, work 6 sc in the 2nd ch from hook. (6 sts) Fasten off, leaving a long tail. Flatten.
- Olives (make 4-5): With black yarn, ch 2, work 6 sc in the 2nd ch from hook. (6 sts) Fasten off, leaving a long tail. Flatten.
Part 5: Assembly – Building Your Pizza Slice
- Layer the top: Place one crust piece flat on your work surface. Center the sauce layer on top of it, then place the cheese layer on top of the sauce. Align the edges as evenly as possible.
- Sew the layers together: Using cream yarn and a tapestry needle, sew through all three layers (crust, sauce, cheese) around the entire edge. Use a whip stitch or running stitch, keeping your stitches close together. Leave a 6-inch opening unsewn.
- Stuff the pillow: Through the opening, firmly stuff the pillow with polyester fiberfill. Make sure it's plump and evenly filled, especially at the point and along the crust edge.
- Close the opening: Sew the 6-inch opening closed with the cream yarn. Weave in the end.
- Attach the back crust: Take the second crust piece and place it on the back of the pillow, covering the stuffing. Sew it in place around the entire edge using cream yarn. This creates a beautiful, double-sided crust look. Weave in all ends.
- Sew on the toppings: Using the long tails left on each topping, sew them onto the cheese layer in a scattered, realistic pattern. Weave in all ends securely.
Part 6: Finishing – Shaping the Slice
- Fold the pillow: Fold the pillow in half along the long edge, from the point (the narrow end opposite the crust) towards the crust. The crust edge should remain open and curved.
- Sew the sides: Using cream yarn, sew the two sides together, starting from the point and working your way up to about 4 inches from the crust edge. This creates the classic triangular slice shape.
- Stuff the remaining gap: Lightly stuff the unsewn gap near the crust to maintain the pillow's shape, then sew the gap closed.
- Final touches: The crust edge remains open as the wide end of the slice. Gently shape the pillow and fluff it. Your Slice of Heaven Pizza Pillow is complete!
Enjoy your new favorite cozy companion! Share your finished pillow with us using the hashtag #SliceOfHeavenPillow.



