The Savannah Snuggle Zebra Blanket Free Pattern – A Crocheted Safari Cuddle
The Savannah Snuggle Zebra Blanket Free Pattern – A Crocheted Safari Cuddle
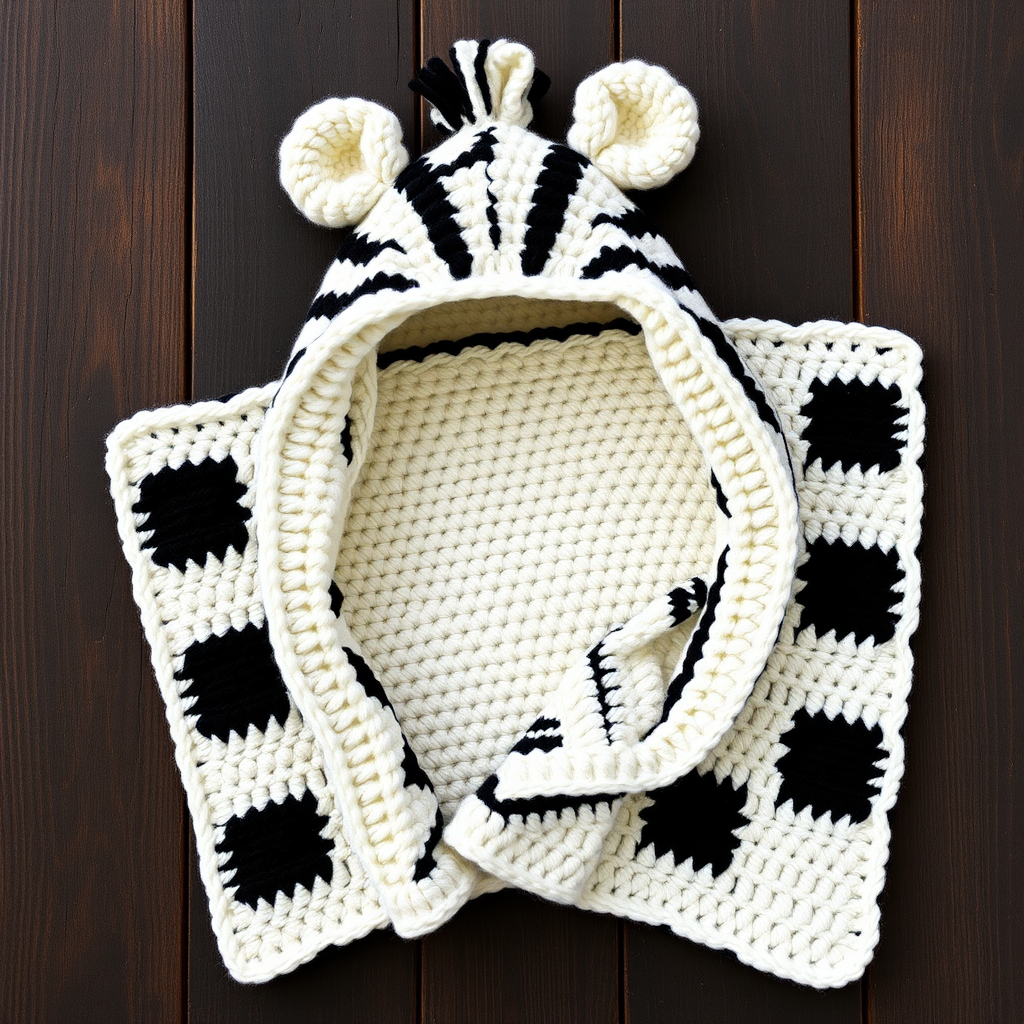
Wrap your little one in the wild comfort of the Savannah with this crocheted zebra blanket, featuring a soft, textured mane and a cozy hood. This unique design combines the warmth of a blanket with the charm of a cuddly companion. Perfect for nap time, cuddle time, or as a stunning nursery décor piece, this pattern is surprisingly beginner-friendly while delivering a professional, handmade heirloom-quality result. The stark white and deep black checkerboard pattern, accented with a soft cream mane, creates a classic zebra look that stands out in any room.
This isn't just a blanket—it's an adventure. The hood transforms your little one into a safari explorer, while the spiky mane and adorable ears add that irresistible "aww" factor. Whether you're a seasoned crocheter or picking up a hook for the first time, this step-by-step guide will walk you through every single stitch, ensuring your zebra blanket turns out perfectly. Let's dive into this wild and wonderful project!
Materials Needed
Before you begin, gather all your materials. Having everything ready will make the process smooth and enjoyable. Here's your complete shopping list:
Yarn
- Worsted weight yarn in white: Approximately 800g (about 16 skeins of 50g each, or 8 skeins of 100g). This is your main color for the blanket body and hood.
- Worsted weight yarn in black: Approximately 400g (about 8 skeins of 50g, or 4 skeins of 100g). This creates the zebra stripes and checkerboard pattern.
- Worsted weight yarn in soft cream: Approximately 200g (about 4 skeins of 50g, or 2 skeins of 100g). This is for the spiky mane strips.
Pro tip: Choose a soft, machine-washable acrylic or cotton blend for easy care—perfect for baby items!
Hook and Notions
- 5.5mm crochet hook (or size needed to obtain gauge)
- Yarn needle for weaving in ends and sewing pieces together
- Scissors
- Stitch markers (optional, but helpful for counting)
- Safety eyes (optional, for older children) or black yarn for embroidered eyes
Gauge
14 sc x 16 rows = 4 inches (10 cm) in single crochet. Always check your gauge before starting! If your gauge is off, adjust your hook size accordingly. A swatch that's too small means you need a larger hook; too large means a smaller hook.
Step-by-Step Instructions
This pattern is broken down into manageable sections: the blanket body, the hood, the mane, and the ears. Follow each section carefully, and you'll have a stunning zebra blanket in no time. Let's get started!
Part 1: Blanket Body (Worked in One Piece from Bottom Up)
The blanket body is worked in rows, creating a beautiful checkerboard pattern of white and black squares. Each square is 10 stitches wide and 2 rows tall. Don't worry—it's easier than it sounds!
Row 1: With white yarn, chain (ch) 101. Single crochet (sc) in the 2nd chain from the hook and in each chain across. You should have 100 sc total. (Count your stitches to be sure!)
Row 2: Chain 1, turn. Single crochet in each stitch across. (100 sc)
Row 3 (Starting the stripes): Chain 1, turn. Single crochet in the first 10 stitches with white yarn. Now, change to black yarn and sc in the next 10 stitches. Change back to white yarn and sc in the next 10 stitches. Repeat this pattern from * to * across the row: *10 white, 10 black, 10 white, 10 black*, ending with white. You'll have 5 white stripes and 5 black stripes across the row.
Row 4 (Creating the checkerboard): Chain 1, turn. This is where the magic happens! With black yarn, sc in the first 10 stitches (this is the black stripe from Row 3). Then, switch to white yarn and sc in the next 10 stitches. Continue alternating colors, but offset by 10 stitches. This means the black stripe is now over the white stripe from the previous row, and vice versa. This creates the checkerboard effect.
Rows 5-80: Repeat Rows 3 and 4, alternating the stripe offset each time. This means Row 5 will match Row 3, Row 6 will match Row 4, and so on. Continue this pattern until the blanket measures approximately 30 inches long. Fasten off and weave in all ends securely.
Helpful hint: To change colors neatly, work the last yarn-over of the previous stitch with the new color. This prevents gaps and makes the color change seamless.
Part 2: Hood (Worked Separately)
The hood is crocheted flat and then sewn to the top of the blanket. It features vertical zebra stripes and a gentle decrease for a rounded shape.
Row 1: With white yarn, chain 60. Sc in the 2nd chain from the hook and in each chain across. You should have 59 sc.
Row 2: Chain 1, turn. Sc in each stitch across. (59 sc)
Row 3 (Starting the hood stripes): Chain 1, turn. Sc in the first 10 stitches with white. Change to black and sc in the next 10 stitches. Change to white and sc in the next 10 stitches. Change to black and sc in the next 10 stitches. Change to white and sc in the last 9 stitches. This creates a striped pattern across the hood.
Rows 4-20: Continue working in single crochet, following the stripe pattern you established in Row 3. Important: On Row 10, you will begin decreasing to shape the top of the hood. At the beginning and end of Row 10, work a sc2tog (single crochet two together). This means you insert your hook into the first stitch, yarn over, pull through, insert into the next stitch, yarn over, pull through, then yarn over and pull through all three loops on your hook. This decreases your stitch count by 1 on each end.
Repeat this decrease (sc2tog at the beginning and end of the row) every 4 rows (Rows 14 and 18) until you have 45 stitches remaining. Fasten off, leaving a long tail (about 18 inches) for sewing the hood to the blanket.
Part 3: Mane (Crocheted Separately)
The mane is made of three separate strips that will be sewn along the top of the hood. These create the spiky, mohawk-like effect.
Strip 1 (Cream): With cream yarn, chain 30. Sc in the 2nd chain from the hook and in each chain across. (29 sc) Fasten off.
Strip 2 (Black): With black yarn, chain 30. Sc in the 2nd chain from the hook and in each chain across. (29 sc) Fasten off.
Strip 3 (Cream): With cream yarn, chain 30. Sc in the 2nd chain from the hook and in each chain across. (29 sc) Fasten off.
Each strip should measure approximately 12 inches long. Set them aside for assembly.
Part 4: Ears (Make 2)
These cute little ears are worked in the round, starting with a magic ring. If you're not familiar with a magic ring, don't worry—it's simple! Make a loop with your yarn, insert your hook, and work your stitches into the loop, then pull tight.
Round 1: With white yarn, make a magic ring. Chain 1, work 6 sc into the ring. (6 sc) Pull the ring tight.
Round 2: Work 2 sc in each stitch around. (12 sc)
Round 3: *Sc in the next stitch, 2 sc in the next stitch* repeat from * to * around. (18 sc)
Round 4: *Sc in the next 2 stitches, 2 sc in the next stitch* repeat from * to * around. (24 sc)
Rounds 5-8: Sc in each stitch around. (24 sc) No increases—just straight crochet.
Round 9 (Starting the decrease): *Sc2tog, sc in the next 2 stitches* repeat from * to * around. (18 sc)
Round 10: *Sc2tog, sc in the next stitch* repeat from * to * around. (12 sc)
Round 11: Sc2tog around. (6 sc) Fasten off, leaving a long tail (about 12 inches).
To finish the ear, flatten it so the decreases are at the top. Sew the bottom edge closed with your yarn needle, creating a neat, rounded ear shape.
Part 5: Assembly
Now for the fun part—putting it all together! Take your time and use the long tails you left for sewing.
Step 1: Attach the Hood. Lay your blanket flat with the right side facing up. Place the hood on the top edge of the blanket, centered. The right side of the hood should face the right side of the blanket. The hood should cover the top 10 inches of the blanket. Using the long tail from the hood, sew the hood to the blanket using a whip stitch or mattress stitch. Make sure it's secure and evenly attached.
Step 2: Attach the Mane. Now, take your three mane strips. Position them along the top of the hood, from the front edge to the back. The strips should stand up like a mohawk. Place the black strip in the middle, with the two cream strips on either side. Sew each strip securely to the top of the hood using your yarn needle and a matching yarn color. Make sure they're attached along the entire length of the strip.
Step 3: Attach the Ears. Sew the ears to the top of the hood, just behind the mane, one on each side. Position them so they stick out slightly from the sides of the hood. Use the long tails from the ears to sew them securely.
Step 4: Add the Face (Optional). For a finished look, you can add a muzzle and eyes. Using black yarn, embroider a simple cross-stitch for the eyes, or use safety eyes (only for children over 3 years old). For the muzzle, you can embroider a small oval shape at the front of the hood using black yarn. Alternatively, you can leave the face off for a cleaner, more minimalist look.
Step 5: Weave in All Ends. Finally, take your yarn needle and weave in every loose end. This is crucial for durability and a professional finish. Make sure all ends are securely hidden inside the stitches.
Final Thoughts
Congratulations! You've just created a beautiful, handmade Savannah Snuggle Zebra Blanket. This cozy, textured piece is sure to become a treasured keepsake. The combination of the checkerboard pattern, the spiky mane, and the adorable ears makes it a standout gift for baby showers, birthdays, or just because.
Remember, crocheting is a journey. If you make a mistake, don't be afraid to rip it out and start again—that's part of the learning process. Each stitch you make is a stitch of love, and your little one will feel that warmth every time they snuggle into their new safari friend.
Happy crocheting, and enjoy your wild adventure on the Savannah!



