The Grand Gander Wig Free Pattern – A Knitted Feathered Fowl Fascinator
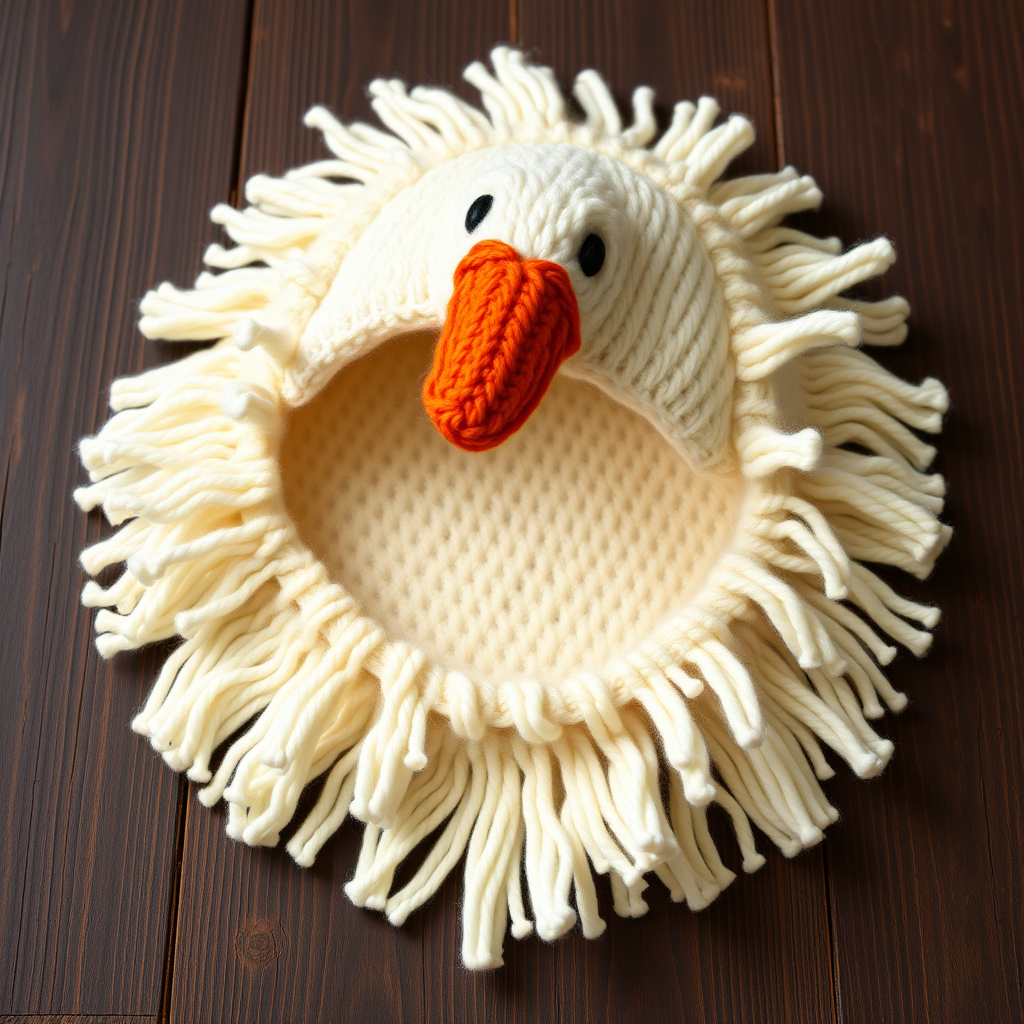
The Grand Gander Wig Free Pattern – A Knitted Feathered Fowl Fascinator
Are you ready to hatch a truly unique accessory? The Grand Gander Wig is a whimsical, knitted headpiece designed to look like a majestic goose's head, complete with a soft, textured beak and a cascade of feathered layers. This cozy, conversation-starting fascinator is perfect for costume parties, theatrical productions, or simply for those who adore quirky yarn art. Whether you're a seasoned knitter or a brave beginner, this pattern is a delightful project that will have you strutting your stuff with avian flair. Let's dive into the world of wearable art and create something utterly charming!
Materials Needed
Before you begin your feathered fowl journey, gather the following materials. This project uses simple, worsted weight yarn and basic knitting techniques, making it accessible for crafters of all levels.
- Yarn: Worsted weight yarn in the following colors:
- Main Color (MC): White – approximately 150 yards
- Contrast Color 1 (CC1): Orange – approximately 30 yards
- Contrast Color 2 (CC2): Black – approximately 10 yards
- Knitting Needles: US Size 7 (4.5 mm) knitting needles, or the size needed to obtain the correct gauge.
- Notions: Tapestry needle for seaming and weaving in ends, stitch markers (optional but helpful).
- Crochet Hook: A crochet hook (any size that works with your yarn) for creating the feathered fringe.
Gauge: 20 stitches and 26 rows = 4 inches in stockinette stitch. Always take time to check your gauge to ensure the cap fits properly!
Step-by-Step Instructions
This knitted goose wig is worked in pieces and seamed together. The main cap is knit flat, then shaped to fit the head. The beak and eyes are knitted separately and attached. The feathered layers are created with a simple fringe technique. Follow these detailed instructions carefully, and you'll have your very own Grand Gander Wig in no time.
Cap (Make 1)
The cap is the foundation of your goose wig. It's knit flat in stockinette stitch and then seamed up the back.
- Cast On: Using your Main Color (MC) yarn, cast on 80 stitches.
- Row 1 (Right Side): Knit all stitches.
- Row 2 (Wrong Side): Purl all stitches.
- Repeat: Continue repeating Rows 1 and 2 until the piece measures 6 inches from the cast-on edge, ending with a Wrong Side row. This creates the main body of the cap that will cover your head.
Shape the Crown
Now we will decrease stitches to shape the top of the cap so it fits snugly over your head. The decreases are evenly spaced to create a smooth, rounded crown.
- Row 1 (RS): *K8, k2tog (knit two together)*; repeat from * to * across the row. (72 stitches remain)
- Row 2 (WS): Purl all stitches.
- Row 3 (RS): *K7, k2tog*; repeat from * to * across the row. (64 stitches remain)
- Row 4 (WS): Purl all stitches.
- Row 5 (RS): *K6, k2tog*; repeat from * to * across the row. (56 stitches remain)
- Row 6 (WS): Purl all stitches.
- Row 7 (RS): *K5, k2tog*; repeat from * to * across the row. (48 stitches remain)
- Row 8 (WS): Purl all stitches.
- Row 9 (RS): *K4, k2tog*; repeat from * to * across the row. (40 stitches remain)
- Row 10 (WS): Purl all stitches.
- Row 11 (RS): *K3, k2tog*; repeat from * to * across the row. (32 stitches remain)
- Row 12 (WS): Purl all stitches.
- Row 13 (RS): *K2, k2tog*; repeat from * to * across the row. (24 stitches remain)
- Row 14 (WS): Purl all stitches.
- Row 15 (RS): *K1, k2tog*; repeat from * to * across the row. (16 stitches remain)
- Row 16 (WS): Purl all stitches.
- Row 17 (RS): *K2tog*; repeat from * to * across the row. (8 stitches remain)
Finishing the Cap: Cut the yarn, leaving a long tail (about 12 inches). Thread the tail through a tapestry needle, then slide the needle through the remaining 8 stitches on your knitting needle. Pull tight to gather the top of the cap closed and secure the yarn. Use the same tail to sew the back seam of the cap, matching the edges together. Leave the bottom edge open—this is where your head goes!
Beak (Make 1)
The beak is a simple triangular shape knit flat. It adds the iconic goose feature to your wig.
- Cast On: Using Contrast Color 1 (CC1) orange yarn, cast on 10 stitches.
- Row 1 (RS): Knit all stitches.
- Row 2 (WS): Purl all stitches.
- Row 3 (RS): K1, k2tog, k4, k2tog, k1. (8 stitches remain)
- Row 4 (WS): Purl all stitches.
- Row 5 (RS): K1, k2tog, k2, k2tog, k1. (6 stitches remain)
- Row 6 (WS): Purl all stitches.
- Row 7 (RS): K1, k2tog, k2tog, k1. (4 stitches remain)
- Row 8 (WS): Purl all stitches.
- Row 9 (RS): K2tog twice. (2 stitches remain)
- Row 10 (WS): Purl 2 stitches.
Finishing the Beak: Cut the yarn, leaving a tail. Thread the tail through the remaining 2 stitches and pull tight to secure. Weave in the ends. Position the beak on the front of the cap, centered horizontally, about 2 inches above the bottom edge. Sew it securely in place using the tapestry needle and matching orange yarn.
Eyes (Make 2)
These small black ovals give your goose its charming, watchful expression.
- Cast On: Using Contrast Color 2 (CC2) black yarn, cast on 6 stitches.
- Row 1: Knit all stitches.
- Row 2: K2tog, k2, k2tog. (4 stitches remain)
- Row 3: K2tog, k2tog. (2 stitches remain)
Finishing the Eyes: Cut the yarn, thread through the remaining 2 stitches, and pull tight to secure. Weave in the ends. Sew the eyes onto the cap, one on each side of the beak, positioned about 1 inch above the top of the beak. Make sure they are symmetrical for a balanced look.
Feathered Fringe
This is the magical step that transforms your cap into a majestic goose! The fringe mimics the layered, fluffy plumage of a goose.
- Cut Yarn: Cut lengths of your Main Color (MC) white yarn, each about 6 inches long. You will need many pieces—prepare a generous pile.
- Attach Fringe: Take one piece of yarn and fold it in half. Insert your crochet hook through the edge of the cap from the outside to the inside. Catch the folded loop of yarn with the hook and pull it through the fabric, creating a small loop on the outside.
- Secure the Fringe: Take the two loose ends of the yarn and pull them through the loop. Pull tight to create a secure knot. This is a standard fringe technique.
- Repeat: Continue adding fringe all around the bottom edge of the cap. Space the fringe pieces about ½ inch apart, or closer for a denser look.
- Layer the Crown: To create a truly feathered, three-dimensional effect, add additional rows of fringe around the crown of the cap. Work in concentric circles, starting from the bottom edge and moving upward. You can also add a few clusters of fringe at the very top of the crown.
- Trim and Shape: Once all the fringe is attached, use scissors to trim the yarn to varying lengths. The fringe at the bottom can be longer, while the fringe near the crown can be shorter. This variation creates a natural, fluffy, and dynamic silhouette that mimics a goose's plumage.
Final Assembly and Styling Tips
Your Grand Gander Wig is now complete! Give it a gentle shake to fluff up the fringe. Try it on and adjust the fringe as needed. For a more dramatic look, you can gently steam the cap (avoiding the yarn) to help it hold its shape, but this is optional.
This whimsical fascinator is sure to be a hit at any event. Pair it with a cozy sweater for a quirky everyday look, or wear it as the centerpiece of a theatrical costume. The Grand Gander Wig is a testament to the joy of handmade, wearable art. Enjoy your new feathered friend!



