Sunny Sprout Snuggle Bunny Free Pattern – Textured Knit Easter Companion
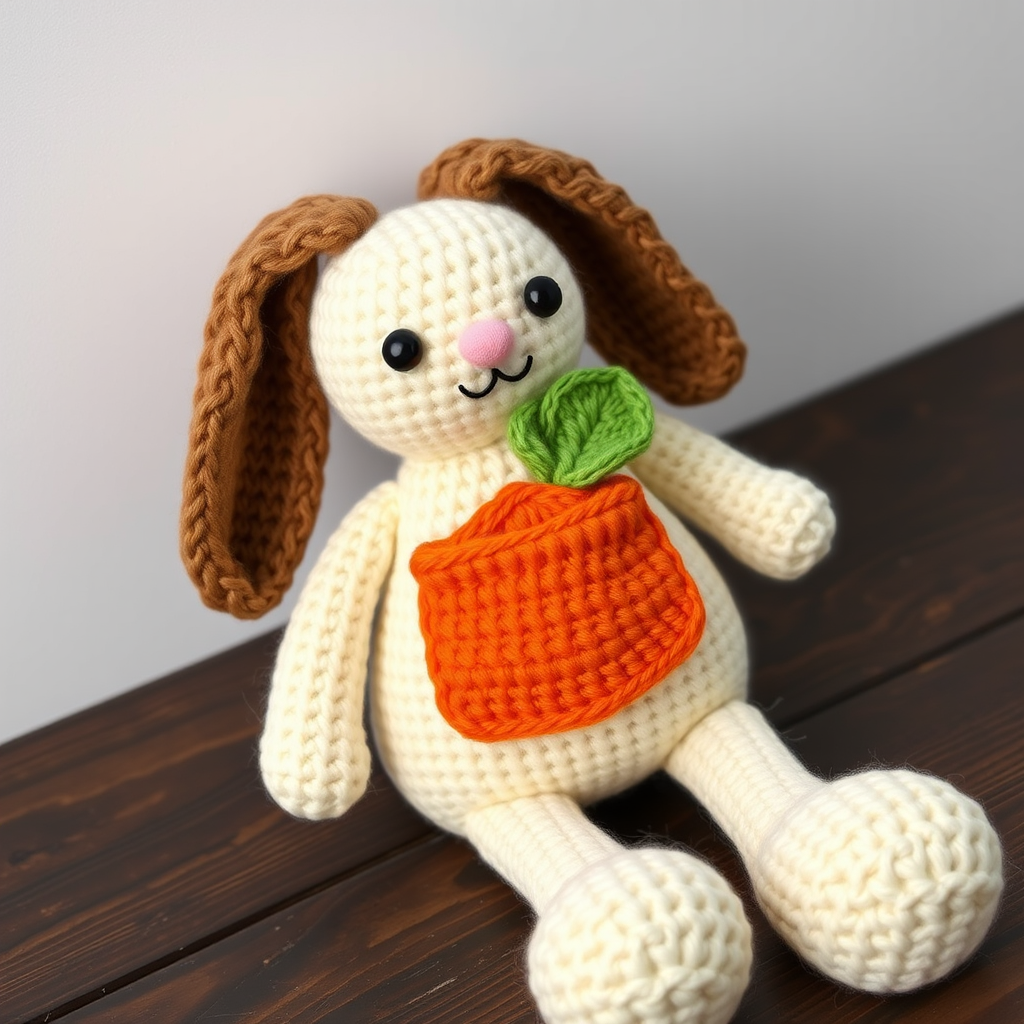
Sunny Sprout Snuggle Bunny: A Free Knitted Easter Companion Pattern
Looking for a heartwarming handmade gift that combines the charm of amigurumi with a playful, functional twist? Meet the Sunny Sprout Snuggle Bunny—a cozy, textured knit bunny with a hidden carrot pocket, perfect for tucking away tiny treats, Easter eggs, or little love notes. This free pattern is designed with beginners in mind, using simple knit-in-the-round techniques and a touch of crochet for the adorable sprout detail. Whether you're crafting for a child, a friend, or your own shelf, this 6-inch-tall bunny is sure to bring a smile.
With its soft cream body, floppy brown ears, and bright orange carrot pocket, this bunny is as delightful to make as it is to gift. Let's dive into the materials and step-by-step instructions to create your very own snuggle companion.
Materials Needed
Before you begin, gather the following supplies. This project uses basic knitting and crochet tools, and the gauge is not critical—just aim for a firm, even fabric so the stuffing doesn't show through.
- Yarn: Worsted weight cotton or acrylic yarn in four colors:
- Cream (for body and head)
- Soft brown (for ears)
- Carrot orange (for pocket)
- Leaf green (for the sprout)
- Knitting Needles: US 6 (4.0 mm) double-pointed needles (or circular for magic loop) for the body and head; straight needles for flat pieces.
- Crochet Hook: US E/4 (3.5 mm) for the carrot leaf.
- Polyester Fiberfill: For stuffing the body and head firmly.
- Tapestry Needle: For sewing pieces together and weaving in ends.
- Scrap Yarn: Black and pink for embroidering the face.
- Stitch Markers: To mark the beginning of rounds.
Gauge: 20 stitches and 28 rows = 4 inches in stockinette stitch. This is a guideline, not a strict requirement—just keep your tension consistent.
Step-by-Step Instructions
Bunny Body (Knit in the Round)
The body is worked from the bottom up, starting with a small cast-on and increasing to create a pear shape. Use double-pointed needles or a magic loop.
- Cast on: Using the long-tail method, cast on 6 stitches. Distribute evenly on needles and join in the round, being careful not to twist. Place a marker.
- Round 1: Knit all stitches (6 sts).
- Round 2: *K1, M1 (make one)* repeat around (12 sts).
- Round 3: Knit all stitches.
- Round 4: *K2, M1* repeat around (18 sts).
- Round 5: Knit all stitches.
- Round 6: *K3, M1* repeat around (24 sts).
- Rounds 7-12: Knit all stitches (24 sts). This creates the straight middle section of the body.
- Round 13: *K2, K2tog (knit two together)* repeat around (18 sts).
- Round 14: Knit all stitches.
- Round 15: *K1, K2tog* repeat around (12 sts).
- Stuff the body: Firmly stuff with polyester fiberfill, shaping the pear form. Ensure the bottom is flat so the bunny sits upright.
- Round 16: *K2tog* repeat around (6 sts). Cut yarn, leaving a 6-inch tail. Thread the tail through a tapestry needle, pass through the remaining 6 stitches, and pull tight to close. Weave in the end securely.
Bunny Head (Knit in the Round)
The head is slightly smaller than the body and worked similarly, starting from the top of the head down to the neck.
- Cast on: Cast on 6 stitches and join in the round as before.
- Round 1: *K1, M1* repeat around (12 sts).
- Round 2: *K2, M1* repeat around (18 sts).
- Rounds 3-8: Knit all stitches (18 sts). This gives the head its rounded shape.
- Round 9: *K1, K2tog* repeat around (12 sts).
- Stuff the head: Stuff firmly, shaping a smooth sphere. Don't overstuff—you want it soft and huggable.
- Round 10: *K2tog* repeat around (6 sts). Cut yarn, thread through remaining stitches, pull tight, and weave in the end.
Ears (Make 2, Knit Flat)
The ears are knitted flat and then folded to create a narrow, floppy shape. Use straight needles.
- Cast on: Cast on 6 stitches with brown yarn.
- Row 1: Knit all stitches.
- Row 2: K1, M1, K4, M1, K1 (8 sts).
- Rows 3-10: Knit all stitches (8 sts). This creates a long, flat rectangle.
- Row 11: K1, K2tog, K2, K2tog, K1 (6 sts).
- Row 12: Knit all stitches.
- Bind off: Bind off all stitches loosely. Cut yarn, leaving a long tail for sewing.
- Shape the ear: Fold each ear in half lengthwise, with the right side out. Sew the side edges together using a whip stitch, creating a narrow, tube-like ear. Leave the bottom edge open for attaching to the head.
Carrot Pocket (Knit Flat, Then Folded)
This clever pocket is knitted as a flat rectangle, then folded and seamed to create a pouch. The top edge stays open to hold treats.
- Cast on: Cast on 10 stitches with orange yarn.
- Row 1: Knit all stitches.
- Row 2: K1, M1, K8, M1, K1 (12 sts).
- Rows 3-8: Knit all stitches (12 sts).
- Row 9: K1, K2tog, K6, K2tog, K1 (10 sts).
- Row 10: Knit all stitches.
- Row 11: K1, K2tog, K4, K2tog, K1 (8 sts).
- Row 12: Knit all stitches.
- Bind off: Bind off all stitches. Cut yarn, leaving a long tail.
- Form the pouch: Fold the knitted rectangle in half widthwise, with the right side out. Sew the side seams together using a mattress stitch or whip stitch to form a pouch. The top edge (the bind-off edge) remains open—this is the pocket opening.
Carrot Leaf (Crochet)
This small crochet piece adds the finishing sprout detail. Use the green yarn and a 3.5 mm hook.
- Magic ring: Make a magic ring with green yarn.
- Round 1: Work 6 single crochet (sc) into the ring. Pull the tail to tighten the ring closed.
- Round 2: *Chain 5, slip stitch into the next sc* repeat around. This creates 6 small leaf loops. Fasten off, leaving a long tail for sewing.
Assembly
Now it's time to bring your bunny to life. Take your time with the sewing to ensure a polished finish.
- Attach the head: Sew the head to the top of the body, slightly offset to one side for a playful look. Use a whip stitch, going through the neck edge of the head and the top of the body. Weave in the end.
- Attach the ears: Position the ears on top of the head, spacing them about 1 inch apart. Sew each ear securely using the long tail left from binding off. Make sure they're angled slightly outward for a floppy, cute appearance.
- Attach the carrot pocket: Sew the carrot pocket to the front of the bunny's body, just below the head. Position it so the open top faces upward. Use the tail from binding off to sew around the sides and bottom of the pouch, leaving the top edge free.
- Attach the carrot leaf: Sew the crocheted leaf to the top of the carrot pocket, so it peeks out like a sprout. Use the long tail from the leaf to secure it firmly.
- Embroider the face: Using black yarn, embroider two small eyes with a few straight stitches each. Using pink yarn, create a tiny nose with a small triangle or vertical stitch. Add a small smile with a few curved stitches in black or dark brown.
- Weave in all ends: Use a tapestry needle to weave in any remaining yarn tails securely, ensuring they're hidden inside the bunny or along seams.
Final Touches & Gift Ideas
Your Sunny Sprout Snuggle Bunny is now complete! Standing about 6 inches tall and 4 inches wide, this little companion is perfect for holding mini chocolate eggs, a small toy, or a handwritten note. The hidden carrot pocket adds an element of surprise that kids and adults alike will adore.
This pattern is wonderfully customizable—try using pastel yarns for a spring-themed bunny, or add a tiny bow or bell for extra charm. Because the gauge isn't critical, you can easily adjust the yarn weight and needle size to create a larger or smaller bunny.
We'd love to see your finished creations! Share your Sunny Sprout Snuggle Bunny on social media with the hashtag #SunnySproutBunny and inspire fellow crafters. Happy knitting!



