Starlight Bloom Gnome Ornament Free Pattern – Knit a Celestial Holiday Charm
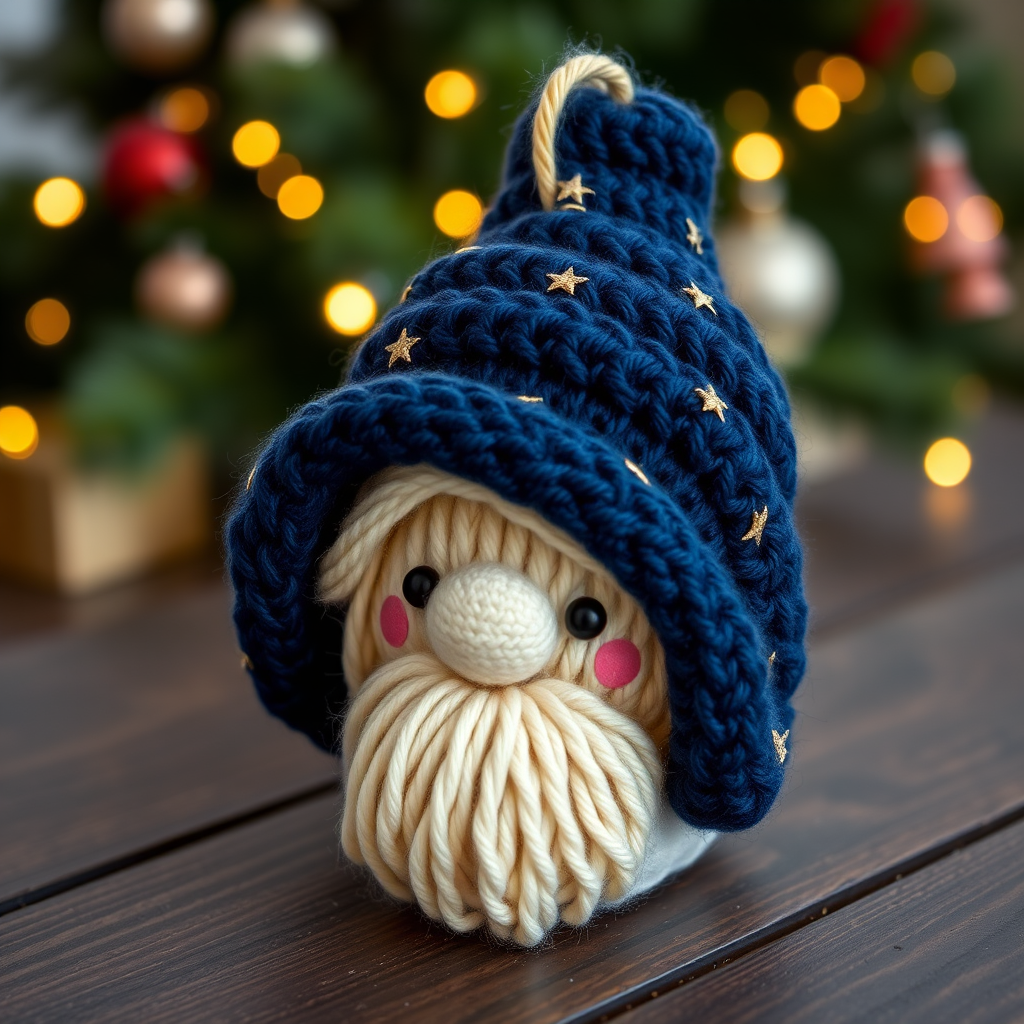
Starlight Bloom Gnome Ornament: A Celestial Knitting Project for Your Holiday Tree
There's something truly magical about handmade holiday decorations. They carry warmth, intention, and a story that store-bought ornaments simply can't replicate. Today, I'm thrilled to share a pattern that captures that enchantment perfectly: the Starlight Bloom Gnome Ornament. This little fellow features a deep navy hat sprinkled with golden stars and a fluffy, cloud-like cream beard that begs to be touched. It's a quick, satisfying project that adds a touch of celestial whimsy to your Christmas tree, gift wrap, or even as a charming addition to a winter tablescape.
Whether you're a seasoned knitter looking for a weekend project or a brave beginner ready to tackle their first amigurumi, this pattern is designed to be approachable and rewarding. Let's dive into creating this little piece of handmade magic together.
Materials Needed: Gathering Your Celestial Toolkit
Before we begin our knitting journey, let's ensure you have everything you need. This project uses simple, readily available materials, making it perfect for a spontaneous crafting session.
Yarn & Notions
- Worsted Weight Yarn: You'll need small amounts in three colors:
- Deep Navy Blue: For the starry hat.
- Cream: For the head and fluffy beard.
- Soft Gold: For the embroidered stars and hanging loop.
- Blush Pink Yarn: A tiny scrap for embroidering the cheeks.
- Polyester Fiberfill: For stuffing the head firmly.
- Tapestry Needle: For sewing pieces together and weaving in ends.
- Stitch Marker: To mark the beginning of your rounds (optional but helpful).
Knitting Tools
- US 4 (3.5 mm) Knitting Needles: You can use a set of double-pointed needles (DPNs) or a long circular needle for the magic loop method. Both work perfectly for knitting small circumferences in the round.
Gauge & Size
- Gauge: 22 stitches and 30 rows = 4 inches in stockinette stitch. While gauge isn't critical for a toy, matching it will ensure your ornament is the intended size.
- Finished Size: Approximately 3 inches tall, not including the hanging loop.
Step-by-Step Instructions: Knitting Your Gnome
This charming gnome is knitted in the round from the top down, starting with the head. Don't be intimidated by the small circumference—using DPNs or the magic loop method makes it a breeze. Let's get started!
Part 1: Knitting the Head and Body
We'll begin with the head, which forms the base of your gnome. Work these rounds carefully, keeping your tension even for a smooth, plump result.
- Cast On: Using your cream yarn, make a magic ring. Alternatively, cast on 6 stitches and join to work in the round, being careful not to twist. Place a stitch marker to mark the beginning of the round.
- Round 1: Knit into the front and back of each stitch (kfb) across the round. You will now have 12 stitches.
- Round 2: *Kfb, k1*; repeat from * to * around. You will now have 18 stitches.
- Round 3: *Kfb, k2*; repeat from * to * around. You will now have 24 stitches.
- Rounds 4-8: Knit every stitch. This creates the smooth, rounded crown of the head. You should have a nice, even tube.
- Round 9 (Decrease): *K2tog (knit two together), k2*; repeat from * to * around. You will now have 18 stitches.
- Round 10 (Decrease): *K2tog, k1*; repeat from * to * around. You will now have 12 stitches.
- Stuff the Head: This is a crucial step! Firmly stuff the head with your polyester fiberfill. Make sure it's plump and smooth, but not so tight that it distorts the knitting. The stuffing will give your gnome his adorable, round shape.
- Round 11 (Decrease): K2tog around. You will now have 6 stitches.
- Finish: Cut your yarn, leaving a 6-inch tail. Thread the tail onto your tapestry needle and pass it through the remaining 6 stitches. Pull tight to close the hole and secure. Weave in the end inside the head to hide it.
Part 2: Crafting the Fluffy Beard
The beard is what gives this gnome his cozy, textured charm. It's a simple garter stitch rectangle that we'll transform into a fluffy loop.
- Cast On: Using your cream yarn, cast on 10 stitches.
- Knit Rows: Knit every row (this is garter stitch) for a total of 6 rows. You'll have a neat little square.
- Bind Off: Bind off all stitches loosely. Cut your yarn, leaving a long tail for sewing.
- Form the Loop: Fold your knitted square in half so the short edges meet. Using your tapestry needle and the yarn tail, sew the short edges together to form a loop. This loop will fit over the gnome's face.
- Attach the Beard: Place the loop over the lower half of the gnome's head, positioning it so the seam is at the back. The top of the loop should sit just below where the hat will go. Sew the loop securely to the head at the top edge of the beard, leaving the bottom open.
- Fluff It Up: Here's the fun part! Gently pull the yarn fibers of the beard apart with your fingers to create a soft, fluffy, cloud-like texture. This gives the beard its characteristic "bloom."
Part 3: Knitting the Starry Hat
Now for the pièce de résistance—the celestial navy hat. This is knitted in the round and features gentle decreases to create its conical shape.
- Cast On: Using your navy blue yarn, cast on 18 stitches. Join to work in the round, being careful not to twist. Place a stitch marker.
- Rounds 1-4: Knit every stitch. This forms the base of the hat.
- Round 5 (Decrease): *K2tog, k4*; repeat from * to * around. You will now have 15 stitches.
- Rounds 6-7: Knit every stitch.
- Round 8 (Decrease): *K2tog, k3*; repeat from * to * around. You will now have 12 stitches.
- Rounds 9-10: Knit every stitch.
- Round 11 (Decrease): *K2tog, k2*; repeat from * to * around. You will now have 9 stitches.
- Rounds 12-13: Knit every stitch.
- Round 14 (Decrease): *K2tog, k1*; repeat from * to * around. You will now have 6 stitches.
- Rounds 15-16: Knit every stitch.
- Round 17 (Decrease): K2tog around. You will now have 3 stitches.
- Finish: Cut your yarn, leaving a 6-inch tail. Thread it through the remaining 3 stitches and pull tight to close the tip. Weave in the end.
- Fold the Brim: Fold the bottom edge of the hat up about 1/2 inch to create a cute, rolled brim.
- Embroider the Stars: Using your soft gold yarn and a tapestry needle, embroider small, random stars onto the hat. A simple star can be made with a straight stitch in the shape of an asterisk (*). Scatter them across the navy fabric for a celestial effect.
Part 4: Final Assembly & Finishing Touches
Now it's time to bring your gnome to life! This final assembly is where all the pieces come together.
- Attach the Hat: Place the hat onto the top of the gnome's head. It should sit snugly, covering the top of the beard. Sew the hat securely to the head around the base of the hat, just above the folded brim.
- Create the Hanging Loop: Cut a piece of soft gold yarn about 6 inches long. Fold it in half to form a loop. Using your tapestry needle, thread the two ends through the very tip of the hat. Tie a secure knot on the inside of the hat and weave in the ends. This loop will allow you to hang your ornament on the tree.
- Embroider the Cheeks: Using your blush pink yarn, embroider two tiny, circular cheeks on the gnome's face, just below where the eyes would be. A simple satin stitch or a few small straight stitches will create a sweet, rosy glow.
- Weave in All Ends: Take a moment to carefully weave in any remaining loose yarn ends using your tapestry needle. This ensures your ornament is neat, durable, and ready for years of holiday cheer.
And there you have it—your very own Starlight Bloom Gnome Ornament! This little guy is the perfect project for an afternoon of cozy crafting. He makes a wonderful gift, a delightful addition to your own tree, or a charming way to add a touch of handmade magic to a gift package. Happy knitting, and may your holidays be filled with starlight and warmth!



