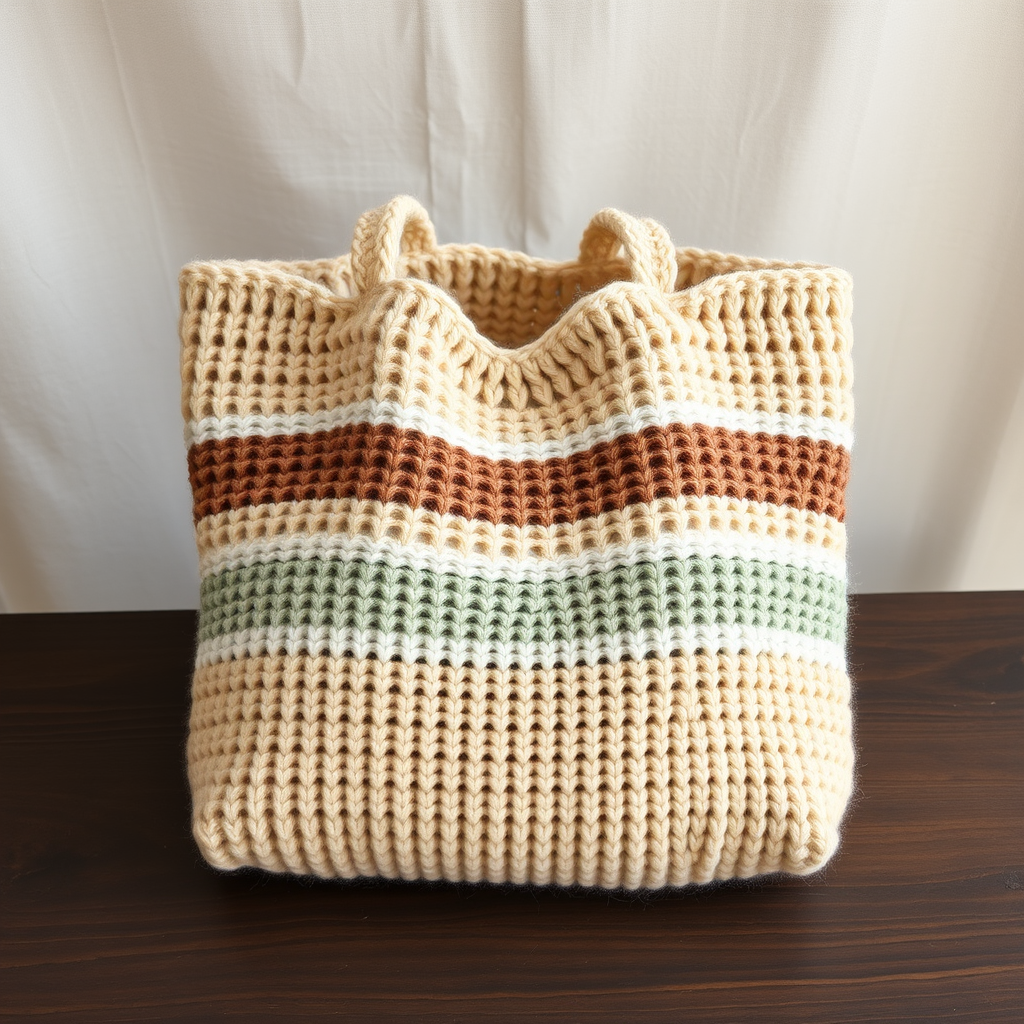
Harvest Moon Woven Tote Free Pattern – Knit a Textured Autumn Carryall

Harvest Moon Woven Tote Free Pattern – Knit a Textured Autumn Carryall
Carry the golden glow of autumn wherever you go with this richly textured tote, knitted in warm wheat, rust, and olive tones. The woven-look slip-stitch pattern creates a sturdy, beautiful bag that's perfect for farmers' market hauls, library books, or cozy day trips. This free knitting pattern is beginner-friendly, uses simple knit and purl stitches with a clever slip-stitch technique, and results in a rustic, handcrafted accessory you'll be proud to carry.
Whether you're new to colorwork or just love textured knits, this tote is a satisfying weekend project. The flat-panel construction means no complicated circular knitting—just two identical rectangles seamed together, with separately knitted handles. Let's dive into the pattern and create your new favorite autumn accessory.
Materials Needed
Before you begin, gather the following supplies. All are readily available at craft stores or online.
Yarn
- Worsted weight cotton yarn (e.g., Lion Brand 24/7 Cotton) in three colors:
- Wheat (MC – Main Color): approx. 300g (about 6 balls of 50g)
- Rust (CC1 – Contrast Color 1): approx. 100g (about 2 balls of 50g)
- Olive (CC2 – Contrast Color 2): approx. 100g (about 2 balls of 50g)
Needles & Notions
- US 7 (4.5 mm) knitting needles – straight or circular (used flat)
- Tapestry needle for seaming and weaving in ends
- Scissors
- Stitch markers (optional, for counting rows)
Gauge
20 stitches x 28 rows = 4 inches in stockinette stitch (knit one row, purl one row). Always knit a gauge swatch to ensure your finished tote matches the intended size. If your gauge is off, adjust needle size accordingly.
Step-by-Step Instructions
This tote is knitted flat in two identical panels, then seamed together. The woven slip-stitch pattern mimics a basket weave, and the color changes create beautiful autumn stripes. Follow along carefully—each step is explained in detail.
Panel (Make 2)
With MC (Wheat), cast on 40 stitches. Use a long-tail cast-on for a neat, stretchy edge.
Row 1 (Right Side): Knit all stitches. (This is a stockinette row.)
Row 2 (Wrong Side): Purl all stitches.
Row 3: Knit 2, *slip 1 purlwise with yarn in back, knit 3*; repeat from * to * until last 2 stitches, knit 2.
Tip: "Slip 1 purlwise with yarn in back" means you insert the right needle into the next stitch as if to purl, but instead of wrapping yarn, you simply slide the stitch to the right needle. Keep the working yarn behind the work (on the wrong side). This creates a long, floating strand on the back.
Row 4: Purl 2, *slip 1 purlwise with yarn in front, purl 3*; repeat from * to * until last 2 stitches, purl 2.
Tip: Here, keep the yarn in front of the work (on the wrong side) as you slip the stitch. This maintains the woven effect.
Row 5: Knit all stitches.
Row 6: Purl all stitches.
Row 7: Knit 4, *slip 1 purlwise with yarn in back, knit 3*; repeat from * to * until last 4 stitches, knit 4.
Note: This row shifts the slip-stitch pattern by 2 stitches, creating the diagonal basketweave effect.
Row 8: Purl 4, *slip 1 purlwise with yarn in front, purl 3*; repeat from * to * until last 4 stitches, purl 4.
Repeat Rows 1-8 for the pattern, but after every 8 rows (i.e., after each complete pattern repeat), switch colors in this order:
- MC (Wheat) – 8 rows
- CC1 (Rust) – 8 rows
- MC (Wheat) – 8 rows
- CC2 (Olive) – 8 rows
- MC (Wheat) – 8 rows
- CC1 (Rust) – 8 rows
- MC (Wheat) – 8 rows
- CC2 (Olive) – 8 rows
- MC (Wheat) – 8 rows
That's 9 stripes of 8 rows each = 72 rows total in the patterned section. When changing colors, simply tie the new yarn to the old at the beginning of a right-side row, leaving a 6-inch tail to weave in later. Do not cut the previous color until you're sure you won't need it again (you'll use MC multiple times).
After the last stripe (72 rows of pattern), continue with MC and knit 6 rows of garter stitch (knit every row). This creates a sturdy, non-curling top edge.
Bind off loosely on the last row. To bind off, knit the first two stitches, then pass the first stitch over the second and off the needle. Knit one more stitch, pass the previous stitch over, and repeat until one stitch remains. Cut yarn, pull through the last loop, and tighten.
Repeat this entire process to make a second identical panel.
Handles (Make 2)
With MC (Wheat), cast on 8 stitches.
Knit in garter stitch (knit every row) for 18 inches. This creates a sturdy, stretchy handle that's comfortable on the shoulder.
Bind off loosely as described above. Weave in the ends at the cast-on and bind-off edges.
Assembly
Now it's time to bring your tote together. Take your time with seaming for a professional finish.
Step 1: Sew the side and bottom seams. Place the two panels with right sides together (the pretty sides facing each other). Using a tapestry needle and a length of MC yarn, whip stitch or mattress stitch along the side and bottom edges, leaving the top open. Start at one top corner, sew down the side, across the bottom, and up the other side. Use a ½-inch seam allowance for durability. When you reach the top, knot securely and weave in the end.
Step 2: Turn right side out. Carefully push the bag through the top opening so the right side faces out. Gently shape the corners with your fingers.
Step 3: Fold and sew the hem. Fold the top edge down 1 inch toward the inside of the bag. Pin or clip in place. Using a whip stitch or running stitch with MC yarn, sew the hem down all the way around. This gives a clean, finished edge and adds structure.
Step 4: Attach the handles. Place each handle on the inside of the tote, positioning them 3 inches from the side seams and centering them. The handles should be folded in half so the ends meet at the hem. Using a whip stitch, sew each handle end securely to the inside of the bag, going through both the handle and the hem fabric. Sew a square or X pattern for extra strength, then knot and weave in ends.
Step 5: Weave in all remaining ends. Use your tapestry needle to thread any loose yarn tails through the inside of the bag, then trim close. Make sure all color-change tails are securely woven in.
Finishing Touches & Care
Your Harvest Moon Woven Tote is complete! Gently block the bag by misting with water and laying flat to dry, shaping it to the correct dimensions (approximately 14 inches wide and 12 inches tall, plus handles).
Care instructions: Because this is cotton yarn, you can hand wash in cool water with mild detergent and lay flat to dry. Do not machine wash or tumble dry, as this may cause shrinkage or distortion.
This tote is as practical as it is beautiful—the cotton yarn is strong and washable, the woven stitch pattern hides wear, and the warm autumn colors go with everything. Make one for yourself, or knit a few as heartfelt handmade gifts for the harvest season.
Happy knitting, and enjoy carrying a little piece of autumn wherever you go!