Frostfire Fox Amigurumi Free Pattern – A Cozy Knitted Forest Spirit
Frostfire Fox Amigurumi Free Pattern – A Cozy Knitted Forest Spirit
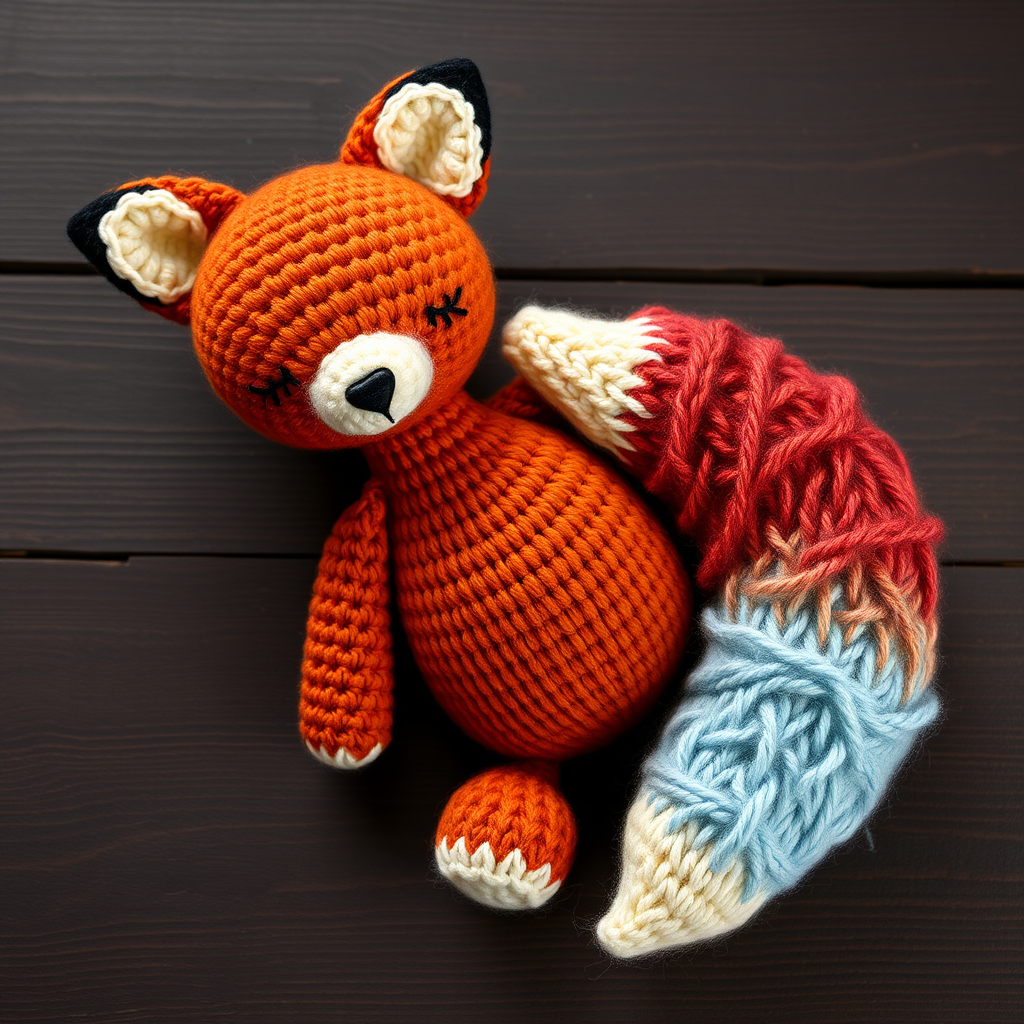
Bring a touch of woodland magic to your shelf with this knitted fox spirit, wrapped in a swirling gradient of ember and ice. Its oversized tail and gentle face make it a heartwarming gift for nature lovers. This amigurumi pattern is perfect for knitters who want to create a whimsical, handmade companion that captures the essence of a cozy forest winter. The combination of burnt orange, cream, charcoal, and a gradient yarn creates a striking visual effect that will stand out in any room.
Whether you're a seasoned knitter or a brave beginner looking for a fun project, this Frostfire Fox is designed to be approachable and rewarding. The pattern is knitted flat in pieces and seamed, making it easy to manage each section before assembly. With a few simple crochet details for the face, you'll have a charming forest spirit ready to snuggle into your life.
Materials Needed
Before you begin, gather the following materials to ensure a smooth knitting experience:
- Yarn: Worsted weight yarn in the following colors:
- Burnt orange (for body, head, and ears)
- Cream (for muzzle and head base)
- Charcoal (for legs)
- Gradient yarn (e.g., from rust to pale blue) for the tail
- Needles: US 5 (3.75 mm) knitting needles, or size needed to match gauge
- Notions: Tapestry needle for seaming and embroidery, stitch markers
- Optional: Small crochet hook (for the muzzle), black yarn for face details, contrasting yarn for a scarf
Gauge: 22 stitches and 30 rows = 4 inches in stockinette stitch. Gauge is not critical for amigurumi, but consistent tension will help your pieces look neat and uniform.
Step-by-Step Instructions
This pattern is knitted flat in pieces and seamed, with a few crochet details for the face. Work all pieces in stockinette stitch (knit on the right side, purl on the wrong side) unless otherwise noted. Let's dive into each section!
Head (Knit Flat)
The head is worked from the top down, starting with cream yarn for the face area, then transitioning to burnt orange for the rest.
- Cast on: With cream yarn, cast on 12 stitches.
- Row 1 (RS): Knit all stitches.
- Row 2: Purl all stitches.
- Row 3 (Increase row): Kfb (knit front and back) across all stitches – you will have 24 stitches.
- Row 4: Purl all stitches.
- Row 5: Knit all stitches.
- Row 6: Purl all stitches.
- Row 7 (Increase row): Kfb, k10, kfb, k10, kfb – you will have 27 stitches.
- Rows 8-14: Work even in stockinette stitch (knit on RS, purl on WS).
- Row 15 (Decrease row): K2tog (knit two together), k9, k2tog, k9, k2tog – you will have 24 stitches.
- Row 16: Purl all stitches.
- Row 17 (Decrease row): K2tog across all stitches – you will have 12 stitches.
- Row 18: Purl all stitches.
- Finish: Cut the yarn, leaving a long tail. Thread the tail through a tapestry needle, then pass it through the remaining 12 stitches on the needle. Pull tight to gather the top of the head. Seam the back of the head using the mattress stitch or whip stitch, leaving a small opening. Stuff the head firmly with fiberfill, then close the opening completely.
Body (Knit Flat)
The body is worked from the bottom up, starting with burnt orange yarn.
- Cast on: With burnt orange yarn, cast on 16 stitches.
- Row 1 (RS): Knit all stitches.
- Row 2: Purl all stitches.
- Row 3 (Increase row): Kfb, k6, kfb, k6, kfb – you will have 19 stitches.
- Rows 4-10: Work even in stockinette stitch.
- Row 11 (Decrease row): K2tog, k5, k2tog, k5, k2tog – you will have 16 stitches.
- Rows 12-18: Work even in stockinette stitch.
- Row 19 (Decrease row): K2tog across all stitches – you will have 8 stitches.
- Finish: Cut the yarn, leaving a long tail. Thread through the remaining 8 stitches, pull tight, and seam the back of the body. Stuff the body firmly, then close the opening.
Tail (Knit Flat, Using Gradient Yarn)
The tail is the showstopper of this project, featuring the beautiful gradient yarn that transitions from rust to pale blue.
- Cast on: With gradient yarn, cast on 8 stitches.
- Row 1 (RS): Knit all stitches.
- Row 2: Purl all stitches.
- Row 3 (Increase row): Kfb, k6, kfb – you will have 10 stitches.
- Rows 4-12: Work even in stockinette stitch.
- Row 13 (Increase row): Kfb, k8, kfb – you will have 12 stitches.
- Rows 14-24: Work even in stockinette stitch.
- Row 25 (Decrease row): K2tog, k8, k2tog – you will have 10 stitches.
- Rows 26-30: Work even in stockinette stitch.
- Row 31 (Decrease row): K2tog, k6, k2tog – you will have 8 stitches.
- Row 32: Purl all stitches.
- Finish: Cut the yarn, leaving a long tail. Thread through the remaining 8 stitches, pull tight, and seam the tail. Stuff lightly, especially the base of the tail, to give it shape. Close the opening.
Legs (Make 2, Knit Flat)
These little charcoal legs will ground your fox and give it a sturdy sitting position.
- Cast on: With charcoal yarn, cast on 6 stitches.
- Row 1 (RS): Knit all stitches.
- Row 2: Purl all stitches.
- Row 3 (Increase row): Kfb across all stitches – you will have 12 stitches.
- Rows 4-8: Work even in stockinette stitch.
- Row 9 (Decrease row): K2tog across all stitches – you will have 6 stitches.
- Finish: Cut the yarn, leaving a long tail. Thread through the remaining 6 stitches, pull tight, and seam the leg. Stuff lightly, then close the opening.
Ears (Make 2, Knit Flat)
These small triangular ears add the perfect finishing touch to your fox's head.
- Cast on: With burnt orange yarn, cast on 4 stitches.
- Row 1 (RS): Knit all stitches.
- Row 2: Purl all stitches.
- Row 3 (Increase row): Kfb, k2, kfb – you will have 6 stitches.
- Rows 4-6: Work even in stockinette stitch.
- Row 7 (Decrease row): K2tog, k2, k2tog – you will have 4 stitches.
- Row 8: Purl all stitches.
- Finish: Bind off all stitches. Fold each ear in half and seam the bottom edge to form a triangle shape.
Assembly
Now that all your pieces are knitted and stuffed, it's time to bring your Frostfire Fox to life!
- Attach the head to the body: Using a tapestry needle and matching yarn, sew the head to the top of the body. Make sure the seam is secure and the head sits upright.
- Attach the tail: Sew the tail to the back of the body, curving it upward so it wraps around the fox's side. This creates the signature bushy tail look.
- Attach the legs: Sew the legs to the bottom front of the body, positioning them so the fox can sit upright.
- Attach the ears: Sew the ears to the top of the head, spacing them evenly apart.
Face Details
The face is what gives your fox its gentle, whimsical expression. Follow these steps to add the finishing touches:
- Create the muzzle: Using a small crochet hook and cream yarn, make a magic ring. Chain 2, then work 6 single crochet into the ring. Pull the ring closed and sew this small circle to the front of the face, centered below the eyes.
- Embroider the nose: Using black yarn and a tapestry needle, embroider a small triangle nose at the top of the muzzle.
- Embroider the eyes: Using black yarn, embroider two closed eyes (gentle curved lines) above the muzzle. This gives the fox a peaceful, sleeping expression.
Optional Scarf
For an extra cozy touch, you can add a tiny scarf to your fox:
- Cast on 6 stitches with a contrasting color yarn.
- Knit in garter stitch (knit every row) for 20 rows.
- Bind off and tie the scarf around the fox's neck.
Final Thoughts
Your Frostfire Fox is now complete! This charming forest spirit is perfect for gifting to nature lovers, displaying on a shelf, or cuddling up with on a cold winter night. The gradient tail and gentle expression make it a truly unique handmade treasure.
Remember, amigurumi is all about practice and personal touch. Don't be afraid to experiment with different yarn colors or add your own creative details. Happy knitting!



