Coastal Drift Asymmetric Triangle Shawl Free Pattern
Coastal Drift Asymmetric Triangle Shawl: A Breezy First Project
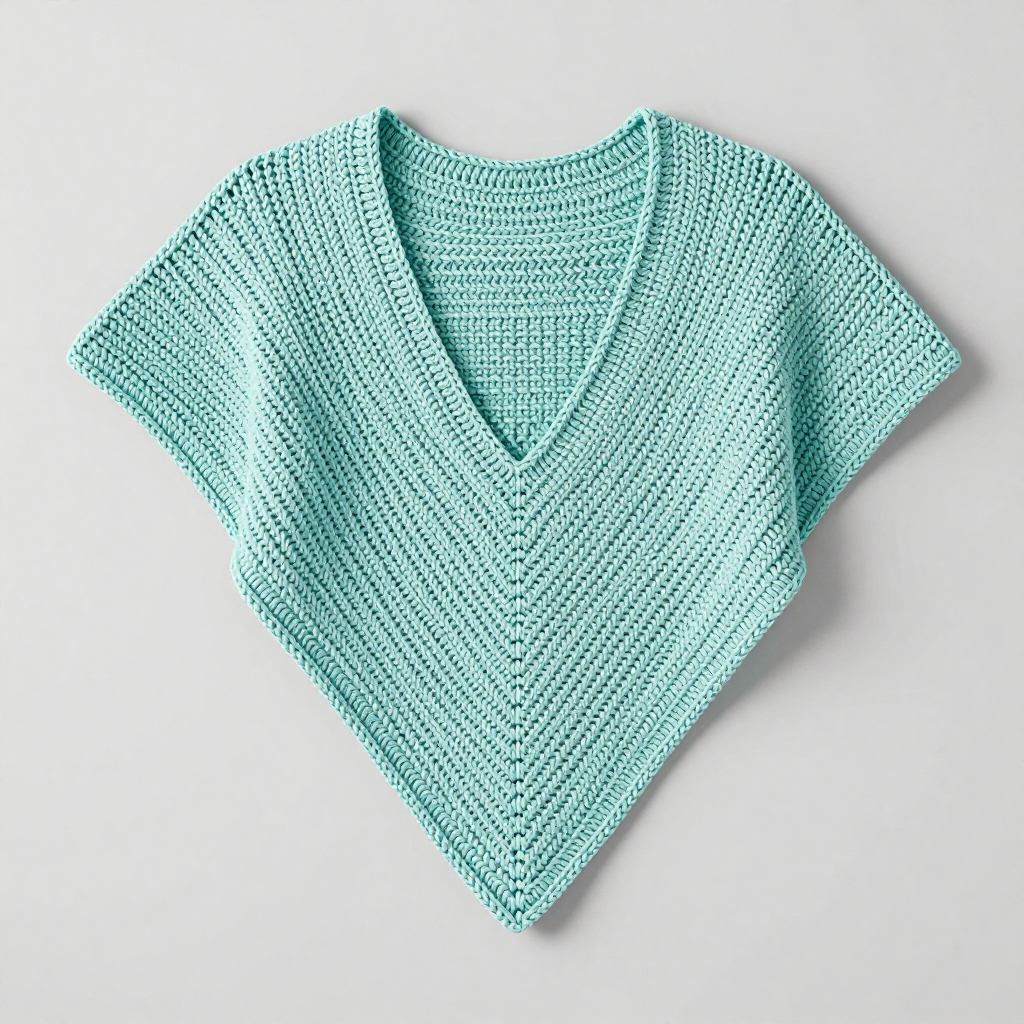
If you have never held a crochet hook before, this is the project to start with. The Coastal Drift Shawl is a soft, sea-glass aqua wrap that grows from one narrow tip into a generous, wearable triangle — and it uses only one stitch, repeated over and over, so you get plenty of practice without ever feeling lost. It is perfect for absolute beginners, for anyone who wants a relaxing "no-thinking" project, and for anyone who wants a beautiful handmade gift that looks far more complicated than it is. The finished shawl measures about 50 inches across the top edge and 29 inches deep at the center, and it drapes lightly over the shoulders like a warm breeze. Made in DK-weight yarn, the fabric is airy and soft, with neat rows of V-shaped double crochet stitches and a simple single crochet border that gives every edge a clean, polished finish.
Materials Needed
- Yarn: DK weight (category 3) yarn, approximately 600–650 yards (550–600 m). The sample is shown in a soft sea-glass aqua. A cotton-linen blend or a smooth acrylic both work beautifully. Tip: buy one extra ball so you never run short near the end.
- Crochet hook: G/6 (4.0 mm). (The "G/6" is the US size; "4.0 mm" is the metric size. They are the same hook.)
- Stitch markers: at least 4 (small clips or safety pins work too). These help you keep track of your increasing edge.
- Tapestry needle: a large blunt needle with an eye big enough for your yarn, used for weaving in ends.
- Scissors: any sharp pair for cutting yarn.
- Measuring tape: for checking gauge and the finished size.
- Blocking supplies (optional but recommended): rust-proof pins and a towel or blocking mat.
- Finished size: approximately 50 inches (127 cm) across the top edge and 29 inches (74 cm) from top center to bottom point.
Abbreviations and Beginner Glossary
Every abbreviation used in this pattern is listed below, explained in plain English as if you have never crocheted before. Read through this list once before you begin — it will make the instructions feel like a friendly conversation instead of a code.
- ch – chain: Make a loop of yarn on your hook (a "slip knot"), then wrap the yarn over the hook and pull it through the loop already on the hook. That is one chain. Chains form the foundation you build on.
- dc – double crochet: Wrap the yarn over your hook once, insert the hook into the stitch, wrap the yarn over again and pull up a loop (you now have 3 loops on the hook), wrap the yarn over and pull through the first 2 loops (2 loops remain), wrap the yarn over and pull through the last 2 loops (1 loop remains). That is one double crochet. It is a tall stitch that creates the V-shaped texture you see in the finished shawl.
- sc – single crochet: Insert the hook into the stitch, wrap the yarn over and pull up a loop (2 loops on the hook), wrap the yarn over and pull through both loops. That is one single crochet — a short, firm stitch used for the border.
- sl st – slip stitch: Insert the hook into the stitch, wrap the yarn over and pull it straight through both the stitch and the loop on your hook in one motion. It makes an almost invisible join and does not add height.
- st(s) – stitch(es): One completed stitch, or several. When the pattern says "each st," it means every stitch across the row.
- sp – space: The small gap between stitches. (Not used in the main body of this pattern, but you may see it in other patterns.)
- turning ch – turning chain: The chains you make at the start of a row so your work can "turn" and reach the correct height. In this pattern, ch 3 at the start of a row counts as the first double crochet of that row.
- increase: Working two stitches into the same stitch, which adds one extra stitch to your row and makes the shawl grow wider.
- fasten off: Cut the yarn a few inches from your work, then pull the tail all the way through the last loop on your hook to lock it. This finishes the piece so it will not unravel.
- weave in ends: Thread a yarn tail onto a tapestry needle and sew it back and forth through the back of the fabric so it disappears.
- turn: Flip your work over so you can crochet back along the row you just made. Every row in this pattern ends with a turn.
Gauge
Gauge: 8 stitches x 3 rows of double crochet = a 2-inch (5 cm) square.
Why gauge matters: Gauge is simply how big your stitches come out. If your stitches are larger than the pattern's, your shawl will end up bigger than 50 inches; if they are smaller, it will end up smaller. Checking gauge first means your finished shawl will match the measurements and use the right amount of yarn.
How to make a gauge swatch: With your 4.0 mm hook and your yarn, chain 20. Work 1 double crochet into the 4th chain from the hook and into each chain across (you will have 18 double crochets). Turn, ch 3, and work 1 double crochet into each stitch across. Repeat for a total of 6 rows. Lay the swatch flat and measure a 2-inch square in the middle. Count how many stitches fit across 2 inches and how many rows fit in 2 inches. If you have more than 8 stitches in 2 inches, your stitches are too tight — try a hook one size larger. If you have fewer than 8, your stitches are too loose — try a hook one size smaller. Do not skip this step — it takes ten minutes and saves hours of disappointment.
Beginner Tips Before You Start
- Place a stitch marker in the last stitch of every row. This shawl increases at the end of each row, and the last stitch can be hard to see. A marker tells you exactly where to put your final increase so your edges stay straight and your stitch counts stay correct.
- Do not pull your yarn too tight. Beginners often grip the yarn hard, which makes tiny, stiff stitches. Keep a relaxed, even tension — the yarn should glide, not fight. Loose, even stitches are what give this shawl its beautiful drape.
- Count your stitches at the end of every row. The count is written in parentheses at the end of each row. If your count is off by one, fix it right away — it is much easier to correct one row than twenty.
- Remember that the ch 3 at the start of each row counts as your first double crochet. Do not work a stitch into the base of that chain, or you will accidentally add an extra stitch.
- Work in good light and take breaks. Your hands and eyes will tire faster than you expect at first. Ten minutes of rest every half hour keeps your tension even and your stitches happy.
- Keep your yarn label. If you run out and need more, the label tells you the exact dye lot so your new yarn matches perfectly.
Step-by-Step Instructions
How this shawl is built: You begin at one narrow tip with just 3 stitches and work sideways. On every single row you add one extra stitch at the end, so the triangle grows wider and wider. After 72 rows you will have a wide, asymmetric triangle. Then you add a simple border all the way around. That is the whole shawl — one stitch, one increase, repeated.
Set-Up
Row 1: Ch 4. Work 2 dc in the 4th ch from hook (the first 3 ch count as 1 dc). Turn. (3 dc)
What this means: Make 4 chains. Skip the first 3 chains (they stand in for your first double crochet), and work 2 double crochets into the very last chain. You now have 3 double crochets in total. Flip your work over.
Body
Row 2: Ch 3 (counts as first dc here and throughout), dc in each of the next 2 dc, then 2 dc in the top of the turning ch. Turn. (5 dc)
What this means: Chain 3 to start the row. Work one double crochet into each of the next 2 stitches. Then work 2 double crochets into the top of the turning chain from the row below — that is your increase. Flip your work over.
Row 3: Ch 3, dc in each dc across to the last st, 2 dc in the last st. Turn. (7 dc)
What this means: Chain 3. Work one double crochet into every stitch across until you reach the very last stitch. Work 2 double crochets into that last stitch (your increase). Flip your work over.
Row 4: Ch 3, dc in each dc across to the last st, 2 dc in the last st. Turn. (9 dc)
What this means: Exactly the same as Row 3 — one double crochet in every stitch, then 2 double crochets in the final stitch. Flip your work over.
Rows 5–72: Repeat Row 4, increasing 1 st at the end of every row, until the shawl measures approximately 50 inches along the long top edge and 29 inches deep at the center. Fasten off, leaving a 6-inch tail.
What this means: Every row from 5 to 72 is identical to Row 4: chain 3, one double crochet in each stitch across, 2 double crochets in the last stitch, turn. Each row adds exactly one stitch. Here is the stitch count for each row so you can check your work as you go:
- Row 5: (11 dc)
- Row 6: (13 dc)
- Row 7: (15 dc)
- Row 8: (17 dc)
- Row 9: (19 dc)
- Row 10: (21 dc)
- Row 11: (23 dc)
- Row 12: (25 dc)
- Row 13: (27 dc)
- Row 14: (29 dc)
- Row 15: (31 dc)
- Row 16: (33 dc)
- Row 17: (35 dc)
- Row 18: (37 dc)
- Row 19: (39 dc)
- Row 20: (41 dc)
- Row 21: (43 dc)
- Row 22: (45 dc)
- Row 23: (47 dc)
- Row 24: (49 dc)
- Row 25: (51 dc)
- Row 26: (53 dc)
- Row 27: (55 dc)
- Row 28: (57 dc)
- Row 29: (59 dc)
- Row 30: (61 dc)
- Row 31: (63 dc)
- Row 32: (65 dc)
- Row 33: (67 dc)
- Row 34: (69 dc)
- Row 35: (71 dc)
- Row 36: (73 dc)
- Row 37: (75 dc)
- Row 38: (77 dc)
- Row 39: (79 dc)
- Row 40: (81 dc)
- Row 41: (83 dc)
- Row 42: (85 dc)
- Row 43: (87 dc)
- Row 44: (89 dc)
- Row 45: (91 dc)
- Row 46: (93 dc)
- Row 47: (95 dc)
- Row 48: (97 dc)
- Row 49: (99 dc)
- Row 50: (101 dc)
- Row 51: (103 dc)
- Row 52: (105 dc)
- Row 53: (107 dc)
- Row 54: (109 dc)
- Row 55: (111 dc)
- Row 56: (113 dc)
- Row 57: (115 dc)
- Row 58: (117 dc)
- Row 59: (119 dc)
- Row 60: (121 dc)
- Row 61: (123 dc)
- Row 62: (125 dc)
- Row 63: (127 dc)
- Row 64: (129 dc)
- Row 65: (131 dc)
- Row 66: (133 dc)
- Row 67: (135 dc)
- Row 68: (137 dc)
- Row 69: (139 dc)
- Row 70: (141 dc)
- Row 71: (143 dc)
- Row 72: (145 dc)
After Row 72, fasten off by cutting the yarn about 6 inches from your work and pulling the tail through the last loop on your hook. Check your measurement: lay the shawl flat. The long top edge should measure about 50 inches, and the depth from the top center down to the bottom point should be about 29 inches. If it is a little short, simply work a few more rows in the same way, adding one stitch each row, until it measures correctly.
Border
Round 1: Join yarn with a sl st at one corner of the top edge. Ch 1, work sc evenly along the top edge, down the angled side, and back up the other side, placing 3 sc in the bottom point to turn the corner smoothly. Join with a sl st to the first sc.
What this means: Attach your yarn at one end of the long top edge using a slip stitch. Chain 1 (this does not count as a stitch). Now work single crochets all the way around the outside of the shawl: one single crochet into the end of each row along the top edge, one single crochet into each stitch down the angled side, and when you reach the very bottom point, work 3 single crochets into that one point so the corner turns smoothly without pulling. Continue up the other side the same way. When you get back to where you started, join with a slip stitch into the first single crochet you made. Keep your single crochets even and relaxed — if they are too tight, the border will pucker.
Round 2: Ch 1, sc in each sc around, working 3 sc in each corner point. Join with a sl st. Fasten off and weave in all ends.
What this means: Chain 1. Work one single crochet into every single crochet from the previous round, all the way around. At each corner point (including the bottom point), work 3 single crochets into that one stitch so the corner stays flat and sharp. Join with a slip stitch to the first single crochet. Cut the yarn and pull the tail through the last loop to fasten off.
Assembly and Finishing
Weaving in ends: Thread each yarn tail onto your tapestry needle. Turn the shawl to the wrong side (the back). Sew the tail back and forth through the back of about 2 inches of stitches, changing direction once or twice so it cannot work loose. Trim the yarn close to the fabric. Do this for every tail — the starting tail, the ending tail, and any tails from joining new yarn.
Blocking: Blocking is simply dampening the shawl and pinning it to its final shape so the stitches open up and the edges become even. Lay the shawl on a towel or blocking mat. Lightly mist it with water (or press a damp cloth gently over it with a warm iron — never let the iron touch the yarn directly). Pin the top edge straight and pin the bottom point out to its full 29-inch depth. Use rust-proof pins so they do not leave marks. Leave it to dry completely, usually overnight. When you unpin it, the shawl will be soft, even, and beautifully drapey.
Final check: Give the shawl a gentle shake, hold it up by the top edge, and admire your work. You have just crocheted a real, wearable garment — congratulations!
Pro Tips and Variations
- Change colors for a gradient look: Work the first 24 rows in one color, the next 24 rows in a second color, and the final 24 rows plus the border in a third. Simply fasten off at the end of a row and join the new color at the start of the next row with a slip stitch. Choose three shades of the same color family for a soft, sea-glass fade.
- Make it bigger or smaller: Because every row adds exactly one stitch, you can stop at any row you like for a smaller shawlette, or keep going past Row 72 for a larger wrap. Just remember that each extra row uses more yarn — add about 8–10 yards per extra row.
- Try a different yarn: This pattern works with any DK weight yarn. A cotton-linen blend gives a crisp, summery drape; a soft acrylic is cozy and easy to wash; a merino blend feels luxurious against the skin. Always check your gauge again when you change yarn, because different fibers behave differently.
- Add a lacy touch: For a lighter, more open shawl, work every third row as (ch 1, skip 1 st, dc in next st) across instead of solid double crochet. This creates little windows of air that make the shawl feel even breezier — perfect for warm evenings.