Everlasting Crochet Terrarium Free Pattern – A Botanical Glassless Garden
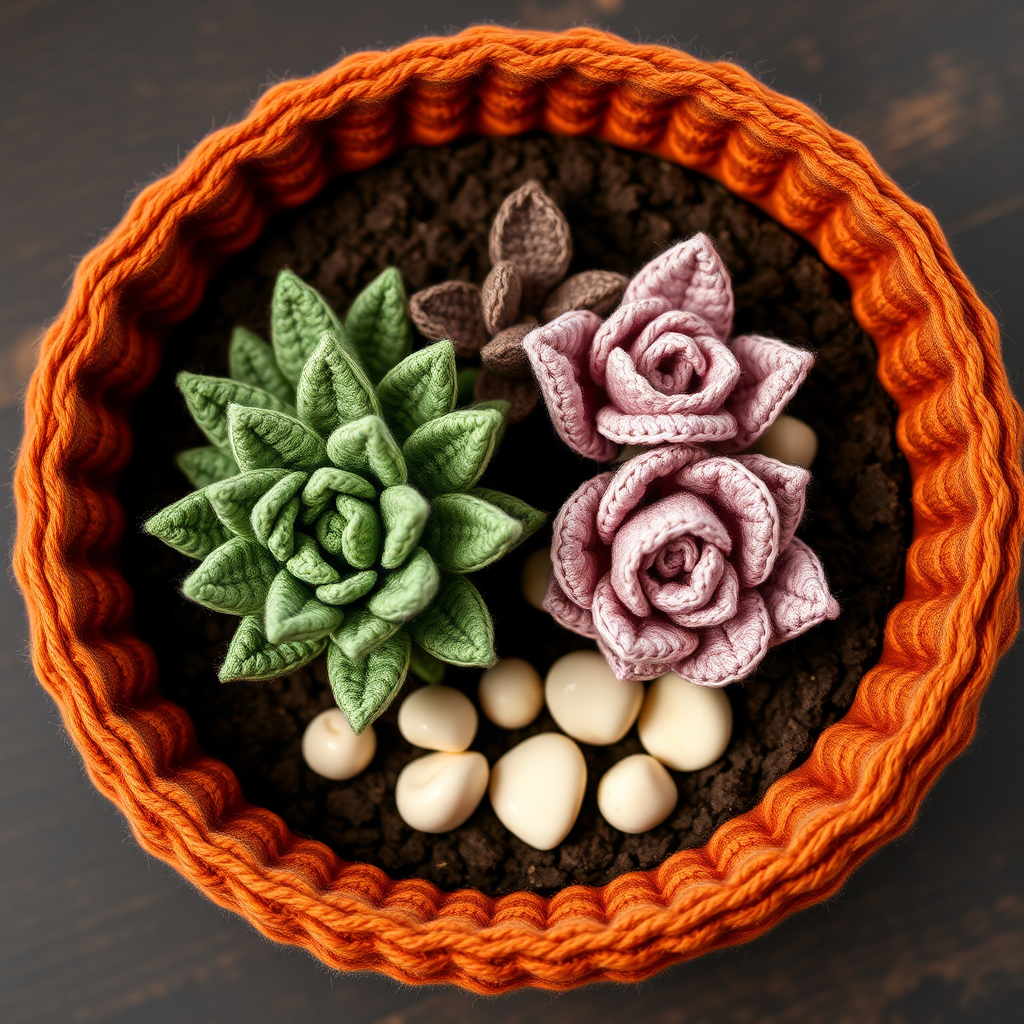
Everlasting Crochet Terrarium Free Pattern – A Botanical Glassless Garden
Bring a touch of eternal spring to your shelf with this charming crocheted terrarium! Complete with lush succulents and a cozy yarn pot, this project requires no watering, no sunlight, and no maintenance—just pure handmade charm. Whether you're a seasoned crocheter or a curious beginner, this pattern is designed to be approachable, rewarding, and endlessly satisfying. The earthy color palette of terracotta, sage, moss, dusty pink, and cream will add a warm, organic touch to any room. Let's dive in and create your very own everlasting garden!
Materials Needed
Before you begin, gather the following supplies. All items are readily available at craft stores or online.
- Yarn: Worsted weight cotton yarn in the following colors:
- Sage green (for Echeveria succulent)
- Moss green (for Aloe succulent)
- Dusty pink (for Pink rosette succulent)
- Terracotta (for the pot)
- Dark brown (for the soil)
- Cream (for decorative pebbles)
- Crochet Hook: 3.5mm (E) crochet hook
- Yarn needle: For sewing pieces together and weaving in ends
- Scissors
- Stuffing: Polyester fiberfill or any soft stuffing material (for pebbles)
- Stitch marker (optional but helpful for tracking rounds)
Gauge: 4 sc x 4 rows = 1 inch. Gauge is not critical for this project, so don't worry if your tension is slightly different—just aim for a firm, even fabric.
Step-by-Step Instructions
This pattern creates a self-contained crochet terrarium with a pot, soil, and three distinct succulent plants. All pieces are worked in continuous spirals unless otherwise noted. Let's start with the foundation!
Part 1: The Terracotta Pot
The pot is worked from the bottom up, with a decorative ribbed texture created by working in back loops only.
- Round 1: Make a magic ring, work 6 single crochet (sc) into the ring. (6 stitches)
- Round 2: Work 2 sc in each stitch around. (12 stitches)
- Round 3: *Sc in the next stitch, 2 sc in the next stitch*; repeat from * to * around. (18 stitches)
- Round 4: *Sc in the next 2 stitches, 2 sc in the next stitch*; repeat around. (24 stitches)
- Round 5: *Sc in the next 3 stitches, 2 sc in the next stitch*; repeat around. (30 stitches)
- Rounds 6-10: Sc in each stitch around. (30 stitches)
- Round 11: Working in the back loops only, sc in each stitch around. This creates the ribbed rim of the pot. (30 stitches)
- Rounds 12-15: Sc in each stitch around. (30 stitches)
- Fasten off, leaving a long tail for weaving in. Weave in the end securely.
Part 2: The Soil Disc
The soil sits on top of the pot and provides the base for your succulents.
- Round 1: Make a magic ring, work 6 sc into the ring. (6 stitches)
- Round 2: 2 sc in each stitch around. (12 stitches)
- Round 3: *Sc in the next stitch, 2 sc in the next stitch*; repeat around. (18 stitches)
- Round 4: *Sc in the next 2 stitches, 2 sc in the next stitch*; repeat around. (24 stitches)
- Round 5: *Sc in the next 3 stitches, 2 sc in the next stitch*; repeat around. (30 stitches)
- Round 6: Sc in each stitch around. (30 stitches)
- Fasten off, leaving a long tail for sewing. Place the soil disc on top of the pot and sew it in place using the yarn needle and the long tail.
Part 3: Succulent 1 – Echeveria (Sage Green)
This rosette-style succulent features layered, pointed petals.
- Round 1: Magic ring, 6 sc. (6 stitches)
- Round 2: *Sc in the next stitch, 2 sc in the next stitch*; repeat around. (9 stitches)
- Round 3: *Sc in the next 2 stitches, 2 sc in the next stitch*; repeat around. (12 stitches)
- Round 4: *Sc in the next 3 stitches, 2 sc in the next stitch*; repeat around. (15 stitches)
- Round 5: *Sc in the next 4 stitches, 2 sc in the next stitch*; repeat around. (18 stitches)
- Round 6: *Sc in the next 5 stitches, 2 sc in the next stitch*; repeat around. (21 stitches)
- Round 7: *Sc in the next 6 stitches, 2 sc in the next stitch*; repeat around. (24 stitches)
- Creating the petals: *Chain 4, skip 1 stitch, slip stitch (sl st) in the next stitch*; repeat from * to * around. This will create 12 pointed petals.
- Fasten off, leaving a long tail. Sew the succulent securely to the soil disc.
Part 4: Succulent 2 – Aloe (Moss Green)
This succulent features long, spiky leaves that fan outward.
- Round 1: Magic ring, 6 sc. (6 stitches)
- Round 2: *Sc in the next stitch, 2 sc in the next stitch*; repeat around. (9 stitches)
- Round 3: *Sc in the next 2 stitches, 2 sc in the next stitch*; repeat around. (12 stitches)
- Round 4: *Sc in the next 3 stitches, 2 sc in the next stitch*; repeat around. (15 stitches)
- Round 5: *Sc in the next 4 stitches, 2 sc in the next stitch*; repeat around. (18 stitches)
- Creating the leaves: *Chain 10, turn, sc in the 2nd chain from the hook and in each chain down, slip stitch in the next 2 stitches of the base*; repeat from * to * around. This will create 9 long, spiky leaves.
- Fasten off, leaving a long tail. Sew the succulent securely to the soil disc.
Part 5: Succulent 3 – Pink Rosette (Dusty Pink)
This delicate rosette has smaller, curled petals for a soft, romantic look.
- Round 1: Magic ring, 6 sc. (6 stitches)
- Round 2: 2 sc in each stitch around. (12 stitches)
- Round 3: *Sc in the next stitch, 2 sc in the next stitch*; repeat around. (18 stitches)
- Round 4: *Sc in the next 2 stitches, 2 sc in the next stitch*; repeat around. (24 stitches)
- Round 5: *Sc in the next 3 stitches, 2 sc in the next stitch*; repeat around. (30 stitches)
- Round 6: *Sc in the next 4 stitches, 2 sc in the next stitch*; repeat around. (36 stitches)
- Creating the petals: *Chain 3, skip 1 stitch, slip stitch in the next stitch*; repeat from * to * around. This will create 18 small, delicate petals.
- Fasten off, leaving a long tail. Sew the succulent securely to the soil disc.
Part 6: Decorative Pebbles (Cream)
These tiny pebbles add a natural, finished look to your terrarium. Make 5 of them.
- Round 1: Magic ring, 6 sc. (6 stitches)
- Round 2: 2 sc in each stitch around. (12 stitches)
- Rounds 3-4: Sc in each stitch around. (12 stitches)
- Round 5: *Sc2tog (single crochet 2 together)*; repeat around. (6 stitches)
- Fasten off, leaving a tail. Stuff the pebble lightly with fiberfill, then sew the opening closed. Weave in the end.
Part 7: Assembly
Now it's time to bring your terrarium to life!
- Place the soil disc on top of the pot and sew it securely in place using the long tail left from the soil.
- Arrange the three succulents on the soil, spacing them nicely so they don't overlap too much. Sew each one in place using its long tail.
- Sew the cream pebbles randomly around the succulents for a natural, organic look.
- Weave in all remaining ends with your yarn needle.
Congratulations! Your everlasting crochet terrarium is complete. Display it on a shelf, desk, or windowsill to enjoy a touch of handmade greenery that never wilts. This project also makes a thoughtful, unique gift for plant lovers and craft enthusiasts alike. Happy crocheting!



