Chrysanthemum Bloom Tea Cozy Free Pattern – Crochet a Garden of Warmth
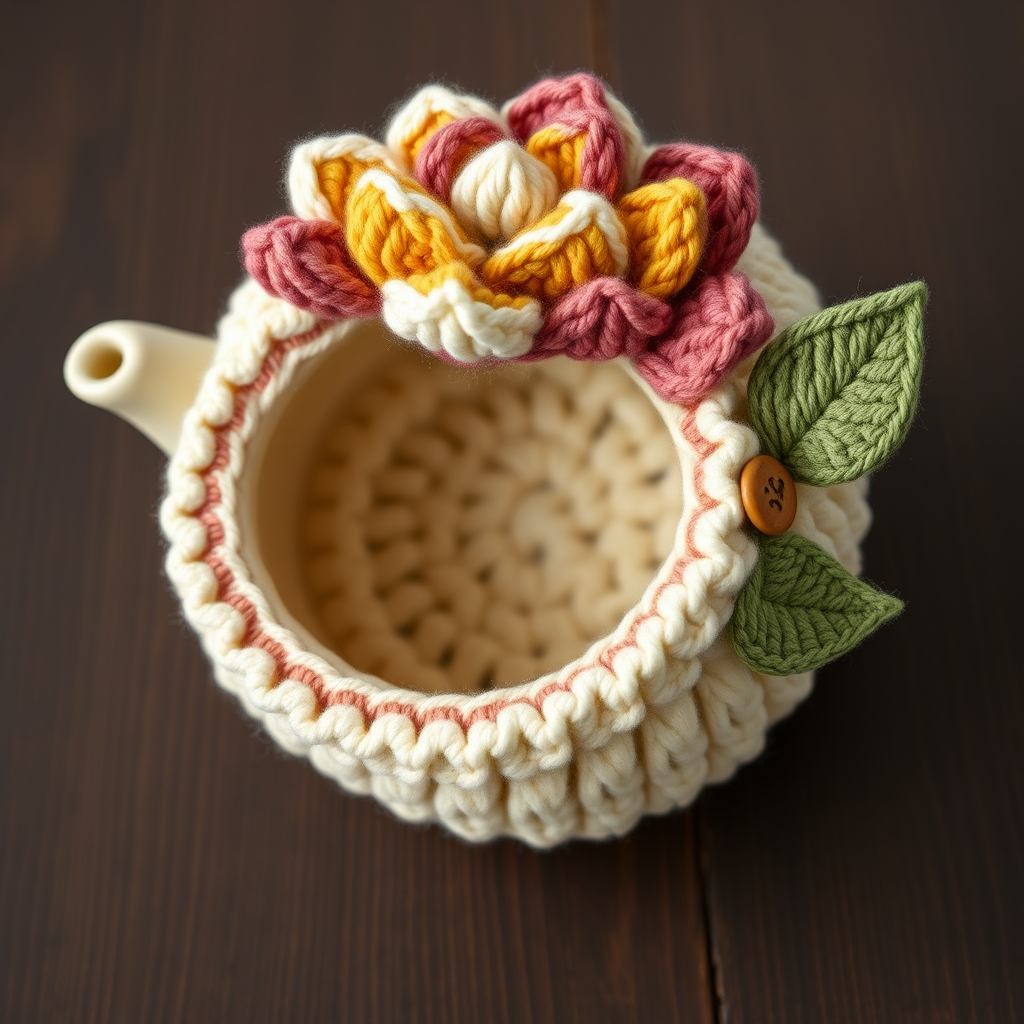
Wrap Your Teapot in a Handcrafted Bloom
Imagine your favorite teapot nestled under a crown of handcrafted petals, turning every afternoon tea into a garden party. This Chrysanthemum Bloom Tea Cozy is more than just a functional kitchen accessory—it's a statement piece that brings warmth and whimsy to your home. With its layered, textured petals in soft dusty rose, cream, and golden yellow, this cozy transforms a simple pot into a blooming centerpiece. Whether you're a seasoned crocheter or a curious beginner, this pattern is designed to guide you through every loop and stitch with confidence. Let's pick up our hooks and grow a little garden of warmth, one stitch at a time.
Materials Needed
Before we dive into the petals, let's gather our supplies. This project uses simple, readily available materials that come together to create a stunning result.
- Yarn: Worsted weight cotton yarn in four colors:
- 100g Cream (for the teapot body and middle petal layer)
- 50g Dusty Rose (for the outer petal layer)
- 50g Sage Green (for the leaves)
- 20g Golden Yellow (for the inner petal layer)
- Hook: 5.0 mm (H) crochet hook
- Notions: Yarn needle, sharp scissors, stitch markers
- Optional: 1-inch wooden button for the closure, fiberfill stuffing (just a small amount for shaping)
Gauge: 16 single crochet (sc) x 18 rows = 4 inches (10 cm). If your gauge is off, simply adjust your hook size up or down to match. Getting the gauge right ensures your cozy fits a standard teapot perfectly.
Step-by-Step Instructions
This pattern is broken into four manageable parts: the teapot body, the three petal layers, the leaves, and the final assembly. Follow along carefully, and you'll have a blooming masterpiece in no time.
Abbreviations
Familiarize yourself with these standard crochet abbreviations before you begin:
- ch = chain
- sc = single crochet
- hdc = half double crochet
- dc = double crochet
- tr = treble crochet
- sl st = slip stitch
- mr = magic ring
- inc = increase (2 sc in the same stitch)
- dec = decrease (sc 2 stitches together)
- BLO = back loop only
Part 1: Teapot Body (Worked in Rounds)
We'll start with the base of our cozy—a soft, rounded dome that will snuggle over your teapot.
- Round 1: With cream yarn, make a magic ring. Ch 1, then work 6 sc into the ring. Pull the tail to tighten the ring closed. (6 stitches)
- Round 2: Increase in each stitch around. (12 stitches)
- Round 3: *Sc in the next stitch, inc* — repeat from * to * 6 times. (18 stitches)
- Round 4: *Sc in the next 2 stitches, inc* — repeat 6 times. (24 stitches)
- Round 5: *Sc in the next 3 stitches, inc* — repeat 6 times. (30 stitches)
- Round 6: *Sc in the next 4 stitches, inc* — repeat 6 times. (36 stitches)
- Round 7: *Sc in the next 5 stitches, inc* — repeat 6 times. (42 stitches)
- Round 8: *Sc in the next 6 stitches, inc* — repeat 6 times. (48 stitches)
- Rounds 9-18: Sc in each stitch around for 10 straight rounds. (48 stitches each round) Tip: Place a stitch marker at the beginning of each round to keep your place.
- Round 19: *Sc in the next 6 stitches, dec* — repeat 6 times. (42 stitches)
- Round 20: *Sc in the next 5 stitches, dec* — repeat 6 times. (36 stitches)
- Round 21: *Sc in the next 4 stitches, dec* — repeat 6 times. (30 stitches)
- Round 22: *Sc in the next 3 stitches, dec* — repeat 6 times. (24 stitches)
Fasten off, leaving a long tail (about 12 inches) for sewing. Gently stuff the body with a small amount of fiberfill—just enough to give it shape, but keep it soft and flexible so it can easily slip over your teapot.
Part 2: Chrysanthemum Petals (Make 3 Layers)
Now for the star of the show—the layered petals that create the bloom effect. Each layer is worked separately and then stacked on top of the teapot body.
Layer 1 (Outer, Largest): Dusty Rose
- Round 1: With dusty rose yarn, make a mr, ch 1, and work 8 sc into the ring. Pull tight. (8 stitches)
- Round 2: Inc in each stitch around. (16 stitches)
- Round 3: *Sc in the next stitch, inc* — repeat 8 times. (24 stitches)
- Round 4: *Sc in the next 2 stitches, inc* — repeat 8 times. (32 stitches)
- Round 5: *Sc in the next 3 stitches, inc* — repeat 8 times. (40 stitches)
Now we'll work the petals in short rows. Each petal is a small teardrop shape.
- Row 1: Ch 1, turn your work. Sc in the next 4 stitches. Ch 1, turn. (4 stitches)
- Row 2: Sc in each of the 4 stitches. Ch 1, turn. (4 stitches)
- Row 3: Sc dec over the first 2 stitches, then sc in the next 2 stitches. Ch 1, turn. (3 stitches)
- Row 4: Sc dec over the first 2 stitches, then sc in the next stitch. Ch 1, turn. (2 stitches)
- Row 5: Sc dec over the 2 stitches. (1 stitch) Fasten off.
To create the next petal: Skip 1 stitch on the base round, attach the yarn in the next stitch, and repeat the petal pattern (Rows 1-5) across the round. You will have a total of 10 petals. Weave in the ends securely.
Layer 2 (Middle): Cream
- Round 1: With cream yarn, make a mr, ch 1, and work 6 sc into the ring. (6 stitches)
- Round 2: Inc in each stitch around. (12 stitches)
- Round 3: *Sc in the next stitch, inc* — repeat 6 times. (18 stitches)
- Round 4: *Sc in the next 2 stitches, inc* — repeat 6 times. (24 stitches)
Work the petals as in Layer 1, but with a slight modification: start with only 3 sc in the first row instead of 4, then decrease to 1. This creates a slightly smaller petal. You will have 8 petals in this layer. Fasten off.
Layer 3 (Inner): Golden Yellow
- Round 1: With golden yellow yarn, make a mr, ch 1, and work 5 sc into the ring. (5 stitches)
- Round 2: Inc in each stitch around. (10 stitches)
- Round 3: *Sc in the next stitch, inc* — repeat 5 times. (15 stitches)
For this smallest layer, make even tinier petals:
- Row 1: Ch 1, turn. Sc in the next 2 stitches. Ch 1, turn. (2 stitches)
- Row 2: Sc dec over the 2 stitches. (1 stitch) Fasten off.
Repeat this mini-petal across the round to create 7 petals. Fasten off.
Part 3: Leaves (Make 2)
These simple leaves add a lovely garden touch to the side of your cozy.
- With sage green yarn, ch 12.
- Row 1: Sc in the 2nd ch from the hook. Hdc in the next ch. Dc in the next 6 ch. Hdc in the next ch. Sc in the last ch. Ch 1, turn. (11 stitches)
- Row 2: Sc in each stitch across. Ch 1, turn. (11 stitches)
- Row 3: Sc in the first stitch, sc dec, sc in the next 5 stitches, sc dec, sc in the last stitch. (9 stitches)
Fasten off, leaving a long tail for sewing. Repeat to make a second leaf.
Part 4: Assembly
Now we bring all the pieces together to create your blooming masterpiece.
- Attach the petals: Position the chrysanthemum layers on top of the teapot body. Place the largest dusty rose layer at the bottom, the cream layer in the middle, and the golden yellow layer on top. Layer them slightly offset so the petals interlock naturally. Use the yarn tails to sew each layer securely to the teapot body, working from the inside out.
- Sew the leaves: Attach the sage green leaves to the side of the teapot body, near where the spout would be. Use the long tails to sew them flat, angling them slightly outward for a natural look.
- Create the button loop: With cream yarn, ch 10. Slip stitch to the body at the back of the cozy, forming a small loop. Sew the wooden button on the opposite side of the loop. This will close the cozy snugly around your teapot handle.
- Finish: Weave in all remaining ends with your yarn needle. If desired, gently block the cozy to even out the stitches and give it a polished shape.
And there you have it—a stunning Chrysanthemum Bloom Tea Cozy that's as delightful to make as it is to use. This project is perfect for using up scrap yarn, and the layered petals are surprisingly simple once you get into the rhythm. Whether you keep it for yourself or gift it to a fellow tea lover, this cozy is sure to bring a smile with every single pour. Happy crocheting!



